707 - Structural Steel
-THIS SECTION UNDER REVISION-
GENERAL
Structural steel construction involves the fabrication, handling, erection, bolting and welding of steel members used in structural applications. Most structural steel for Department projects is comprised of bridge elements – plate girders and rolled beams, intermediate and end diaphragms, connection plates and stiffeners, cover plates, beam bearings, pin and hanger assemblies and foundation piling. All these elements can be further defined as primary or secondary members, per 707.01 of the MDOT Standard Specifications for Construction. Structural steel may be in the form of plate, rolled or bent shapes, hollow structural shapes, tube railing, steel deck grating, modular expansion joints, bars and pins, etc. Structural Steel also includes other highway appurtenances such as sign and lighting support structures, tower lighting units, mast arm traffic signal supports, and bridge mounted signs.
Structural steel elements are typically fabricated at steel fabricators around the country, who must be certified by the American Institute of Steel Construction (AISC) to the appropriate level for the work being conducted. Bolting, welding, and coating of structural steel takes place both at fabrication shops and in the field, depending on the application. The departments Structural Fabrication Unit of Bridge Field Services oversees the departments QA program for fabrication of structural steel, and should be consulted for any issues that arise out of structural steel fabrication, erection, or construction.
Project Scheduling
Once a bridge project is awarded, the contractor will place an order with a structural steel fabricator. The structural steel fabricator will then need to place an order with a steel mill for the required plates and shapes. The steel mills produce heats of different types and sizes of steel. For example, a mill may produce 36-inch rolled beams one week and piling the following week. Other mills may exclusively produce plates but only roll certain thicknesses once or twice a month. Structural steel rolled in a given heat is typically already devoted to an already placed order, and the mill rolling typically occurs between four to twelve weeks after the order has been placed. Many factors influence when a fabricator can take delivery from a mill, including demand from other states’ bridge programs, demand from other domestic and international industries, cost, availability, and stockpiles of raw material; and production status of mills around the country. Fabricators do not stockpile most types of beams or plate steel. This is consistent with the just-in-time concept of manufacturing common in industry today.
For some small orders or certain types of steel, such as pin and hangers (link plates and pins), fabricators can purchase the needed steel through warehouses or they may have their own supply. For emergencies, such as from a high load impact, fabricators can purchase the needed steel items from national warehouses. However, the cost of this steel may be much higher, and is not economically feasible (to the fabricator or the state) for large orders.
Table 707.1 below details the recommended timelines in which steel delivery to the project site can be expected. Table 707.1
| Work Item – Order and Delivery of Steel Beams | Time |
|---|---|
| Plate Girders and Rolled Beams – with flange thicknesses less than three inches | 26 weeks after award |
| Bascule, Arch, Tub Girder, High Performance Steel (HPS Grade 70 or 100), Plate Girders and Rolled Beams – with flange thicknesses three inches or greater | Consult Structural Fabrication Unit )(*) |
- (*)Contact Matthew Filcek (517-322-5709) or Jeff Weiler (517-322-1235) of the Operations Field Services Division’s Structural Fabrication Unit for assistance in developing the timeframes for order and delivery of steel in preparing the progress clause.
For plate girders and rolled beams with flange thicknesses less than three inches, the recommended time from award to delivery at the project site is based on the following.
- Up to three months for steel delivery from mill to fabricator
- Up to two months for fabrication
- Up to one month for submittal and approval of requests for information (RFI’s) and shop drawings, and shipping of the fabricated product to the project site
While in many cases delivery can occur before the 26 week time frame, there are many variables which can influence steel delivery and frequently they cannot be determined at the time the progress clause is written. In addition to the factors influencing delivery of steel from the mill to the fabricator, the contractor that is awarded the contract and the fabricator they choose can affect the timeline. The fabricator chosen by the contractor may have less work or greater production capabilities than another fabricator. Some fabricators may try to book their production schedules such that by late winter or early spring they are fully booked through the summer or into fall. For this reason jobs let in the spring may have fewer fabricators available to complete the work and the jobs can be difficult to complete in one season especially if designed for part-width construction. In addition, the timeline to deliver steel beams for stage one of a part-width project may take the majority of the recommended timeline for delivery of both stages as the fabricator may elect to apply some aspects of fabrication to both stages instead of completing stage one in total before starting on stage two. The mill order and other milestones may take equal time whether they include one or both stages.
For the reasons outlined above, it is recommended that the Table 707.1 be used when developing progress clauses for projects with steel superstructures. Careful consideration is to be made on projects with staged construction, or interim completion or interim open to traffic dates.
Shop Drawing Review Process
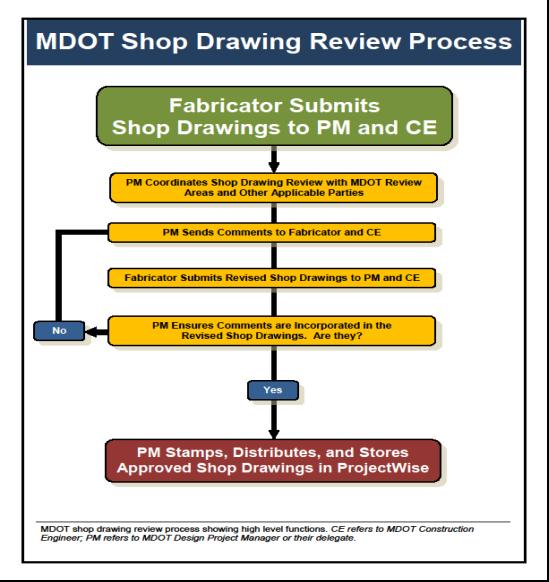
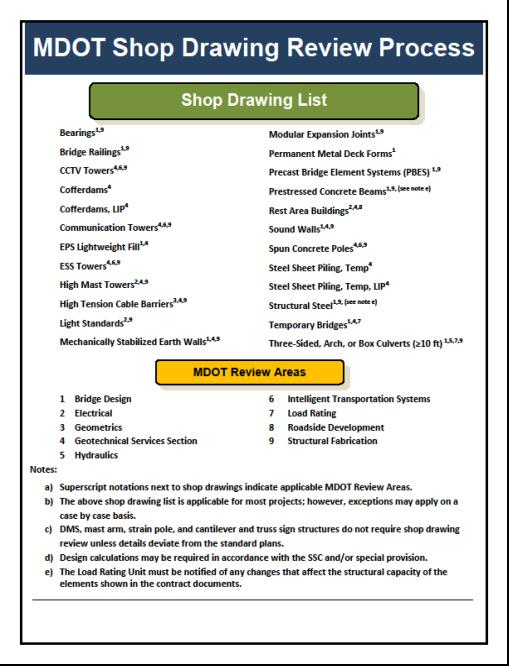
It is the responsibility of the MDOT Design Project Manager (PM) to ensure their project’s shop drawings are being reviewed by all applicable technical reviewers. This process is outlined in Chapter 10 of the MDOT Bridge Design Manual. Figure 707.1-1 and Figure 707.1-2 below summarize MDOT’s electronic shop drawing review process and provides a listing of shop drawings to be reviewed with annotations indicating which MDOT Review Areas need to be involved in their review. Note that this shop drawing listing is general in nature and is applicable for most projects; however, exceptions may apply on a case by case basis and it is the responsibility of the PM to ensure the shop drawings are being reviewed by all applicable parties.
MATERIALS
Delivery Checklist
- Upon delivery of structural steel, the inspector should check for the shop inspector's "approved for use" stamp on all principal members.
- Where steel is shipped to the job without the recommended approval mark, the region Bridge Engineer is to be advised before erection.
- C&T Structural Fabrication Engineer should be contacted to verify that the steel has been inspected and approved.
- Fabrication reports must be placed in the project files but usually they are not received until after the material has been shipped.
- It is the Engineer's responsibility to check steel as received and report shipping damage to the paint or the steel members to C&T Structural Fabrication Engineer and the Contractor for repair or replacement.
- Errors in fabrication will also be reported to C&T Structural Fabrication Engineer by the Engineer.
- The Engineer should use care in authorizing any corrective work until the responsibility for the error has been determined.
- The proposed corrective work should be reviewed by the C&T Structural Fabrication Engineer prior to its approval.
- Masonry and bearing plates should be checked for damage in handling and shipping.
- Structural steel should be stored on adequate supports to preserve its shape and quality.
- Members are to be stored in an upright position and should be thoroughly braced to avoid overturning, which may damage the member itself, adjacent members or material, or injure personnel in the immediate vicinity.
- Members should be so arranged that depressions, troughs, and similar "moisture traps" may be eliminated as much as possible.
- The blocking should be high enough so that the steel members don't come in contact with the ground or sit in ponded water or mud.
- Padding must be used to prevent paint damage when chains or cables are used to brace or erect structural steel.
- Related items such as bolts, washers, plates, and rockers should also be protected from damage, dirt, and corrosion.
CONSTRUCTION
Fabrication of Structural Steel
A. Prefabrication Meeting
The Structural Fabrication Unit will conduct a prefabrication meeting with the fabricator when deemed necessary. Prefabrication meetings are generally scheduled when the fabrication is more complex in nature or the fabricator is new to working with the Department but can be held for any project.
B. Shop Inspection
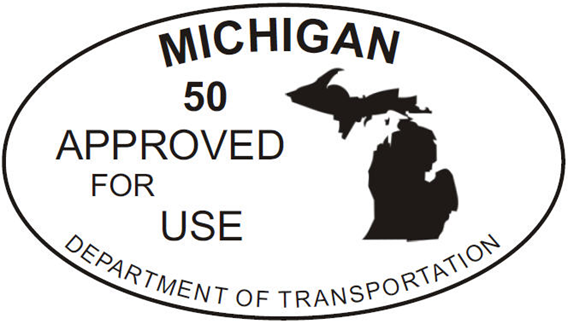
Quality assurance inspection is performed on all structural steel fabricated for the Department during all phases of the fabrication process. The Department’s quality assurance program is implemented by Bridge Field Service’s Structural Fabrication Unit and utilizes vendor Certified Welding Inspectors (CWI) to perform shop inspection at structural steel fabrication facilities nationwide. The contractor is required to provide MDOT an accurate 2 week notice prior to the beginning of fabrication so that shop inspection can be coordinated in accordance with subsection 707.03 of the MDOT Standard Specifications for Construction. Throughout the fabrication process the shop inspector will inspect the materials and fabricated elements for conformance to Department specifications, collect all documentation regarding the fabrication, and verify Buy America provisions were met. If problems arise during the fabrication, the shop inspector will contact the Structural Fabrication Unit for resolution. Once fabrication is complete and the elements are ready to be shipped to the project site, the shop inspector will stamp the elements as well as the shipping documents “Approved for Use”. See Figure 707.2. The CWI then submits all fabrication documentation to the Bridge Field Services Structural Fabrication engineer for placement into the corresponding ProjectWise folder.
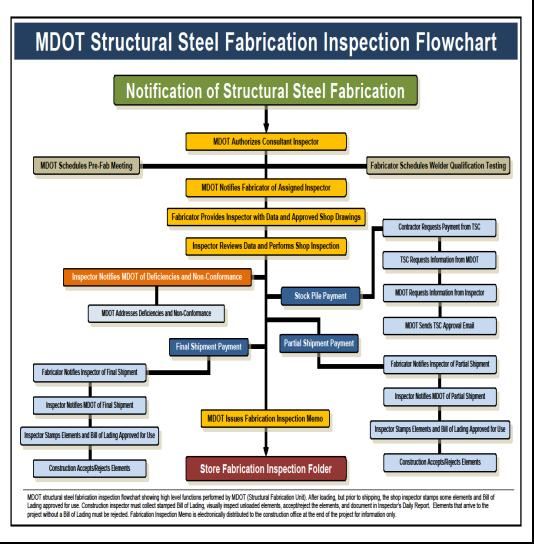
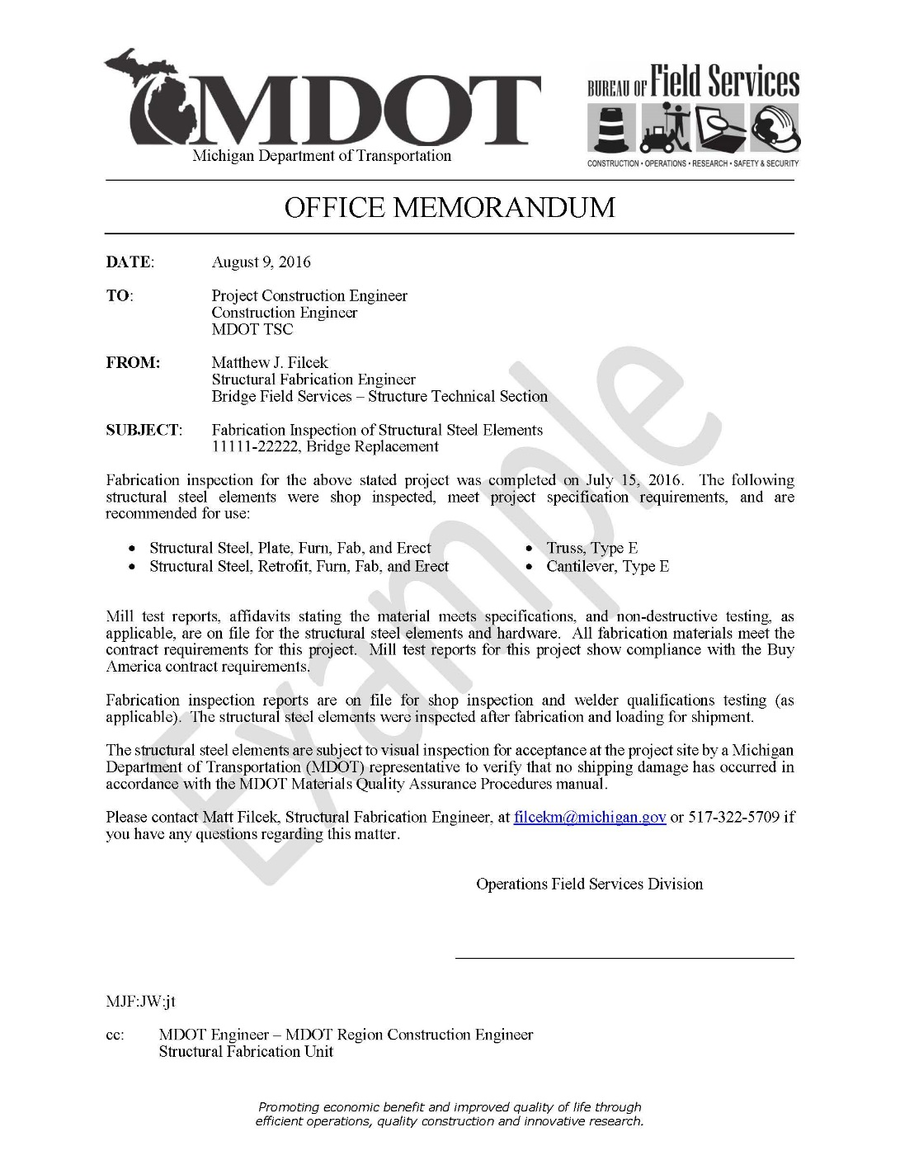
The Structural Fabrication Unit will send a fabrication inspection memorandum electronically to the project office at the end of each project. This memorandum is not the basis of acceptance, but rather a brief summary of the fabrication inspection for the project. The project office should place this memorandum in their project files and use it as a reference when requesting fabrication information from the Structural Fabrication Unit. See Figure 707.3 for more information on the fabrication inspection process and Figure 707.4 for a sample inspection memorandum.
Delivery of Structural Steel
A. Structural Steel Acceptance
Project personnel are required to use the following procedure for acceptance of fabricated structural steel elements that are required to have “Fabrication Inspection and Visual Inspection (VI)” as the basis of acceptance in accordance with the Michigan Department of Transportation’s (MDOT’s) Materials Source Guide. These structural steel elements must not be shipped from the fabricator to the project or contractor’s yard without approval by the shop inspector at the time of loading. Fabricated structural steel elements include, but are not limited to, the following:
- Structural steel for bridges (plate, rolled, hollow structural shape, bridge tube railing, steel deck grating, modular expansion joints, etc.);
- Highway structures (sign structures, tower lighting units, and mast arm traffic signal)
Acceptance of fabricated structural steel elements consist of satisfactory shop inspection by the MDOT shop inspector in accordance with the applicable sections (4.05, 4.06, 4.10, and 4.11) of MDOT’s Materials Quality Assurance Procedures Manual (MQAP) and satisfactory visual inspection in the field by the engineer. The following two part process has been added to the MQAP to clarify the acceptance process:
- Fabrication Inspection Acceptance: Structural steel elements must be inspected by the shop inspector after they are loaded for shipping. The elements must be stamped “Approved for Use” prior to shipping if they meet contract requirements (see Figure 707.1).Additionally, the shop inspector must stamp at least five copies of the Bill of Lading that is prepared by the fabricator. The approval stamp is for use by the Department and does not relieve the contractor of their responsibility to meet contract requirements.
- Visual Inspection Acceptance: The Engineer must collect one copy of the stamped Bill of Lading and use it to verify the delivered structural steel elements. Additionally, the Engineer must verify that the elements are stamped and visually inspect them for signs of damage that may have occurred as a result of shipping and handling. This visual inspection should be documented in the Inspector’s Daily Report (IDR).
The Engineer must inspect fabricated structural elements delivered to the project site with a stamped Bill of Lading and approval stamp as stated in Part 2 of the acceptance process stated above. The Engineer reserves the right to reject any shipped element that shows visual signs of damage or does not meet specification requirements in accordance with section 105 of the MDOT Standard Specifications for Construction. The Engineer must notify the Structural Fabrication Unit of any elements arriving on site that do not meet the standard specifications.
The Engineer must reject fabricated structural steel elements delivered to the project site without being stamped and without a stamped Bill of Lading. Note that only large structural steel elements will be individually stamped. Packaged structural steel elements (containers of fasteners, pallets of diaphragms/ bridge sign connections, etc.) will only be stamped on the outside of the package in multiple locations. Therefore, it is very important that the Engineer verify the material prior to the containers/pallets getting opened and separate, unstamped elements become scattered throughout the project site. The Engineer is instructed to contact the Structural Fabrication Unit immediately whenever an element or Bill of Lading arrives on the project site without the approval stamp.
The Engineer may make stockpile payments for fabricated structural steel elements in accordance with section 109 of the MDOT Standard Specifications for Construction. These elements can be stored at the fabrication facility or at the construction site. If the elements are stored at the construction site then they must be inspected by the Engineer as stockpiling occurs since the approval stamp ink could wash off. The Engineer must then mark the accepted structural steel elements in another more permanent way.
The Engineer should contact the Structural Fabrication Unit if project personnel have any questions regarding the acceptability of structural steel elements shipped to the project site. The Structural Fabrication Unit must review all proposed corrective action to structural steel elements not meeting specifications prior to approval.
B. Structural Steel Storage
Once the structural steel has been accepted on the job site, the inspector should verify that the material is stored properly prior to installation. Below is a list of items the inspector should check regarding storage of structural steel elements:
- Padding adding must be used to prevent paint damage when chains or cables are used to brace or erect structural steel. The padding will minimize coating damage and resulting corrosion due to handling operations.
- Structural steel should be stored on adequate supports to preserve its shape and quality.
- Members are to be stored in an upright position and should be thoroughly braced to avoid overturning, which may damage the member itself, adjacent members or material, or injure personnel in the immediate vicinity.
- Members should be so arranged that depressions, troughs, and similar "moisture traps" are eliminated and the blocking should be high enough so that the steel members don't come in contact with the ground or sit in ponded water or mud. This will keep the structural steel dry and free of corrosion until it is erected.
- Related items such as bearings, bridge railing, sign structures and tower lighting units should also be protected from damage, dirt, and corrosion.
- All related hardware (bolts, nuts and washers, etc.) must be stored in sealed containers that will keep them free of dirt and moisture until the point that they are installed. The inspector must reject any hardware that shows signs of corrosion prior to installation.
Erection of Structural Steel
A. Erection Plan
The inspector should review and understand the erection plan and the location and orientation of match-marked pieces. These markings are usually placed on the end of a member and will be erected with this marking in the same location as shown on the erection diagram.
B. Falsework
Falsework is a form of temporary support and may be required in the erection of steel for some projects. Often it is required at beam splices, usually on long spans or when special erection procedures are called for. A drawing of the proposed falsework must be submitted by the Contractor and approved by the Engineer. Such approval does not relieve the Contractors responsibility for design adequacy. The inspector should ensure that the falsework is assembled as shown on the approved drawings and that all bolted and welded connections are properly completed. See section 714 of the MDOT Construction Manual for more on falsework and temporary structures.
Erection Process
A. Masonry Plates
Placement of masonry plates is the first step in the erection process. These plates are placed on the concrete bridge seats of abutments and piers as shown on the plans. The inspector will see that concrete surfaces are perfectly flat at bearing locations and, if necessary, see that all high spots are ground to provide full bearing under each plate. Check plates to see they are not warped. The inspector should check the bearing of each individual plate by applying pressure to corners of the plate. Thin elastomeric sheets should be placed under the masonry plates when so designated on the plans. Low spots under edges of plates should not be filled with grout as this thin layer often will not bond and will deteriorate under load and weathering action.
Masonry plates and expansion rockers will be match-marked to the centerline of bearing line previously marked on the concrete bearing surface by the instrument crew. If masonry plates are not center marked, it will be necessary for the inspector to establish these marks on each unit. In doing this, locate the match line by using anchor bolt holes as the center. When erecting each unit, these marks will match the centerline of bearing lines previously placed on the bridge seat. On projects where sole plates are welded to the bottom flange of WF-beams or plate girders, it will be necessary to shift the entire beam to align marks.
At the time of erection, machine finished bearing surfaces will be coated with a commercial grade lubricant suitable for bearings.
In considering suspended span ends, the required opening should be maintained at the moving end. It makes little difference what the opening is under a field welded stay plate because it will never move. Where the plans call for expansion joints at independent backwalls, a check should also be made at the backwalls to verify enough beam end clearance to accommodate the maximum expansion.
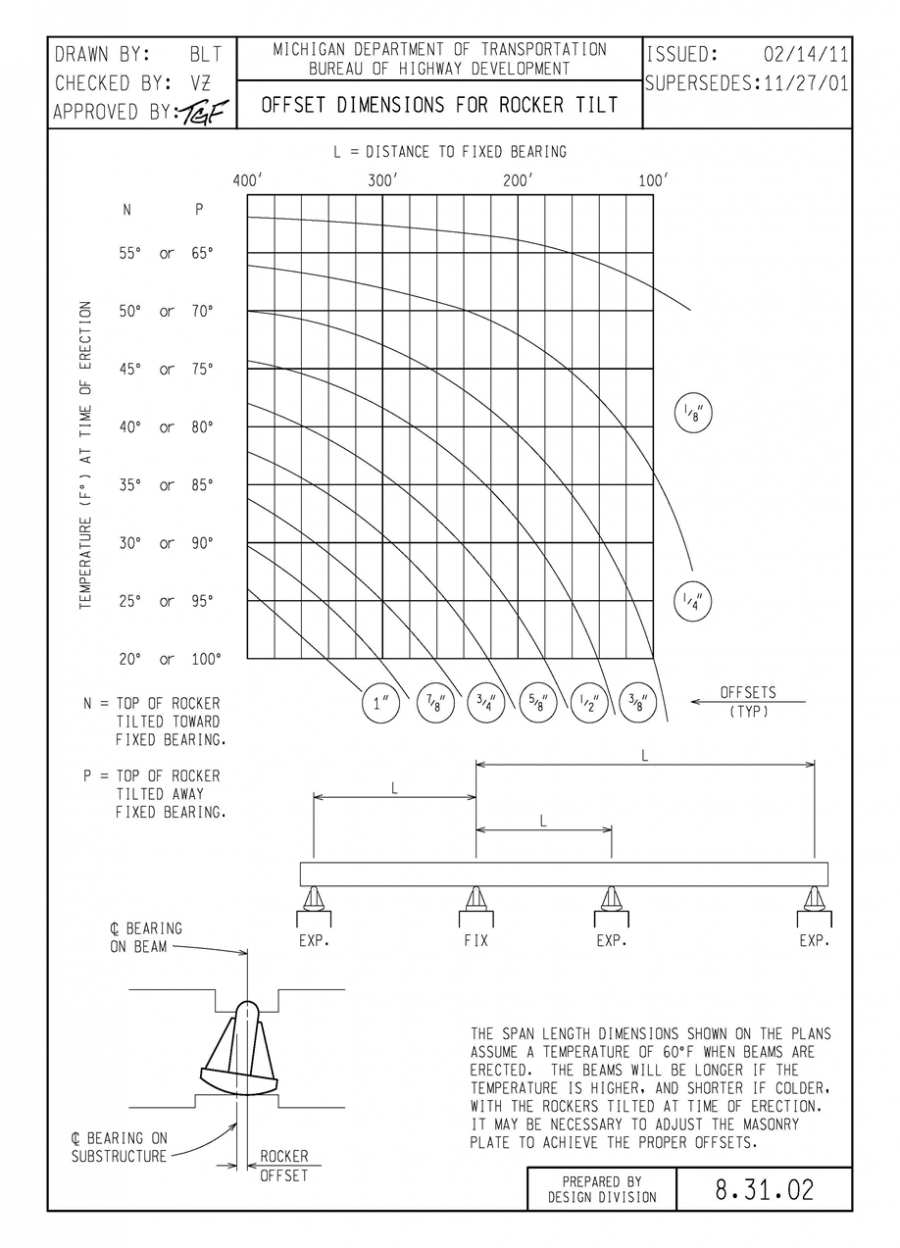
Use the Offset Dimension for Rocker Tilt chart (see Figure 707.5) to adjust for temperature.
B. Horizontal Stabilization
As wide flange beams and plate girders are erected, sufficient horizontal stabilization must be provided for each beam to prevent the beam from tipping over due to construction or wind loading. Common methods for achieving horizontal stabilization are listed below. This is an important phase of erection and may prevent serious accidents and damage to steel beams caused by high winds or crane booms striking erected sections.
- Bolting beams to piers or abutments
- Placing diaphragms as the erection progresses
- Placing falsework
C. Erection Sequence
Give particular attention to cantilevered center spans. End diaphragms and lateral bracing on skewed bridges will be placed as erection progresses to ensure proper fit or to determine assembly problems at the earliest phase possible. These members are, in effect, control members and must be placed in proper sequence. Project inspectors should insist that skewed diaphragms be placed at the time each stringer is set and before any final bolting of intermediate diaphragms. If the fabrication and design are correct, all the steel should fit. At no time should already connected diaphragms or bracing be disconnected to allow for easier fit up of successive elements. This could result in the erected elements becoming unstable.
Flame cutting is not allowed to bring members and connections into proper alignment.
If reaming is required to bring members and connections into proper alignment, it must be approved by the Engineer. Reaming is the process of using specialized tools to enlarge and already drilled hole in the steel elements. Excessive reaming could result in an ineffective bolt in that location to properly joint the materials.
Excessive pressure should not be used to force members into place, particularly on diaphragm assembling. Sweep can be forced into the main member by diaphragms forced into place when the length of the diaphragm has as little as a ½” error. This develops across the structure to a large sweep. When the bridge components do not appear to assemble correctly, a careful check must be made to determine if the pieces are properly match-marked.
D. Camber
On wide flange beam and plate girder spans, the normal sag which occurs when the beam is loaded is necessary to be offset by either fabricating a camber in a beam or thickening the concrete haunch over the beams. Sometimes a combination of both is used. Also, beams may not be true to line and variances in elevation have to be provided for. Therefore, a convenient method of establishing the finished grade before casting concrete is desirable.
The superstructure plans for steel bridges may show a construction camber diagram sketch and another indicating top of screed elevations with slab thickness ordinates.
Plan camber of structural steel beams is built into the member with a small tolerance permitted as shown on the plans. The fabrication is checked by the shop inspector working under the Structural Fabrication Unit to see that the members are fabricated to the tolerance permitted. The camber in the shop is usually measured with the beam on its side. Estimated reduction in camber is then tabulated on the plans to cover camber loss due to the weight of the member, forms and reinforcing steel; welding of stud shear connectors; and the deflection from the weight of the concrete deck.
It is the Contractor's responsibility to erect the beams within the permitted camber tolerance. Any corrective work to obtain this camber is the Contractor's responsibility. Any proposed corrective work should be reviewed by the Structural Fabrication Engineer before approving.
When camber varies from the plan, it should be possible to adjust haunches and/or top of slab grades to allow for discrepancies.
For deck replacement projects, that slab and screed elevations are based on the beam camber completely returning after bridge deck removal. This is not always the case, and it is important to ensure the beams are surveyed after deck removal, and the results compared to the original camber diagram to determine if slab and screed grade adjustments are required.
E. Bolted Field Splices
All field splice plates should be shipped in the assembled and drilled position, except that they are moved back one-half joint. The plates are brought forward on the beams to their final position. Occasionally, ironworkers inadvertently take the plates off, thus creating considerable difficulties. All plates, including the flanges, are required to be match-marked and it should be possible to determine the location and orientation of each plate. The fabrication plants CNC drill some parts of the girders to use as templates then do a laydown assembly. During this assembly, they will use the templates to match drill the other parts of the connection and match mark the parts. The match-marking scheme used should be shown on the approved shop drawings. If the plate hole alignment is difficult to achieve and they appear to require reaming, a mismatch should be suspected.
If minor hole misalignment occurs, the Engineer will be consulted regarding corrective measures to be used. Often the main splice plates on girder splices appear to be slightly out of alignment. When this occurs, the plates need to be inverted or rotated according to the match-marking. Never ream on main girder splice plates, as the connection is design to be slip critical.
The inspector will observe reaming operations to ensure the correct size reamer is being used. Also, holes will be reamed perpendicular to the member faces and all burrs will be removed. Members should be tightly clamped together to prevent metal chips from getting between surfaces.
The joint should be straight edged or string lined during the final bolting operation and adjustments made as required in grade or alignment to ensure straightness at the splice.
The slope of surfaces of bolted parts in contact with the bolt head and nut will not exceed 1:20 with respect to a plane normal to the bolt axis. Where an outer face of the bolted parts has a slope of more than 1:20, a smooth beveled washer will be used to compensate for the lack of parallelism.
Prior to assembling, all joint surfaces, including those under the bolt head, nut, or washer must be free of oil, grease, burrs, dirt, or other foreign material that would prevent the solid seating of the parts. On shop painted steel, a carefully controlled coating of zinc rich primer has been applied to all faying (i.e., contact or friction) surfaces. These surfaces would have been masked during subsequent coating applications per subsection 716.03.B.2 of the MDOT Standard Specifications for Construction. Ensure no other coating is applied to these surfaces prior to bolting.
When making bolted attachments to existing structural steel, the contact surfaces on the old steel should be blast cleaned and prime coated with zinc rich paint as called for on the plans or in the specifications.
F. High Strength Steel Bolts, Nuts, and Washers
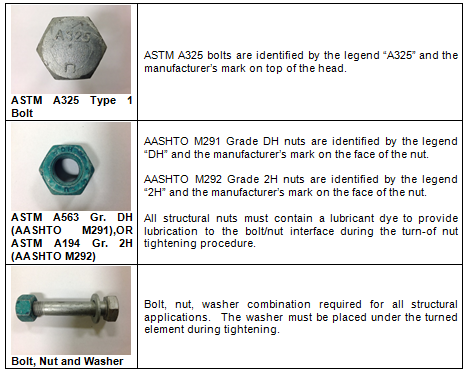
When high strength structural bolts and nuts are used, a hardened washer must be placed under the nut or bolt head, whichever element is being turned. Bolts, nuts, and washers supplied for shop painted or galvanized members must be galvanized. See Table 707.2 for a brief description of high strength bolts, nuts and washers used for structural applications.
Turn of Nut Tightening
Bolt verification testing is required to be performed on all projects requiring turn of nut tightening per subsection 707.03.D.7.c of the MDOT Standard Specifications for Construction. This testing is done to ensure that the contractor has sufficient knowledge and ability to complete turn of nut tightening correctly by using a device that measures bolt tension in conjunction with Table 707.3. Bolt verification testing is conducted by the Structural Fabrication Unit and the inspector should schedule the testing prior to any field bolting taking place.
Table 707.3 Minimum Bolt Tension for ASTM A325 Bolts
| Bolt Diameter (in) | Minimum Bolt Tension (lbs.), (a) |
|---|---|
| 1/2 | 12050 |
| 5/8 | 19200 |
| 3/4 | 28,400 |
| 7/8 | 39,250 |
| 1 | 51,500 |
| 1-1/8 | 56,450 |
| 1-1/4 | 71,700 |
| 1-3/8 | 85,450 |
| 1-1/2 | 104,000 |
a. Equal to 70% of specified minimum tensile strength of bolts.
All bolts must be tightened by the turn-of-nut method. Typically a hardened washer is placed under the head of bolt and the head is turned. Tightening may be required to be completed by turning the nut because of bolt placement and wrench operation clearances. In that case the washer must be placed under the nut. Impact wrenches, if used, must be of adequate capacity and sufficiently supplied with air to perform the required tightening of each bolt in a maximum of ten seconds. If tightening takes longer than 10 seconds the nut or bolt may be damaged and too much of the galvanized coating will be removed.
There will first be enough bolts brought to a snug tight condition to ensure that the joint parts are brought into full contact with each other. Snug tight is defined as the tightness attained by a few impacts of an air impact wrench or the full effort of a person using an ordinary spud wrench. Note that when the plates or parts being bolted cannot be drawn into full contact by "snug tightening" bolts, a few temporary bolts should be fully tightened to force the surfaces into contact. These temporary bolts should then be marked for removal and replacement. The remainder of the bolts should then be snugged and tightened. Then remove and replace the bolts tightened to force surface contact.
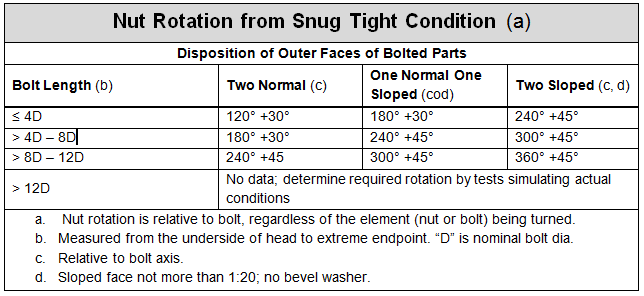
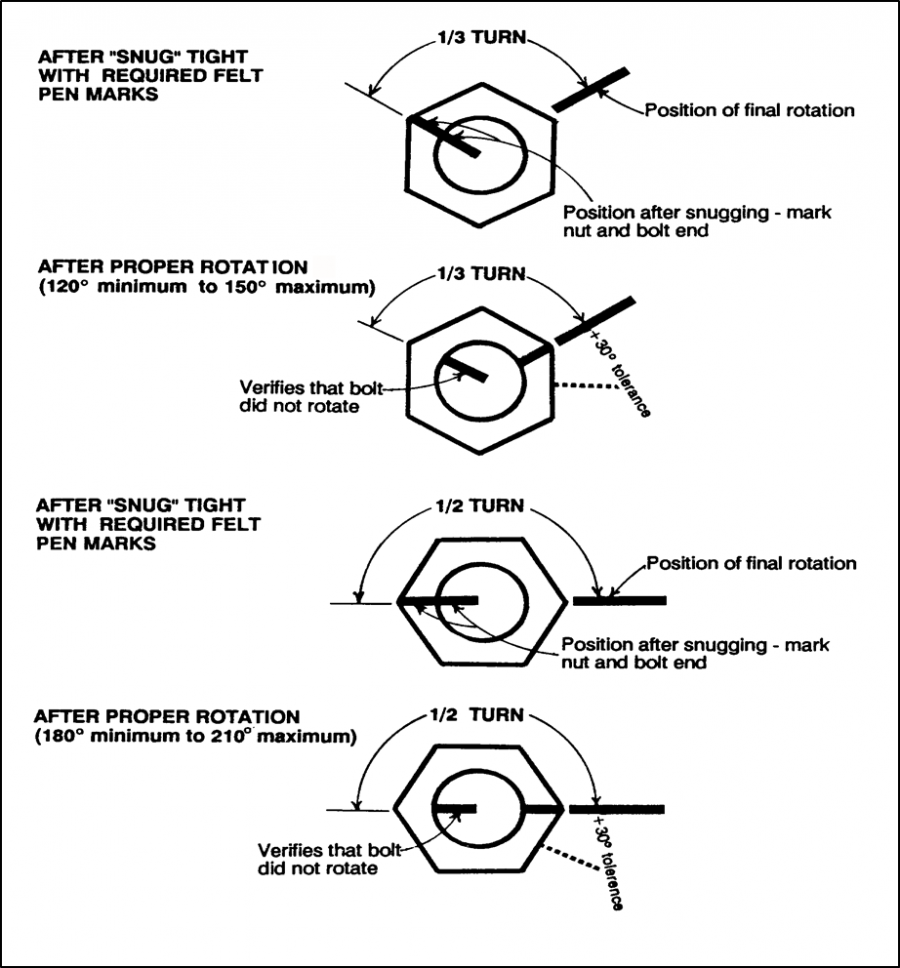
All bolts in the joint will be tightened by first the snugging and then by applying the applicable amount of nut rotation as specified in Table 707.4.
The element being turned, either the nut or the bolt, will be marked after snugging to visually verify the proper rotation has been achieved. The marking should be done with a felt tip ink pen (do not use keel, chalk or soap stone) according to the scheme shown in Figure 707.6.
Tightening will progress systematically from the most rigid part of the joint to its free edges. During this operation there will be no rotation of the part not being turned by the wrench. This usually requires the stationary element being restrained by a spud wrench. After tightening, the bolt must be at least flush with the nut to verify full engagement of all threads of the nut and to ensure proper bolt/nut capacity. All bolts and nuts that have been snug tightened only may be removed and reused. Bolts and nuts that have been tightened beyond the snug stage must not be reused if loosened or removed.
H. Deck Drains
After the steel is erected, the inspector will check the deck drain locations to ensure that water will not be drained directly over some members, such as diaphragms, and that they extend well below the bottom flanges of the beams or girders.
I. Shear Developers
Shear developers are used to provide a composite section between the concrete deck and the steel beams supporting it. They are in the form of steel studs and are welded to beam flanges at the spacing shown on the plans. This composite section generally allows the designer to reduce the beam size required, as a portion of the deck is considered part of beam, thus increasing its moment of inertia.
Stud shear developers are certified in the same manner as electrodes and must be selected from the Qualified Products List.
Defective stud welds can usually be attributed to four main causes:
- welding on contaminated coatings (oil, grease etc.), wet, or moist beams with damp ferrules.
- welding with insufficient amperage.
- welding with a stud gun that is out of adjustment (arc length and plunge).
- welding too close to the flange edge.
Before welding studs to the beams, the specifications require that all coatings be removed by grinding in the weld area and that all moisture, oil, grease, or other dirt be removed.
New operators have a tendency to tip the studs slightly, increasing the chances of producing defective welds. Also, they sometimes do not hesitate long enough to allow the weld metal to cool.
When the welding operation is delayed due to rain, the flange surface must be dry before commencing welding and any connection ferrules which were dampened due to the rain must be replaced with dry ones.
- Prior to the welding operation, it is advisable for the Engineer to discuss with the Contractor the procedure which will be used to repair all studs which lack a full 360°fillet. The Contractor can repair defective studs by manually adding either a fillet weld to each stud that lacks weld metal, using E7015, E7016, or E7018 electrodes, or by adding new studs adjacent to the defective ones.
Testing Studs
Studs are tested by ringing with a hammer. To test the studs, the inspector should allow cooling before testing. The first two studs welded will be bent to a 30 degree angle without breaking the weld. If the weld breaks, repairs will be made and the next set of studs tested along with the studs that were repaired. The rest of the studs on that beam can then be checked for proper welding. Sufficient tests should be made to insure proper procedures are being followed (bend over additional studs). If a weld defect is found, the stud may be bent to an angle of 15 degrees away from the defect. If no weld break occurs, the stud is acceptable. No welding will be done when the temperature of the base material is below 32 °F (0C) or when the surface is wet or exposed to rain or snow.
A. Welder Qualification
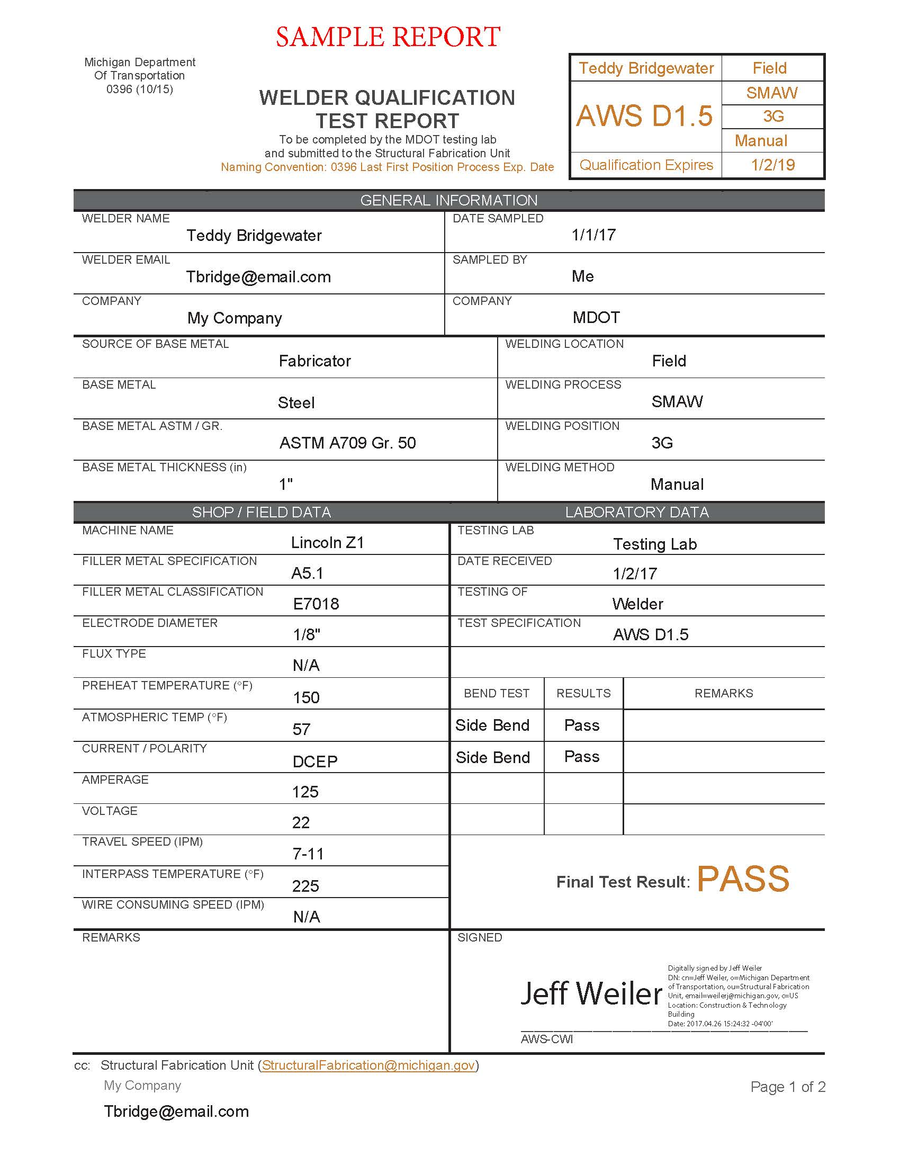
Structural welding or welding repair work requires MDOT qualification testing. The field welder must present Form 0396 “Welder Qualification Test Report” (See Figure 707.7) stating qualification according to AWS D1.5 Bridge Welding Code within the previous two-year period. The Project Engineer will contact the Structural Fabrication Unit to arrange for welder qualification testing if the Contractor does not currently have a Department qualified welder available. The Engineer reserves the right to require a confirming qualification test during work progression.
Field welders must be qualified in the welding process, position, method, electrode classification, base metal type, and the maximum electrode diameter actually being used to perform the work. Welders qualified using a 3/8” thick test plate are allowed to weld material up to 1” in thickness but if the welder is tested using a 1” thick test plate, they are not limited in the thickness of material they can weld.
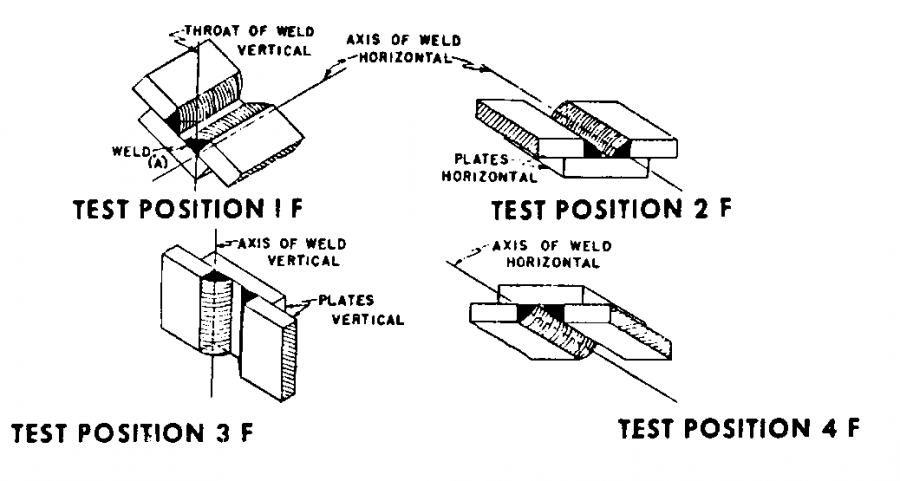
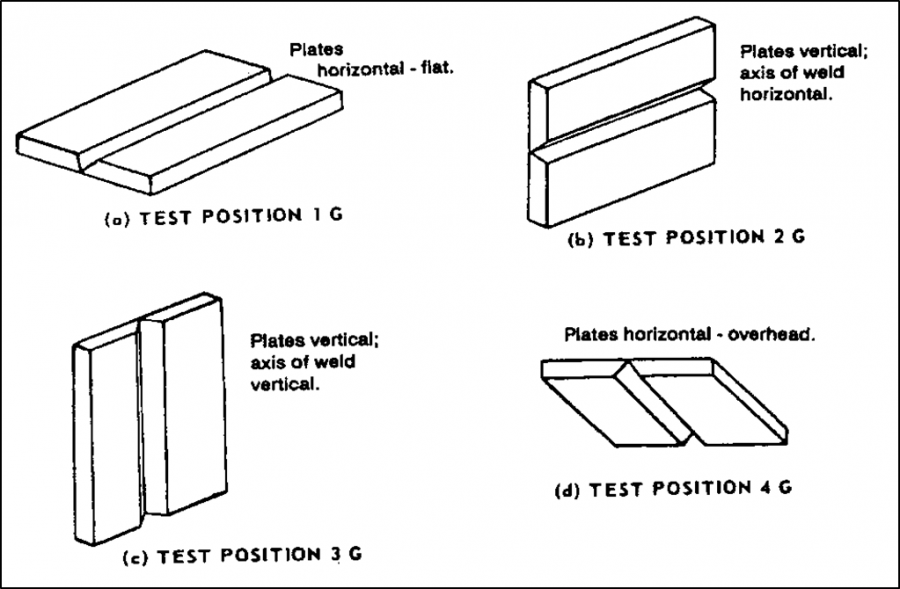
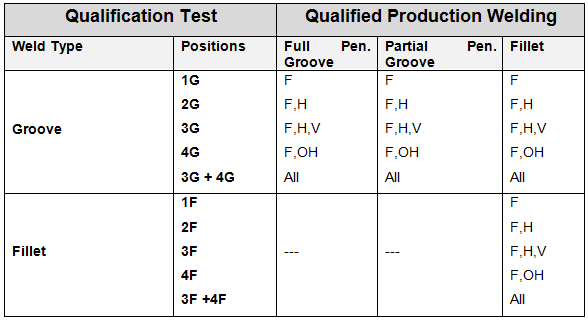
All welding falls into one of two categories: either fillet (F) series or groove (G) series. Fillet welding is encountered when any two structural shapes or plates are joined by lapping or butting together without any joint preparation and, conversely, groove welding requires a specified root opening. Because groove welding requires a greater skill and the welder qualification test is somewhat more severe than the fillet weld test, MDOT grants automatic qualification for certain (F) positions, provided the welder has passed a corresponding or higher (G) qualification test (see Figure707.8 and Figure707.9 for position descriptions). The following Table 707.5 is furnished to assist in ascertaining which positions automatically qualify other positions.
- Position of welding: F = Flat, H = Horizontal, V = Vertical, OH = Overhead
- Note that welding in a vertical downward direction is never permitted, only vertically in the upward direction (starting at the bottom and working towards the top).
B. Bridge Welding in the Field
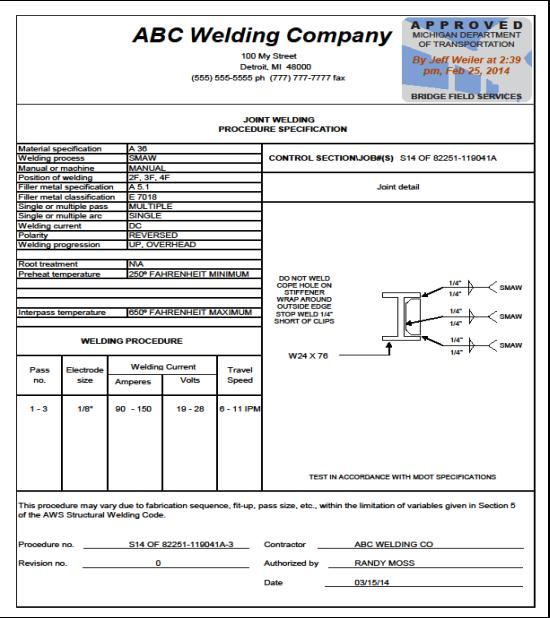
Field welding will be performed according to subsection 707.03.D.8 of the MDOT Standard Specifications for Construction and the current American Welding Society (AWS) Bridge Welding Code D1.5. All field welding must be completed in accordance with a Weld Procedure Specification (WPS) which has been approved by the Structural Fabrication Unit (see Figure 707.10). Field welding is not allowed unless shown on the plans or authorized by the Engineer.
All structural field welding will be done by the Shielded Metal Arc Welding (SMAW) process using E7018 electrodes. Gas Metal Arc Welding (GMAW) and other gas shielded processes are prohibited. Submerged Arc Welding (SAW) and Flux Cored Arc Welding (FCAW) may be allowed for field welding when approved by the Engineer.
Electrode Storage
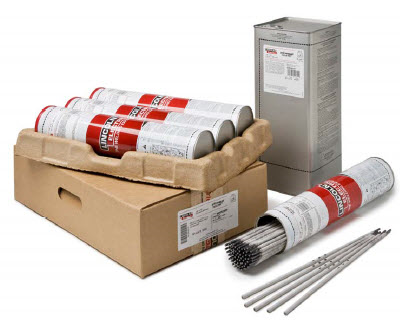
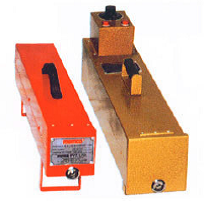
Proper storage and use of electrodes is critical. Care must be taken to ensure no moisture is picked up in the coating of the electrodes as this can add hydrogen to the coating and cause discon¬tinuities in the weld. Electrodes exposed to the atmosphere upon removal from drying or storage ovens (see Figure 707.11) or hermetically sealed containers (see Figure 707.12) must be used within two hours, or re-dried at a minimum temperature of 500° F for a minimum of two hours. Electrodes can only be re-dried once, and any electrode that becomes wet cannot be re-dried. Electrodes taken from a hermetically sealed container or drying oven that are not going to be used within two hours should be stored in a portable oven, also known as a “hot box” (see Figure 707.13), at a minimum temperature of 250° F. The welder should take out only as many electrodes from the hot box as can be used within that two hour period of time.
Weld Joint Preparation
The first step in making a sound weld is to make sure the joint is correctly cleaned and then preheated prior to welding. Cleaning the joint can be accomplished by using a stiff wire brush. All surfaces to be welded must be free from all loose or thick scale, slag, rust, moisture, grease, or other contaminants. Mill scale that can withstand a vigorous wire brushing, or anti-spatter compound may remain prior to welding.
The pieces to be joined should be checked for flatness, straightness and dimensional accuracy. Likewise, alignment, root opening, fit-up and joint preparation should be examined. Finally, process and procedure variables should be verified, including electrode size and type and equip¬ment settings. These variables should be listed in the weld procedure (WPS).
Preheating is the required practice of providing localized heat to the weld zone. The preferred method of preheating is by the use of a manual torch and the required preheat temperature varies based on the thickness of the base metal (see Table 707.6). Preheat shall be applied for a distance of 3 inches in all directions from the weld joint and should be verified by the welder using a temperature indicating stick. Bridge welding is not permitted when the ambient temperature is below 40 degrees Fahrenheit.
Welds should be cleaned between every pass and after the final pass. A finished weld should have a clean appearance. Cleaning is typically accomplished by using a stiff wire brush in conjunction with a chip¬ping hammer to remove slag and splatter. The grinder is also a very common and useful tool for cleaning. Grinders are to be used with care to avoid doing more harm than good to both finished welds and the base metal.
Weld Inspection
Once the welding has been completed the welds must be tested for acceptability according to subsection 707.03.d.8.c of the MDOT Standard Specifications for Construction. The contractor is responsible for the non-destructive testing of the welds. Personnel qualified as Level II or Level III in accordance with the American Society for Nondestructive Testing (ASNT), Recommended Practice No. SNT-TC-1A must perform all the testing and provide a copy of their qualification to the inspector. If welds are found to be unacceptable, the welds must be repaired and retested. Consult the Structural Fabrication Unit of Bridge Field Services with any questions regarding non-destructive testing.
Welding Piles, Falsework, Form Supports and Accessories
A. Welder Certification
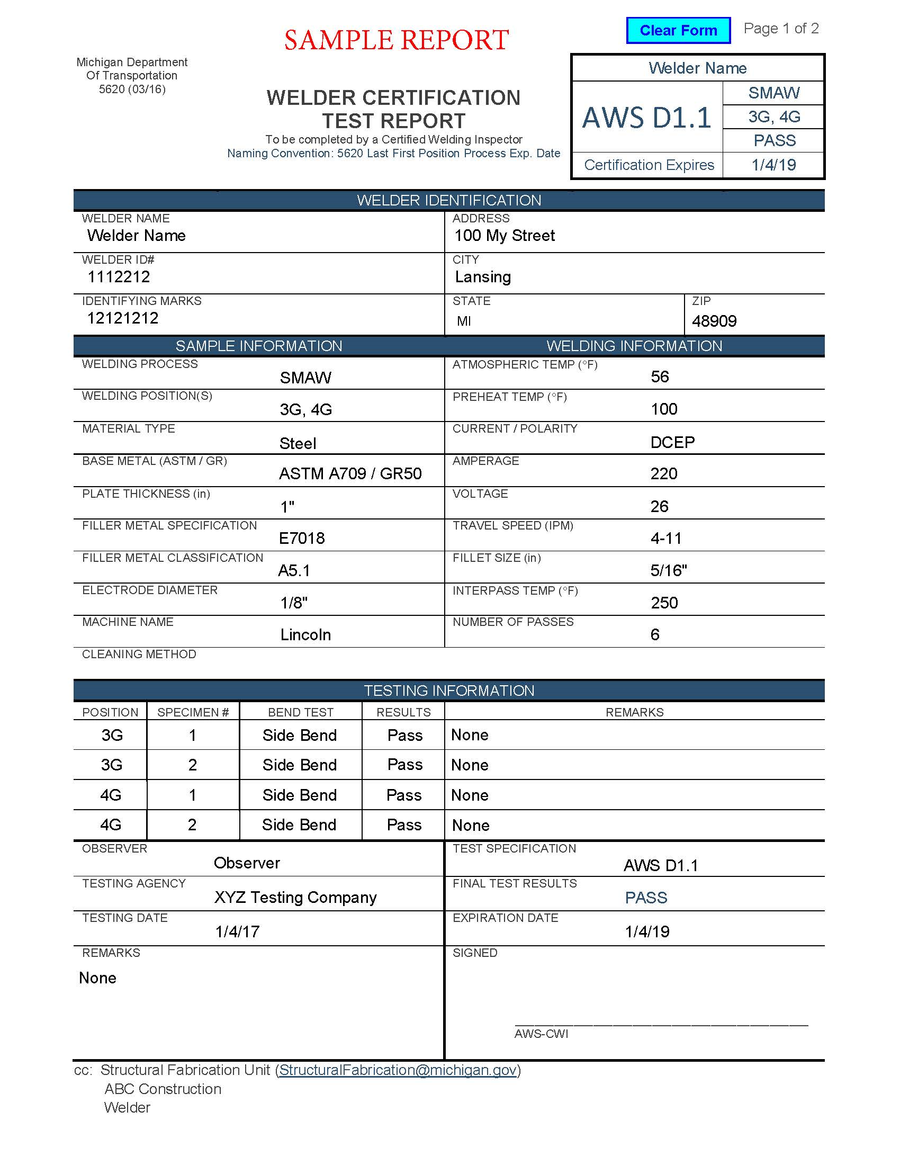
Welding on piles, falsework, form supports and other accessories will be performed according to the current American Welding Society (AWS) Structural Welding Code D1.1. All welders performing this type of welding must be certified through MDOT’s Welder Certification Program which is administered by the Structural Fabrication Unit. The field welder must present Form 5620 “Welder Certification Test Report” (See Figure 707.14) stating qualification according to AWS D1.1 Structural Welding Code within the previous two-year period.
B. Pile Welding
Steel piles are utilized in a variety of bridge foundation designs, and pile lengths beyond 50 feet are typically spliced in the field as needed. For the most critical designs, such as piles considered primary members or integral abutment piles, full penetration butt welds around the entire perimeter of the pile section are required. Lesser applications may allow the use of commercially available mechanical pile splicers. The pile splice requirements are based on the criticality and redundancy of the member in combination with the loading condition.
Piles are considered to be primary members if they are part of the substructure, extend above ground level, or if they are designed to carry live load and act as primary load path members. Piles deemed primary will be shown on the plans. The most common use of piles as primary members are pile bent piers, which utilize driven piles as columns. They are inherently less redundant than piers supported by pile groups tied by a pile cap on grade; therefore, the use of mechanical pile splicers is not acceptable. Full penetration butt welds and 100 percent Ultrasonic Testing (UT) is required for acceptance of primary members.
Integral abutment designs rely on the flexibility of a single row of piles to accommodate thermal expansion and contraction of the bridge superstructure. Due to the lateral forces associated with this movement, full penetration butt welds are necessary to ensure the full section capacity of the pile is developed through the welded splice. Piles used for integral abutments are not deemed to be primary members, however, require greater Quality Control (QC) by the Contractor and Quality Assurance (QA) by MDOT.
Pile foundations designed for high capacity service loads, tension loads, or extreme events (vessel impact, deep scour, etc.) may also require full penetration butt welded splices, and not allow for pile splicers. A determination of the pile’s criticality and the foundation’s redundancy will be made on a case by case basis. Pile splicing requirements will be detailed in the project plans and the specifications will address QC/QA requirements in the same manner as integral piles.
Full penetration butt welding in the field requires significantly more time than the use of pile splicers for typical steel piles. Changes to the specifications were made to require 100% UT for primary members, yet still ensure acceptable full penetration butt welds on other critical pile.
[[top}}
Additional Specifications
- Special Provision for Pile Splicing (SP705 (A)) that completely revises the pile splicing specifications. Subsection 705.03.C.2.d of the 2012 Standard Specifications for Construction is replaced in its entirety with the Special Provision for Pile Splicing.
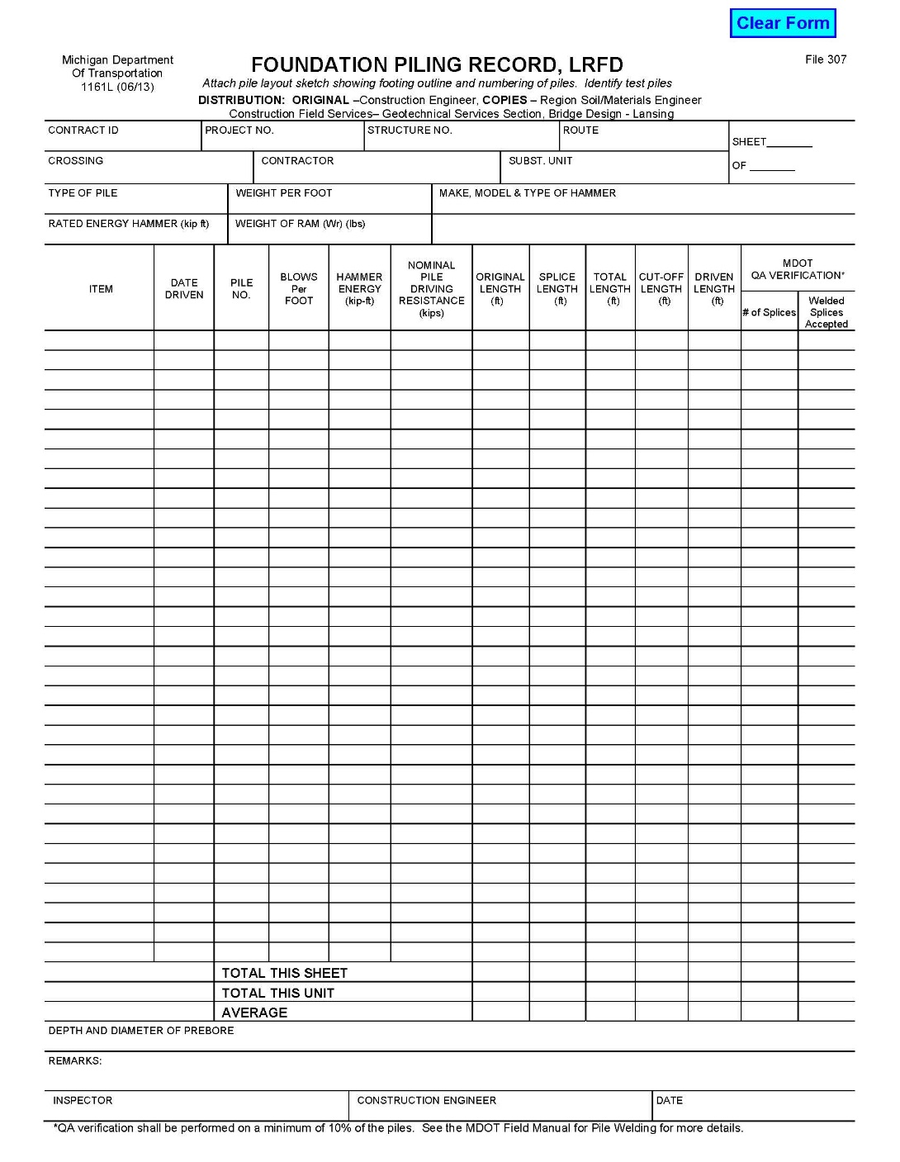
- Special Provision for Quality Control Plan for Welding Foundation Piling Splices (SP705 (B)) requiring Contractors to provide a welding QC plan. This establishes the QC requirements the Contractor must follow. However, MDOT is still responsible for QA by visually inspecting field welds to the maximum extent practicable and documenting the number of splices and QA checks on form 1161L. MDOT reserves the right to UT welds in the event the QA process determines inadequate QC by the Contractor.
- Field Manual for Pile Welding to assist construction staff in understanding basic terminology and principles associated with field welding and inspection. This is an excellent resource for field staff overseeing pile welding. Included in the field manual are descriptions of weld processes, types of welds, welding equipment, inspection procedures, common weld discontinuities, pre- approved welding procedure specifications and photographs of acceptable and non-acceptable welds. This manual can be found at the following website:
http://www.michigan.gov/documents/mdot/Field_Manual_for_Pile_Welding_407880_7.pdf
- Form 1161L Foundation Piling Record, LRFD has been revised to accommodate the pile welding changes and establish a method for QA. See Figure 707.15.
Implementation Examples
- Primary Member Piles–Steel H-Piles or Cast-In-Place (CIP) shells used as primary members typically pile bent piers. Require full penetration buttwelds AND 100 percent UT for acceptance in accordance with the Special Provision for Pile Splicing. The pay item Splice, Steel Pile is applicable to this scenario; however, the costs for all UT testing shall also be included in the pay item.
- Integral Abutment or other High Capacity Piles–Steel H-Piles or CIP shells used for integral abutment or other high capacity foundations require full penetration buttwelds and must be done in accordance with the Special Provision for Pile Splicing and the Special Provision for Quality Control Plan for Welding Foundation Piling Splices. The 100 percent UT requirement for acceptance does not apply unless deemed necessary by the Engineer; however, alternate splice details (pilesplicers) are not allowed for integral or other high capacity piles. The pay item Splice, Steel Pile is applicable to this scenario, and weld acceptance is visually based (see the Field Manual for Pile Welding).
- Standard Steel Piles – Steel H-Piles or CIP shells used for non-integral abutments, piers, or other elements as shown in the project plans and specifications, that are not considered primary structural members (typically pile bent piers) may be spliced with the alternate splice details (mechanical pilesplicers). A full penetration buttweld is not required; however, all welding must be performed in accordance with the Special Provision for Pile Splicing and the Special Provision for Quality Control Plan for Welding Foundation Piling Splices. The pay item Splice, Steel Pile is applicable to this scenario, and weld acceptance is visually based (see the Field Manual for Pile Welding).
C. Welding for Form Supports and Accessories
Certified welders may weld supports and attachments to steel girders if approved by the Engineer, in compression areas only. This may include support angles for permanent metal deck forms or attachments to facilitate bridge deck concrete forms. Welding in tension zones is not permitted and in these cases straps that run across the top flange must be used in lieu of welding to the top flange. Tension zones coincide with areas with no shear studs, with the exception of horizontally curved girders which have shear studs along the full length of the girders. In these cases the tension zones should be noted on the design plans. If there are any questions about the limits of tension zones or compression zones, consult with the bridge designer or Bridge Field Services.
MEASUREMENT AND PAYMENT
-Reserved-
