Difference between revisions of "1.4 Letting Plan Review ProjectWise Process"
m (→1.4.1 Letting - Package Submittal: Text Edits) |
|||
| Line 14: | Line 14: | ||
|- | |- | ||
| style="text-align:center;" | 1 | | style="text-align:center;" | 1 | ||
| − | | ''Design Team'' | + | | ''Design Team'' - Create PDF of: |
| − | * Plan Set and name '' | + | * Plan Set and name '''JN_Road.pdf''' or '''˜JN_Bridge.pdf''' |
| − | * Proposal and name '' | + | * Proposal and name '''JN_Proposal.pdf''' |
| Line 22: | Line 22: | ||
|- | |- | ||
| style="text-align:center;" | 2 | | style="text-align:center;" | 2 | ||
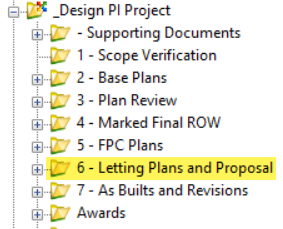
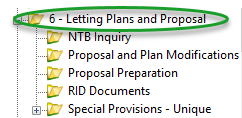
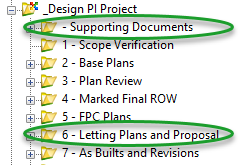
| − | | ''Design Team'' | + | | ''Design Team'' - Add PDFs created in step 1 into the '6 - Letting Plans and Proposal' folder. |
[[File:6 Folder Expanded.png|right|650px|frameless]] | [[File:6 Folder Expanded.png|right|650px|frameless]] | ||
|- | |- | ||
| style="text-align:center;" | 3 | | style="text-align:center;" | 3 | ||
| − | | ''Design Team'' | + | | ''Design Team'' - Are all Final Plan related files in the system? Yes, then: |
| − | * Highlight all files located in the | + | * Highlight all files located in the '˜6 - Letting Plans and Proposal- folder. |
* Then right click and select Change State. | * Then right click and select Change State. | ||
* Select Next. | * Select Next. | ||
|- | |- | ||
| style="text-align:center;" | 4 | | style="text-align:center;" | 4 | ||
| − | | ''Design Team'' | + | | ''Design Team'' - Click on OK in the '˜Change Document to State' window |
|- | |- | ||
| style="text-align:center;" | 5 | | style="text-align:center;" | 5 | ||
| Line 47: | Line 47: | ||
| − | ''REMINDER: Update RID Checklist in the '' | + | ''REMINDER: Update RID Checklist in the '''˜Supporting Documents/ RID Preparation''' folder and upload the RID files in the '''˜6 - Letting Plans and Proposal/RID''' folder for review. <br> |
| − | ''Highlight all files in the '' | + | ''Highlight all files in the '''˜6 - Letting Plans and Proposal/RID''' folder, then change state to next to submit to RID Review staff. |
<br> | <br> | ||
<br> | <br> | ||
| Line 63: | Line 63: | ||
|- | |- | ||
| style="text-align:center;" | 1 | | style="text-align:center;" | 1 | ||
| − | | ''Project Manager'' | + | | ''Project Manager'' - Upon receipt of email, please review proposal and plan packages located in the '˜6-Letting Plans and Proposal' folder and the Supporting Documents located in the '˜Supporting Documents' folder. If ready, proceed to the next step of initiating the CA Sign Off. |
| − | '''''NOTE: This is a | + | '''''NOTE: This is a "living" form. The Project Manager will update this form for each milestone.''''' |
|- | |- | ||
| style="text-align:center;" | 2 | | style="text-align:center;" | 2 | ||
| − | | ''Project Manager'' | + | | ''Project Manager'' - |
| − | * Update and Save the '' | + | * Update and Save the '''˜0303_DPS''' sheet, located in the 'DPS-CA.xlsx' file in the 'Supporting Documents' folder. |
| − | * Highlight all files located in the | + | * Highlight all files located in the '˜Supporting Documents' folder |
* Then right click and select Change State. | * Then right click and select Change State. | ||
* Select Next. | * Select Next. | ||
|- | |- | ||
| style="text-align:center;" | 3 | | style="text-align:center;" | 3 | ||
| − | | ''Project Manager'' | + | | ''Project Manager'' - Once all supporting documents have been changed to the 'Complete Supporting Documents' State, then: |
| − | * Highlight all files located in the | + | * Highlight all files located in the '˜6-Letting Plans and Proposal' folder |
* Then right click and select Change State. | * Then right click and select Change State. | ||
* Select Next. | * Select Next. | ||
| Line 83: | Line 83: | ||
|- | |- | ||
| style="text-align:center;" | 4 | | style="text-align:center;" | 4 | ||
| − | | ''Project Manager'' | + | | ''Project Manager'' - Click on OK in the '˜Change Document to State' window |
|- | |- | ||
| style="text-align:center;" | 5 | | style="text-align:center;" | 5 | ||
| − | | ''Project Manager'' | + | | ''Project Manager'' - Add additional CA Form signers email addresses in the 'To' field and send the system generated email. |
[[File:Email to CA Form signers.png|right|650px|frameless]] | [[File:Email to CA Form signers.png|right|650px|frameless]] | ||
| Line 103: | Line 103: | ||
|- | |- | ||
| style="text-align:center;" | 1 | | style="text-align:center;" | 1 | ||
| − | | ''CA Form Signers'' | + | | ''CA Form Signers'' - Upon receipt of email, review Proposal and Plan packages located in the '˜6- Letting Plans and Proposal' folder and the Supporting Documents located in the '˜Supporting Documents' folder. |
<br> | <br> | ||
[[File:FP and Sup Doc circle.png|right|650px|frameless]] | [[File:FP and Sup Doc circle.png|right|650px|frameless]] | ||
| Line 110: | Line 110: | ||
|- | |- | ||
| style="text-align:center;" | 2 | | style="text-align:center;" | 2 | ||
| − | | ''CA Form Signers'' | + | | ''CA Form Signers'' - If approved for Final Plan review, then: |
| − | * Open the DPS-CA.xlsx file located in the | + | * Open the DPS-CA.xlsx file located in the '˜Supporting Documents' folder. |
* Click on the CA Form sheet tab at the bottom to display the CA Form. | * Click on the CA Form sheet tab at the bottom to display the CA Form. | ||
* Place your signature in the appropriate section of the CA Form. | * Place your signature in the appropriate section of the CA Form. | ||
| Line 117: | Line 117: | ||
|- | |- | ||
| style="text-align:center;" | 3 | | style="text-align:center;" | 3 | ||
| − | | ''Project Manager'' | + | | ''Project Manager'' - Once the CA Form is complete: |
* Sign the CA Form in the Project Manager section. | * Sign the CA Form in the Project Manager section. | ||
| − | * Highlight all files in the | + | * Highlight all files in the '˜Supporting Documents' folder. |
* Then right click and select Change State. | * Then right click and select Change State. | ||
* Select Next | * Select Next | ||
|- | |- | ||
| style="text-align:center;" | 4 | | style="text-align:center;" | 4 | ||
| − | | ''Project Manager'' | + | | ''Project Manager'' - Once the supporting documents have been changed to the '˜Initiate Final Supporting Documents' State, then: |
| − | * Highlight all files in the | + | * Highlight all files in the '6- Letting Plans and Proposal' folder. |
* Then right click and select Change State. | * Then right click and select Change State. | ||
* Select Next | * Select Next | ||
|- | |- | ||
| style="text-align:center;" | 5 | | style="text-align:center;" | 5 | ||
| − | | ''Project Manager'' | + | | ''Project Manager'' - Click on OK in the '˜Change Document to State' window |
|- | |- | ||
| style="text-align:center;" | 6 | | style="text-align:center;" | 6 | ||
| − | | ''Project Manager'' | + | | ''Project Manager'' - Send the system generated email. |
[[File:Initiate Final Project Review email.png|right|650px|frameless]] | [[File:Initiate Final Project Review email.png|right|650px|frameless]] | ||
| Line 150: | Line 150: | ||
|- | |- | ||
| style="text-align:center;" | 1 | | style="text-align:center;" | 1 | ||
| − | | ''Specifiaction & Estimates Engineer'' | + | | ''Specifiaction & Estimates Engineer'' - |
* Verify funding template, letting date, and STIP approved in JobNet. | * Verify funding template, letting date, and STIP approved in JobNet. | ||
* Verify the correct & complete Certification Acceptance form (Type 1,2, or 3) is included in Supporting Docs. | * Verify the correct & complete Certification Acceptance form (Type 1,2, or 3) is included in Supporting Docs. | ||
| − | * Highlight all files located in the | + | * Highlight all files located in the '˜6-Letting Plans and Proposal' folder |
* Then right click and select Change State. | * Then right click and select Change State. | ||
* Select Next. | * Select Next. | ||
|- | |- | ||
| style="text-align:center;" | 2 | | style="text-align:center;" | 2 | ||
| − | | ''Specifiaction & Estimates Engineer'' | + | | ''Specifiaction & Estimates Engineer'' - Click on OK in the 'Change Document to State' window |
|- | |- | ||
| style="text-align:center;" | 3 | | style="text-align:center;" | 3 | ||
| − | | ''Specifiaction & Estimates Engineer'' | + | | ''Specifiaction & Estimates Engineer'' - |
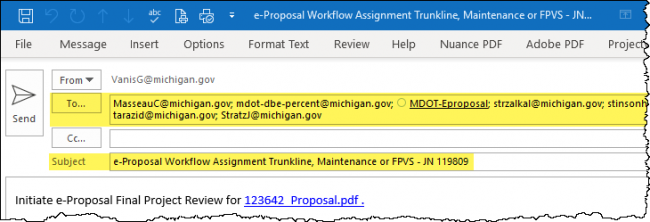
| − | * Edit the | + | * Edit the '˜To' field to send the email to the appropriate people. |
* Edit the subject field to appropriate work type. | * Edit the subject field to appropriate work type. | ||
* Send the system generated email | * Send the system generated email | ||
| Line 182: | Line 182: | ||
|- | |- | ||
| style="text-align:center;" | 1 | | style="text-align:center;" | 1 | ||
| − | | ''Specification & Estimates Engineer'' | + | | ''Specification & Estimates Engineer'' - |
| − | * Select the appropriate workflow on the | + | * Select the appropriate workflow on the '6-Letting Plans and Proposal' folder for the work type to be reviewed (ie. Trunkline, CPM, NFR, FPVS) |
* <u>Process Complete</u> | * <u>Process Complete</u> | ||
|- | |- | ||
Revision as of 15:00, 20 April 2021
By Chapter
1.4.1 Letting - Package Submittal
State: OEC - Pending Submittal
Pre-Construction Task:
| Step | Action |
|---|---|
| 1 | Design Team - Create PDF of:
|
| 2 | Design Team - Add PDFs created in step 1 into the '6 - Letting Plans and Proposal' folder. |
| 3 | Design Team - Are all Final Plan related files in the system? Yes, then:
|
| 4 | Design Team - Click on OK in the '˜Change Document to State' window |
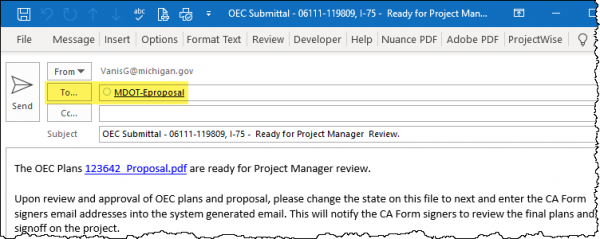
| 5 | Design Team - Send the system generated email.
NOTE: Leave MDOT-Eproposal address in email. Also, you only need to send one email (close out of the other ones). |
REMINDER: Update RID Checklist in the ˜Supporting Documents/ RID Preparation folder and upload the RID files in the ˜6 - Letting Plans and Proposal/RID folder for review.
Highlight all files in the ˜6 - Letting Plans and Proposal/RID folder, then change state to next to submit to RID Review staff.
State: OEC-PM Review in Progress
Pre-Construction Task:
| Step | Action |
|---|---|
| 1 | Project Manager - Upon receipt of email, please review proposal and plan packages located in the '˜6-Letting Plans and Proposal' folder and the Supporting Documents located in the '˜Supporting Documents' folder. If ready, proceed to the next step of initiating the CA Sign Off.
|
| 2 | Project Manager -
|
| 3 | Project Manager - Once all supporting documents have been changed to the 'Complete Supporting Documents' State, then:
|
| 4 | Project Manager - Click on OK in the '˜Change Document to State' window |
| 5 | Project Manager - Add additional CA Form signers email addresses in the 'To' field and send the system generated email.
NOTE: Leave MDOT-Eproposal address in email. Also, you only need to send one email (close out of the other ones). |
State: OEC - CA Sign Off
Pre-Construction Task:
| Step | Action |
|---|---|
| 1 | CA Form Signers - Upon receipt of email, review Proposal and Plan packages located in the '˜6- Letting Plans and Proposal' folder and the Supporting Documents located in the '˜Supporting Documents' folder.
|
| 2 | CA Form Signers - If approved for Final Plan review, then:
|
| 3 | Project Manager - Once the CA Form is complete:
|
| 4 | Project Manager - Once the supporting documents have been changed to the '˜Initiate Final Supporting Documents' State, then:
|
| 5 | Project Manager - Click on OK in the '˜Change Document to State' window |
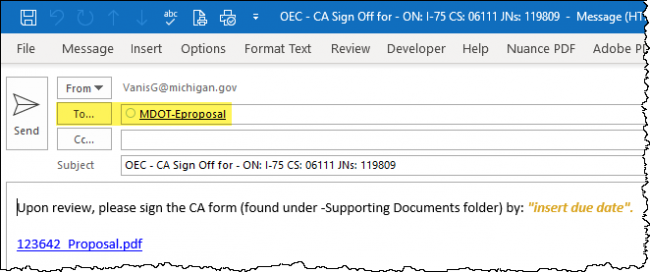
| 6 | Project Manager - Send the system generated email.
NOTE: Leave email address in email. Also, you only need to send one email (close out of the other ones). |
State: e-Prop - Initiate Final Project Review
Pre-Construction Task:
| Step | Action |
|---|---|
| 1 | Specifiaction & Estimates Engineer -
|
| 2 | Specifiaction & Estimates Engineer - Click on OK in the 'Change Document to State' window |
| 3 | Specifiaction & Estimates Engineer -
NOTE: Leave MDOT-Eproposal address in email. Also, you only need to send one email (close out of the other ones). |
State: e-Prop - Workflow Assign
Pre-Construction Task:
| Step | Action |
|---|---|
| 1 | Specification & Estimates Engineer -
|
1.4.2 Letting - Review
-Reserved-
State: QA Tech - Pending
PPMS Task: -Reserved-
State: QA Tech - Complete
PPMS Task: -Reserved-
State: QA Tech - Assign to Reviewer
PPMS Task: -Reserved-
State: QA SE - Pending
PPMS Task: -Reserved-
State: QA SE - Complete
PPMS Task: -Reserved-
State: QA SE - Assign to Estimator
PPMS Task: -Reserved-
State: QA Est - Pending
PPMS Task: -Reserved-
State: QA Est - Complete
PPMS Task: -Reserved-
State: QA Final - Pending
PPMS Task: -Reserved-
State: QA Final - Complete
PPMS Task: -Reserved-
State: QA Final - Ready for Finance
PPMS Task: -Reserved-
State: Finance PQ - Pending
PPMS Task: -Reserved-
State: Finance BLU - Pending
PPMS Task: -Reserved-
State: Final
PPMS Task: -Reserved-
1.4.3 Letting - RID Review
State: E-Proposal RID Pending
PPMS Task:
| Step | Action |
|---|---|
| 1 | Design Team – Create RID Submittal during the State: E-Proposal Complete:
|
| 2 | Project Manager – Make sure the RID files are ready for review prior to completing the State: E-Prop Initiate Final Project Review. |
| 3 | Project Manager – Include MDOT RID Support on the email generated during the State: E-Prop Initiate Final Project Review. |
State: E-Proposal RID Complete
PPMS Task:
| Step | Action |
|---|---|
| 1 | MDOT-RIDSupport Reviewers – Perform review of the RID files and document comments in the RID Review Checklist.xlsm. Reference saved views in the RID Comments column.
NOTE: During this state the ‘RID’ folder will remain accessible for easy corrections of RID files during the MDOT-RIDSupport review. |
| 2 | MDOT-RIDSupport Reviewers – Prior to the State: QA Final – Ready for Finance:
|
| 3 | MDOT-RIDSupport Reviewers – Click on OK in the ‘Change Document to State’ window. |
State: E-Proposal RID Publish
PPMS Task:
| Step | Action |
|---|---|
| 1 | Finance – During the Final State:
Note: The RID must be in the State: E-Proposal Complete before they can be changed to the State: E-Proposal RID Publish. If the RID is not in the State: E-Proposal Complete at the time of Publishing please contact MDOT RID Support |
| 2 | If RID files are added after advertisement:
|
