Difference between revisions of "602 - Concrete Pavement Construction"
m (Removed 2012 Spec Book tagline link) |
|||
| (39 intermediate revisions by the same user not shown) | |||
| Line 16: | Line 16: | ||
===[[#Acceptance of Materials|Acceptance of Materials]]=== | ===[[#Acceptance of Materials|Acceptance of Materials]]=== | ||
| − | Before paving operations start, the paving | + | Before paving operations start, the paving Inspector should verify that the Contractor’s proposed materials to be incorporated in the pavement have been approved for use through testing or via pre-approved products lists as required for the contract. Most materials will be stockpiled in the Contractor’s yard on the project site. Also, this is often the location of the batching plant. |
{| class="wikitable" | {| class="wikitable" | ||
| Line 26: | Line 26: | ||
<center>1</center> | <center>1</center> | ||
| | | | ||
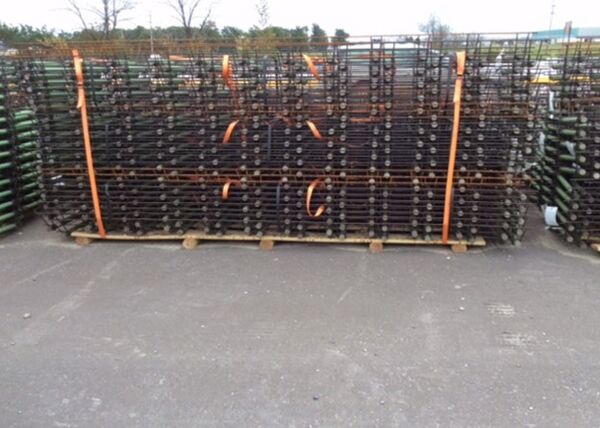
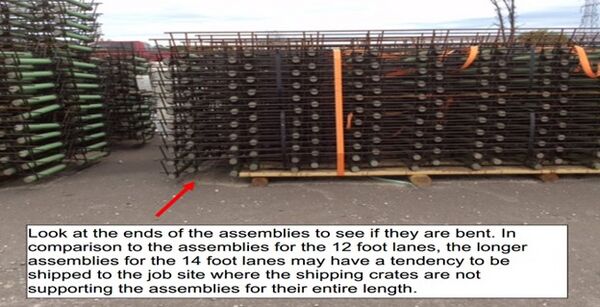
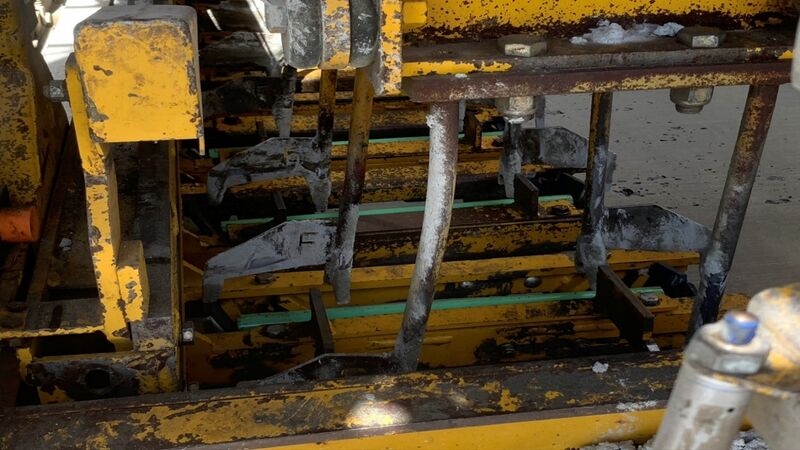
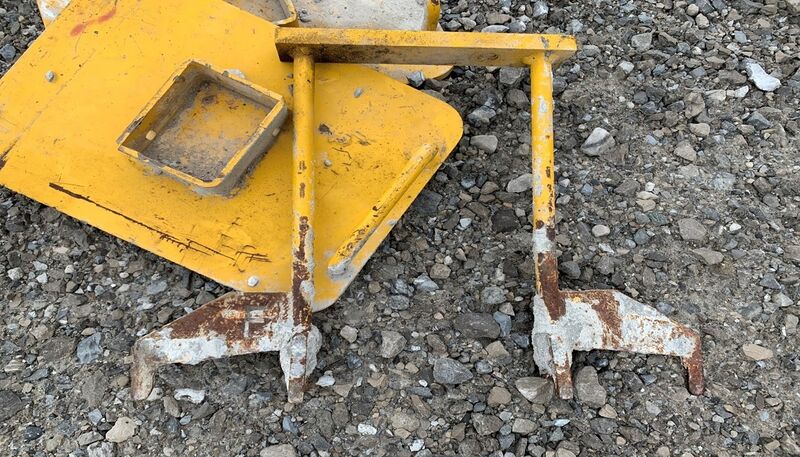
| − | When the load transfer assemblies arrive on the project site, call Region materials personnel so they can verify that the assemblies were built | + | When the load transfer assemblies arrive on the project site, call Region materials personnel so they can verify that the assemblies were built in accordance with the standard plans. Documentation of Acceptance by Region materials personnel is required. Figures 602-1 and 602-2 show load transfer assemblies stored on the job site. |
|- | |- | ||
| | | | ||
| Line 38: | Line 38: | ||
After the Contractor starts to set the load transfer assemblies on the grade, they must be visually inspected for: | After the Contractor starts to set the load transfer assemblies on the grade, they must be visually inspected for: | ||
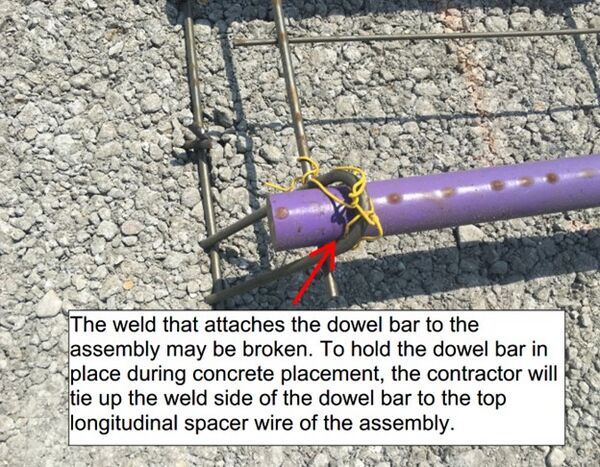
| − | * Broken or missing welds. | + | * Broken or missing welds as shown in Figure 602-3. |
* Damage in handling or shipping. | * Damage in handling or shipping. | ||
* Proper height of dowel bars in the assembly. | * Proper height of dowel bars in the assembly. | ||
| Line 48: | Line 48: | ||
<center>4</center> | <center>4</center> | ||
| | | | ||
| − | The entire bar is to be coated with an approved | + | The entire bar is to be coated with an approved epoxy coating to prevent corrosion, and the entire bar’s length is to be coated with an approved material to prevent concrete from adhering to the bar (typically beeswax). |
|- | |- | ||
| | | | ||
| Line 63: | Line 63: | ||
<center>7</center> | <center>7</center> | ||
| | | | ||
| − | + | Contractor must cover load transfer assemblies when they are to be stored on site for extended periods (more than 6 months). | |
|} | |} | ||
| + | |||
| + | [[File:602-1.jpg|600px|thumb|center|'''Figure 602-1 Load transfer assemblies stored on the jobsite.''']] | ||
| + | |||
| + | |||
| + | |||
| + | |||
| + | [[File:602-2.jpg|600px|thumb|center|'''Figure 602-2 Load transfer assemblies stored on the jobsite.''']] | ||
| + | |||
| + | |||
| + | |||
| + | |||
| + | [[File:602-3.jpg|600px|thumb|center|'''Figure 602-3 Load transfer assembly with a broken weld.''']] | ||
| + | |||
{{top}} | {{top}} | ||
| − | ====[[#Tie Bars and Bent Bars|Tie Bars and | + | ====[[#Straight and Bent Tie Bars |Straight and Bent Tie Bars ]]==== |
| + | |||
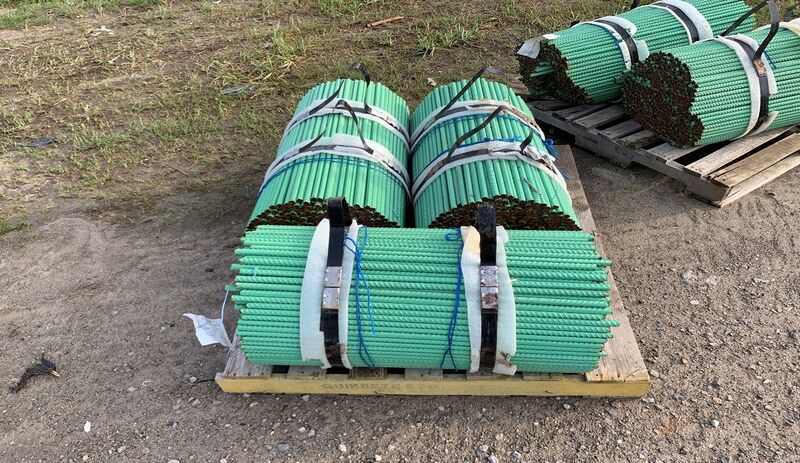
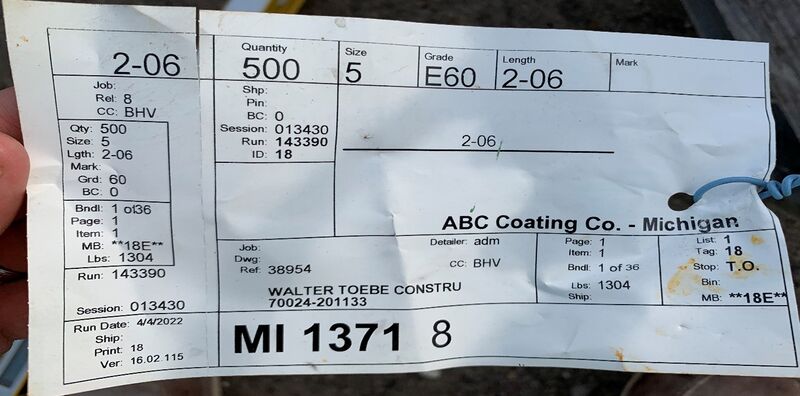
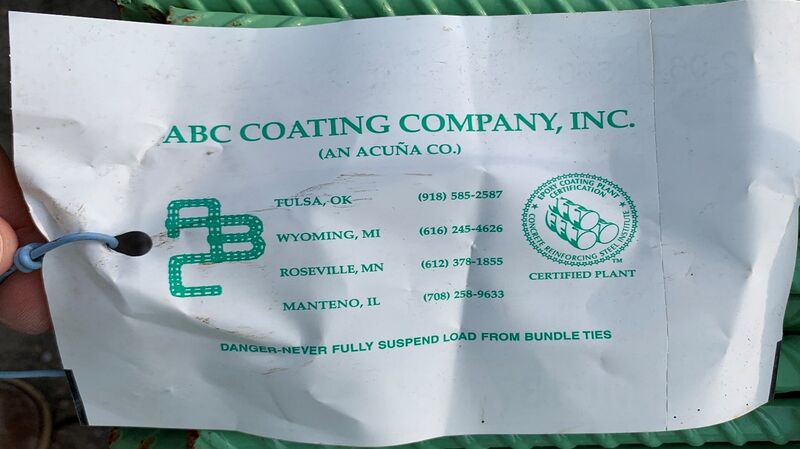
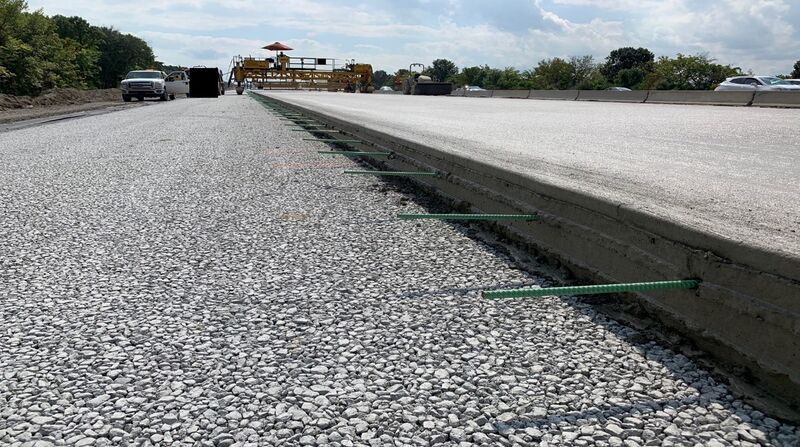
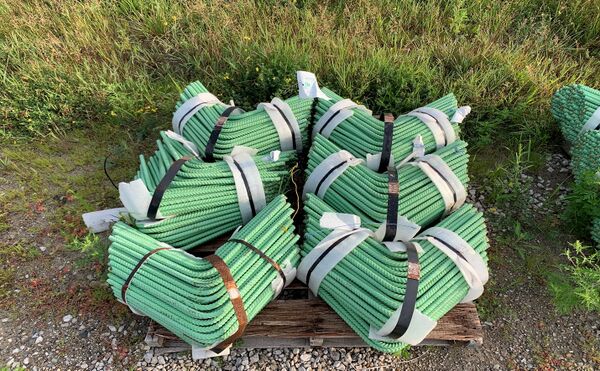
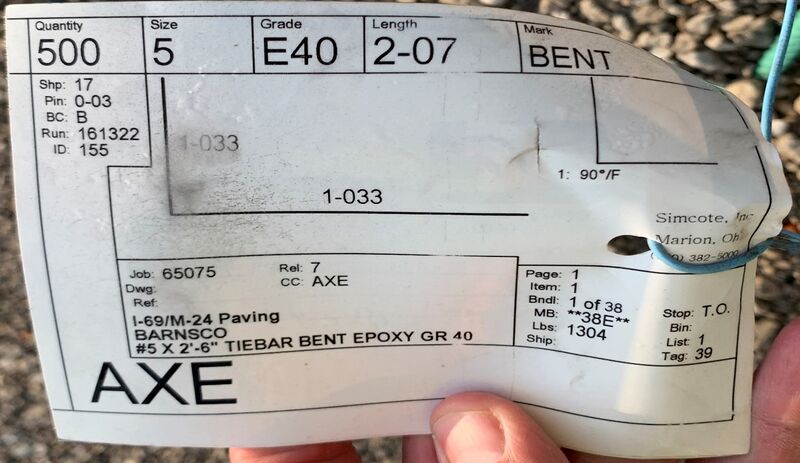
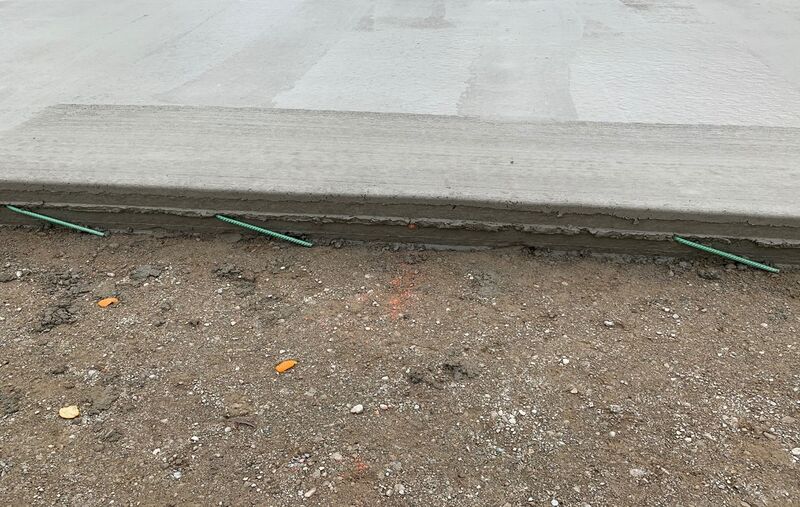
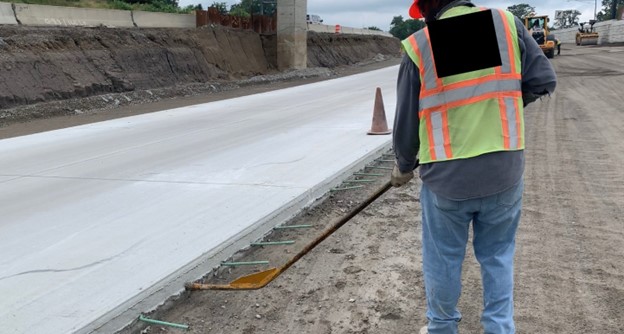
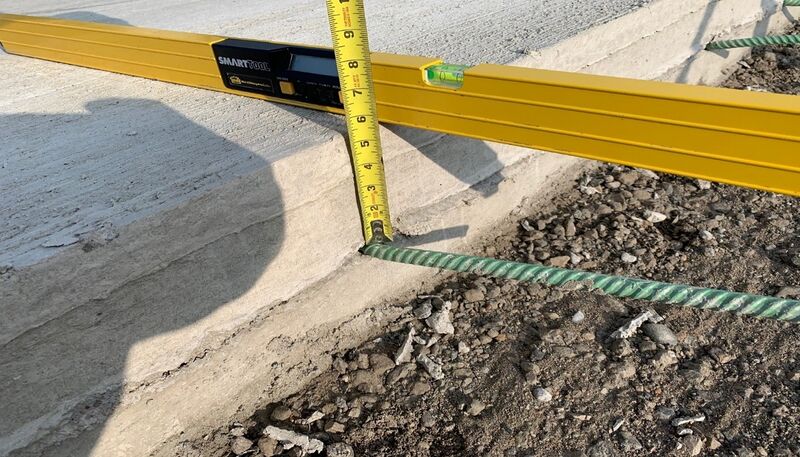
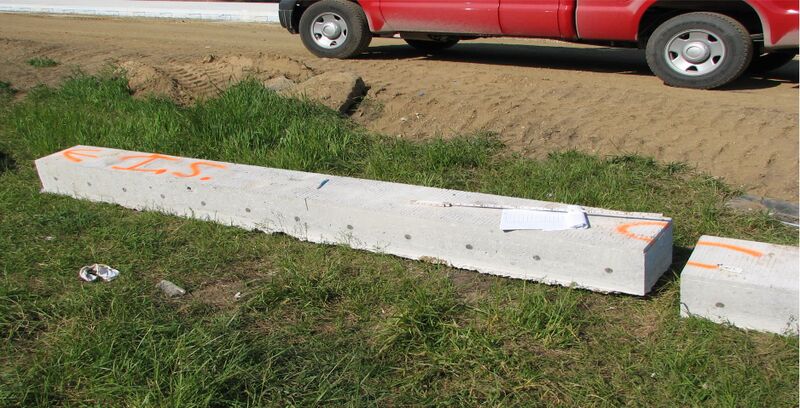
| + | Tie bars should be checked for certification or sampled and tested when they arrive on a project. Straight Tie Bar examples (See Figure 602-4, 602-5, 602-6, 602-7). Bent Tie Bar examples (See Figures 602-8, 602-9, 602-10, 602-11, 602-12, and 602-13). | ||
| + | |||
| + | {{top}} | ||
| + | |||
| + | |||
| + | |||
| + | |||
| + | [[File:602-4.jpg|800px|thumb|center|'''Figure 602-4 Straight Tie Bar (Stored on the job site)''']] | ||
| + | |||
| + | |||
| + | |||
| + | [[File:602-5.jpg|800px|thumb|center|'''Figure 602-5 Straight Tie Bar (Tag)''']] | ||
| + | |||
| + | |||
| + | |||
| + | [[File:602-6.jpg|800px|thumb|center|'''Figure 602-6 Straight Tie Bar Coating (Tag)''']] | ||
| + | |||
| + | |||
| + | |||
| + | [[File:602-7.jpg|800px|thumb|center|'''Figure 602-7 Straight Tie Bar installation''']] | ||
| + | |||
| + | |||
| + | |||
| + | [[File:602-8.jpg|600px|thumb|center|'''Figure 602-8 Bent Tie Bar''']] | ||
| + | |||
| + | |||
| + | |||
| + | [[File:602-9.jpg|800px|thumb|center|'''Figure 602-9 Bent Tie Bar (Tag)''']] | ||
| + | |||
| + | |||
| + | |||
| + | [[File:602-10.jpg|800px|thumb|center|'''Figure 602-10 Bent Tie Bar installation''']] | ||
| + | |||
| + | |||
| + | |||
| + | [[File:602-11.jpg|800px|thumb|center|'''Figure 602-10 Straightening Bent Tie Bars''' (wait to straighten tie bars until after concrete has gained the required strength or you may damage weak young concrete around the bar. Note how tie bars are not to be installed close to the transverse saw cut and load transfer assemblies)]] | ||
| + | |||
| + | |||
| + | |||
| + | [[File:602-12.jpg|800px|thumb|center|'''Figure 602-12 Bent Tie Bar''' After the bent tie bar is straightened, use straight-edge to make sure the tie-bar depth is set at half the pavement thickness for its entire length +/- ¾”). If pavement thickness = 12” then 6” to center of bar (acceptable range = 5 ¼” to 6 ¾”).]] | ||
| + | |||
| + | |||
| + | |||
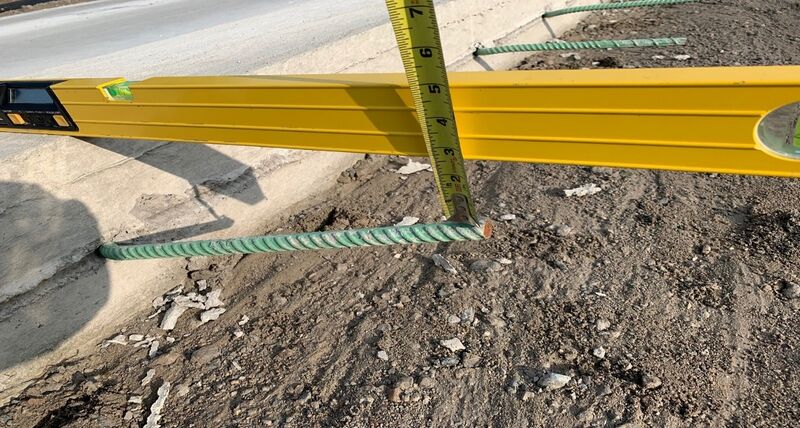
| + | [[File:602-13.jpg|800px|thumb|center|'''Figure 602-13 Bent Tie Bar''' The far end of this bar was set too high when initially straightened and needs to be bent further down to within tolerances. Measurements show 2-10/16” to the top of bar from the top of pavement + 5/16” = 2-15/16” to center of bar (allowable range = 5-1/4” to 6-3/4").]] | ||
| − | |||
{{top}} | {{top}} | ||
| Line 78: | Line 135: | ||
| − | * Check certification | + | *Check certification or sample and test each batch or lot. |
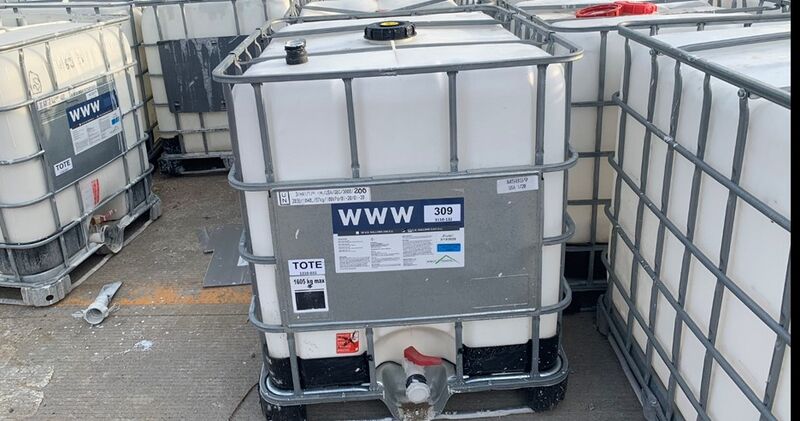
| − | * Material may be in drums or in a large tank. | + | *Material may be in drums or in a large tank. Inspection consists of seeing that the material is not contaminated or diluted and that it is mixed according to the manufacturer’s recommendations (See Figure 602-14). |
| − | * A curing compound should not be used when stored from one construction season to the next without resampling and testing. | + | *A curing compound should not be used when stored from one construction season to the next without resampling and testing. |
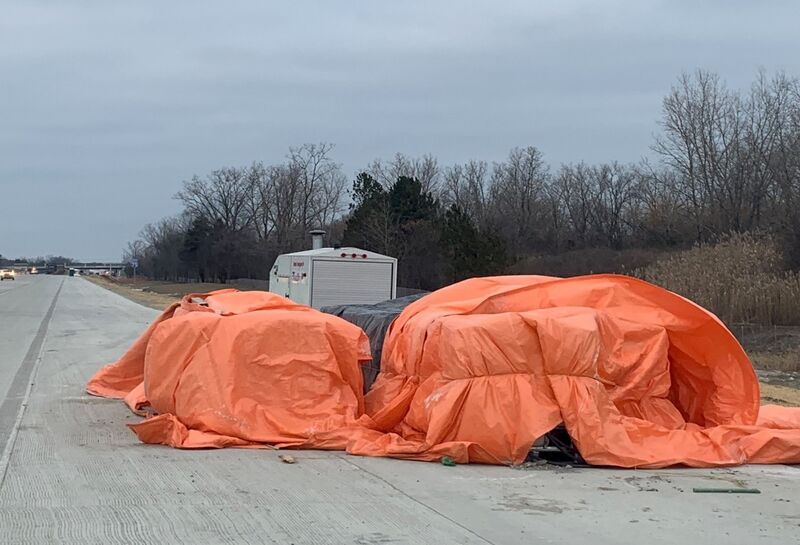
| − | * Check yield of material to | + | *Check yield of material to confirm correct coverage. Proper coverage as soon as practical is important for reducing evaporation of the concrete mixture water from the top of the fresh concrete and for reducing/reflecting solar heat input into the pavement as the concrete sets and gains strength. Very high concrete temperatures at set and shortly after are generally not good in terms of expected long term performance for the concrete pavement due to potential for increased slab shrinkage and warping. For white membrane type curing compounds, coverage should result in a full white color without grey spots from underlying concrete reflecting through due to inadequate thickness or poor spray pattern or nozzles. During cold weather conditions, protect the curing compound from freezing as shown in Figure 602-15. |
| + | |||
| + | |||
| + | |||
| + | [[File:602-14.jpg|800px|thumb|center|'''Figure 602-14 14 Tote of Curing Compound''']] | ||
| + | |||
| + | |||
| + | |||
| + | [[File:602-15.jpg|800px|thumb|center|'''Figure 602-15 Protecting the Curing Compound from Freezing''']] | ||
| + | |||
| + | {{top}} | ||
| + | |||
| + | ==[[#EQUIPMENT|EQUIPMENT]]== | ||
| + | |||
| + | Subsection 602.03 of the Standard Specifications for Construction sets forth the equipment requirements for the concrete paving operations. The specific equipment requirements described in the Standard Specifications have been reduced in the 2020 version of the Standard Specifications. Because equipment used today has become more precise and sophisticated, the Department is less concerned about the specific type or piece of equipment the Contractor uses and more focused on measuring and quantifying the results. | ||
| + | |||
| + | Equipment capacity and capability arriving at the job site will likely not be the same for a small urban widening project versus a high production rural interstate freeway project. For example, a small old paver may not be able to meet high initial smoothness specifications for an interstate freeway final pavement surface, and a new modern paver may be necessary to achieve a very smooth condition. If there are questions about the equipment condition and/or suitability, contact the Engineer or the MDOT State-Wide Concrete Paving Specialist. | ||
{{top}} | {{top}} | ||
| − | |||
| − | + | ==[[#PRECONSTRUCTION|PRECONSTRUCTION]]== | |
| + | |||
| + | Early in the construction project, at the pre-construction meeting, the Contractor will submit a formal proposed Materials Source List. This list may identify some of the proposed suppliers of products to be used in the pavement and offer an initial review. A minimum of 14 days prior to paving operations, the Contractor is to submit the official Quality Control Plan for Concrete. This document will include the proposed concrete mixture designs Job Mix Formulas (JMF’s) and information on proposed pavement placement and consolidation methods and procedures for verification of as-placed dowel and tie bar locations. It is best for the field engineer or technician to review the paving QC plan before construction begins as part of job planning. It is best to gather the internal project paving control team together for a project briefing to go over the proposed materials and procedures and required testing plans before the start of the paving. | ||
| + | |||
| + | |||
| − | |||
{{top}} | {{top}} | ||
| + | |||
| + | |||
| + | ==[[#CONSTRUCTION|CONSTRUCTION]]== | ||
| + | |||
===[[#PLACING AND FINISHING CONCRETE|Placing and Finishing Concrete]]=== | ===[[#PLACING AND FINISHING CONCRETE|Placing and Finishing Concrete]]=== | ||
| − | The | + | The Lansing Office concrete paving staff specialist will typically visit the project when paving starts to assist in verifying equipment suitability and troubleshooting related issues to get the project properly started. The daily paving inspector should note the trimming, placing, spreading, consolidation, finishing, texturing, and curing equipment the Contractor uses each day within the daily work reports, along with any unusual issues encountered with equipment or paving operations. The paving inspector must coordinate with the project and region materials control staff for quality assurance testing needed for the paving materials |
| + | |||
{{top}} | {{top}} | ||
====[[#Minimum Project Requirements|Minimum Project Requirements]]==== | ====[[#Minimum Project Requirements|Minimum Project Requirements]]==== | ||
| − | * | + | The Contractor will have determined how, using equipment or hand work, they will do the following: |
| − | * | + | *Trim the base to the required elevation grade. |
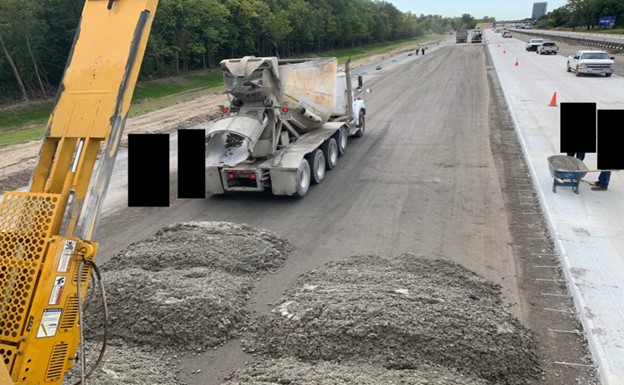
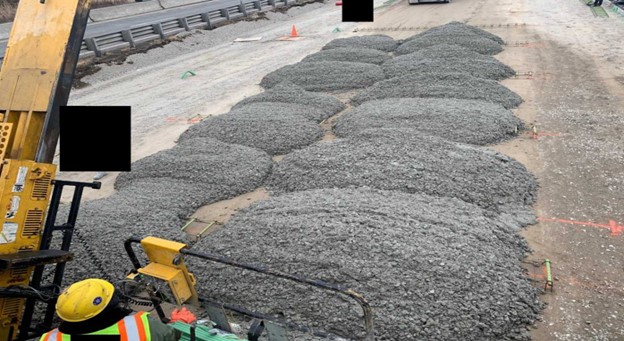
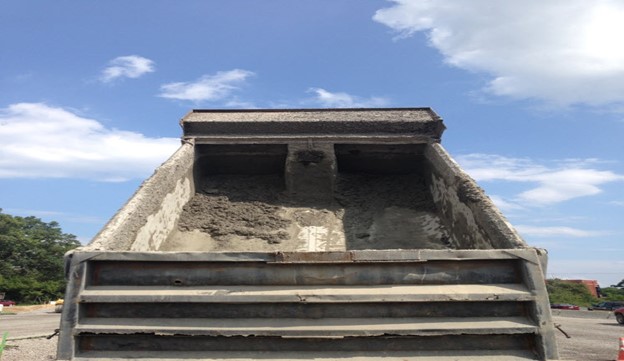
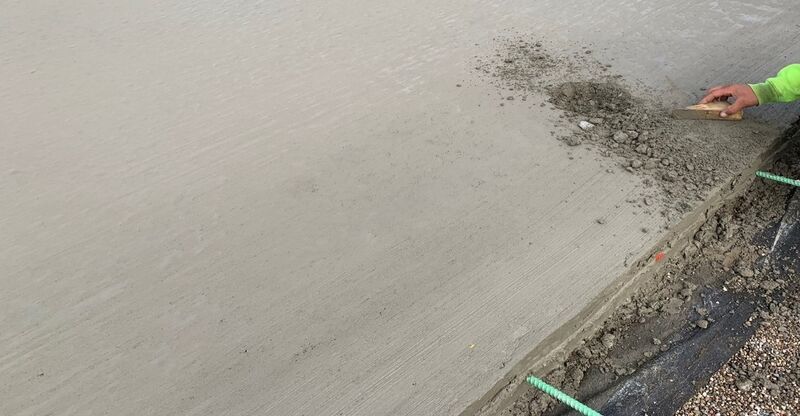
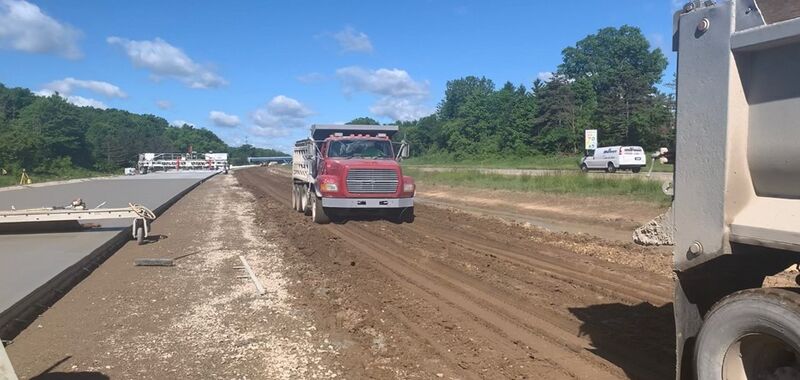
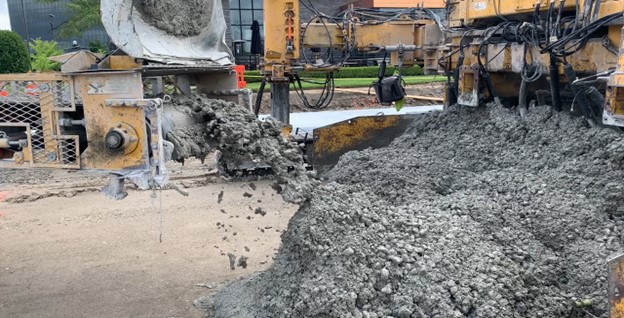
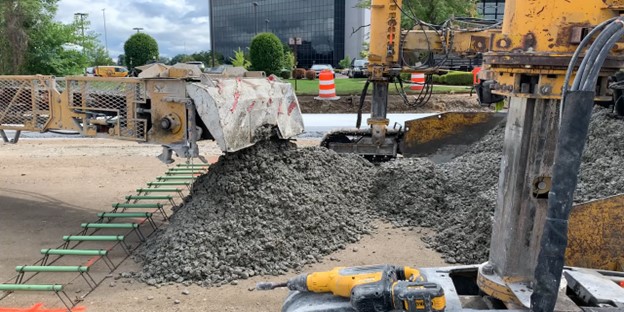
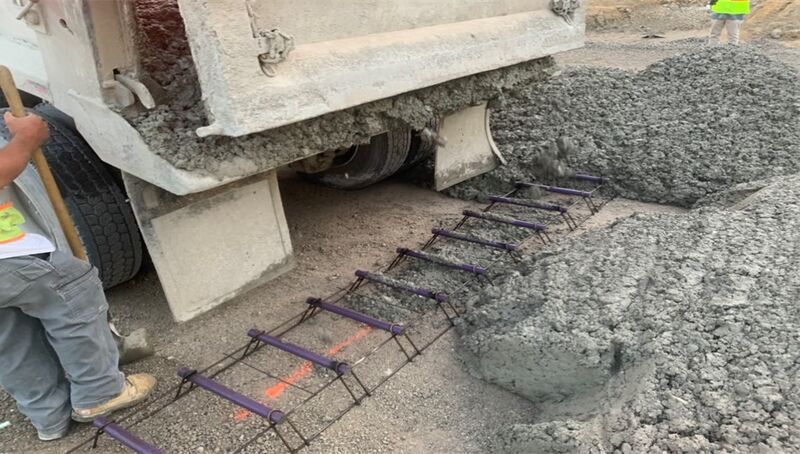
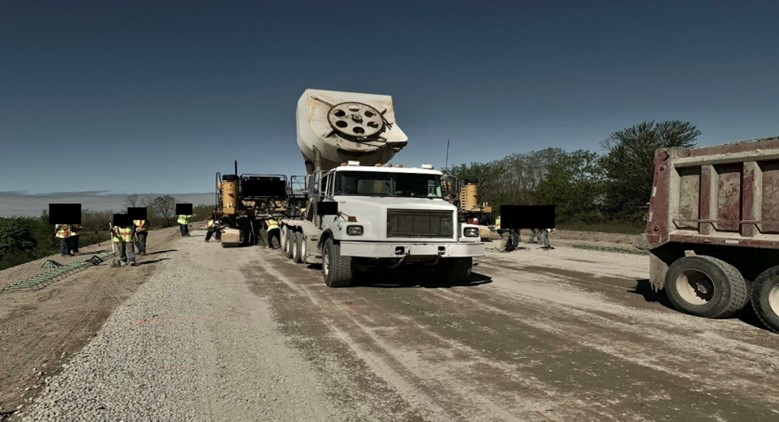
| − | * | + | *Deliver and place the concrete on the grade in a timely manner and without contamination or segregation as shown in Figure 602-16, 602-17, 602-18, 602-19, 602-20, 602-21, 602-22, 602-23, and 602-24. |
| − | * | + | *Install lane ties and dowel bars for joints, and other reinforcement as required. |
| − | * | + | *Consolidate and finish the concrete including straight edging and floating. |
| − | * | + | *Apply the required texturing and edge treatments to the fresh concrete surface. |
| − | * | + | *Apply the required curing procedures and products for the pavement, and |
| + | *Saw clean and seal the required joints. | ||
| − | + | Smaller concrete pour areas are often placed by hand and within stationary forms, rather than using formless ‘slip-form’ type paving techniques. More specialized concrete forms can serve the dual purpose of containing the plastic concrete and supporting a trackway for lightweight concrete placing and finishing equipment, such as roller screeds, to ride on. | |
| − | + | [[File:602-16.jpg|800px|thumb|center|'''Figure 602-16 Contractor placing concrete directly on the grade with the concrete hauling units.''']] | |
| − | |||
| − | + | ||
| + | [[File:602-17.jpg|800px|thumb|center|'''Figure 602-17 Contractor placing concrete directly on the grade with the concrete hauling units.''']] | ||
| + | |||
| + | |||
| + | [[File:602-18.jpg|800px|thumb|center|'''Figure 602-18 Make sure hardened concrete gets cleaned out of concrete haul units at the plant and not mixed in the fresh concrete (keep a close eye on the bottom corners of the dump trucks for hardened concrete). ''']] | ||
| + | |||
| + | |||
| + | |||
| + | [[File:602-19.jpg|800px|thumb|center|'''Figure 602-19 Removing hardened concrete that got mixed in the fresh concrete. The hardened concrete could have come from a concrete haul units previous loads or fallen from a piece of equipment (e.g. paver, roller screed, and loader bucket). ''']] | ||
| + | |||
| + | |||
| + | |||
| + | [[File:602-20.jpg|800px|thumb|center|'''Figure 602-20 Make sure the clay from the haul road doesn’t get tracked on the concrete haul unit tires and mixed in the fresh concrete. The vibrators on the paver will move the clay chunks upward to the surface of the pavement (resulting in popouts). ''']] | ||
| + | |||
| + | |||
| + | |||
| + | [[File:602-21.jpg|800px|thumb|center|'''Figure 602-21 Make sure the clay from the haul road doesn’t get tracked on the concrete haul unit tires and mixed in the fresh concrete ''']] | ||
| + | |||
| + | |||
| + | |||
| + | [[File:602-22.jpg|800px|thumb|center|'''Figure 602-22 Clay may get mixed into the concrete at the plant, due to the bottom of the stockpile not being on a paved surface, and loader operator gathering aggregates in the bottom 12 inches of the stockpile. ''']] | ||
| + | |||
| + | |||
| + | |||
| + | [[File:602-23.jpg|800px|thumb|center|'''Figure 602-23 Segregation in the concrete mix with the use of a material transfer machine (notice the separation of the larger aggregates in the concrete mix). ''']] | ||
| + | |||
| + | |||
| + | |||
| + | [[File:602-24.jpg|800px|thumb|center|'''Figure 602-24 Putting down the guard in front of the material transfer machine prevented the concrete mix from being excessively segregated. ''']] | ||
| + | |||
{{top}} | {{top}} | ||
| − | + | ===[[#GRADE CONDITION|Grade Condition]]=== | |
| + | |||
| + | Proper subgrade preparation and high-quality subbase and base design and construction is the foundation to long lasting concrete pavements. The exposed subgrade area for the entire project needs to be evaluated and repaired/improved as necessary prior to placement of subbase and base layers or final pavements. When the stability of the subgrade is in question, the Engineer should consult with the region soils personnel for the proper solution. The Engineer will promptly inspect the grade to decide whether drying and re-compacting in place, undercutting and replacement of weak soil, or in-place lime/cement type subgrade improvement is necessary and determine the limits of subgrade stabilization (refer to subsection 205.03.E.). An effective method for determining the limits of undercutting is by test-rolling (proof rolling) the subgrade using a suitable heavy loaded vehicle. Test-rolling is a good procedure for visually determining the subgrades uniformity and stability. Refer to MDOT Wiki Division 2 - Section 205 for the procedure of test-rolling. Once weak areas are identified, the geotechnical evaluation team may use various procedures including test holes, test pits/excavations and probing devices such as the U.S. Army style dynamic cone penetrometer to determine the depth of weak soils requiring treatment or removal. | ||
| + | |||
| + | After the aggregate base or open-graded drainage course (OGDC) is placed shaped and compacted, it is brought to final grade, usually by an automatic trimmer machine. The automatic trimmer operates off a string line or by automated machine guidance (3D controls) to control the vertical and horizontal alignment. The automated machine obtains its position with an onboard computer communicating to the global positioning systems (GPS), total stations, lasers, or combinations of similar methods while referencing the Contractor’s model developed for the project. Control string lines, if used, must be tight and checked for excessive sag between securing posts and corrected as necessary before the final trimming of the aggregate base surface elevation, as most slipform paving equipment will travel on the aggregate base or OGDC for final grade (See Figure 602-25). | ||
| + | |||
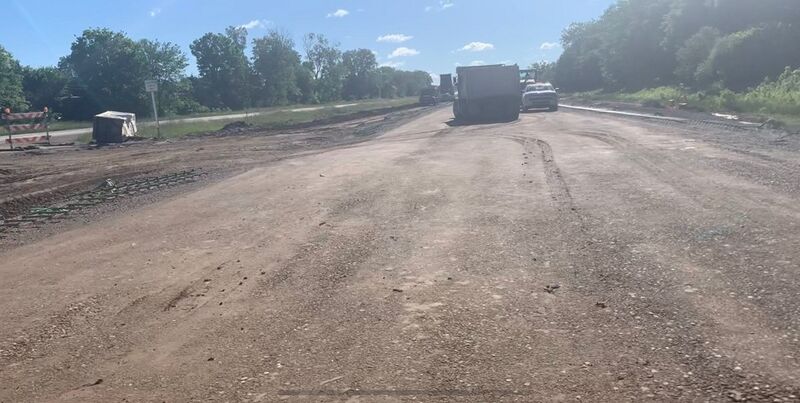
| + | Contractors are supposed to use appropriate haul routes that are built strong enough to support the needed heavy traffic without significantly damaging or yielding the subgrade beneath the final pavement areas. It is critical for jobs that have weaker clayey subgrades and/or thinner base designs, that the prepared base is not used as a haul road in areas that have not been designed as and/or approved as a haul route. If the prepared aggregate base is damaged by construction equipment prior to placing concrete, refer to subsection 602.03.B. | ||
| + | |||
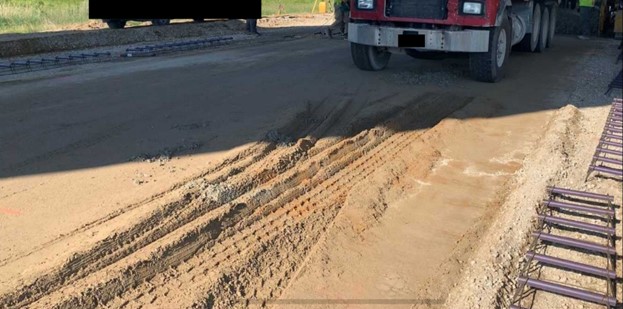
| + | In the past, the Department required the Contractor to use a concrete spreader and material transfer machine to place the concrete on the grade in front of the paver. Recently, the Department granted the Contractors the general privilege of driving the concrete hauling units directly on the grade to place the concrete in front of the paver. A heavy-duty base and subbase system placed on hard/dense natural soils will likely survive this traffic. However, a low-traffic road type design with thin base and subbase at a site having marginal to weak subgrades may not survive much traffic or weight moving around on top of the base layer material. With this privilege, subsection 602.03.D. of the Standard Specifications for Construction states, “When the Engineer determines that damage occurs to the base course from hauling units, discontinue production until the cause of the damage has been evaluated and corrected” (e.g. excessive rutting and looking for geotextile separator coming to the surface of the base course), (See Figure 602-26). When there is large rutting or yielding damage to the base course, that damage is typically being reflected from damaged/displaced subgrade below the base (rutting in the subgrade reduces the strength of the subgrade and compaction effects and increases moisture susceptibility). | ||
| + | |||
| + | To prevent damaging the foundation support with the concrete hauling units, the Contractor needs to minimize the hauling time on the base course by properly using the designated haul road and setting up truck access points in front of the paver as necessary to get on and off the grade. Also, at these truck access points the base course may become more disturbed due to the frequent concrete hauling units turning on the grade. If the Inspector notices the base is being damaged by the concrete hauling units, then the Contractor needs to implement a corrective action to their process of placing concrete. For projects having weak subgrade and/or thin base layers experiencing excessive damage, it may be necessary for the Contractor to place less concrete in each hauling unit or completely stay off the grade and use a material transfer machine to place the concrete into the paver. The Contractor will typically use a roller too smooth out minor deflections in the base course, which is required to provide a level surface to place the load transfer assemblies on). | ||
| + | |||
| + | [[File:602-25.jpg|800px|thumb|center|'''Figure 602-25 Automatic Grade Trimmer ''']] | ||
| + | |||
| + | |||
| − | + | [[File:602-26.jpg|800px|thumb|center|'''Figure 602-26 Concrete Hauling Units Damaging the Base Course. ''']] | |
{{top}} | {{top}} | ||
| − | ====[[# | + | ====[[#Load Transfer Assemblies|Load Transfer Assemblies]]==== |
| + | |||
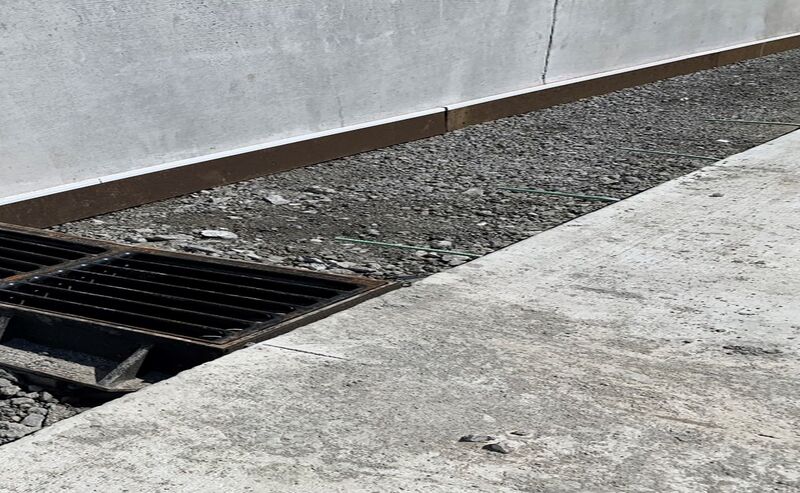
| + | After the base is properly compacted and fine trimmed, dowel bar type load transfer assemblies are placed at planned transverse joint locations. The Inspector should work closely with the Contractor’s crew while they are setting these assemblies. Make sure the joint layouts are in accordance with R-43 Series of the Standard Plans (e.g. match mainline joints to the 22 foot point and 2 foot point of the gores, mainline joints matching the ramps joints, and expansion joints). Custom joint layout patterns are typically used for roundabouts and unusually shaped placement areas. It is preferred that joints line up with drainage structures that are in the curb and gutter or valley gutter castings and manholes to help prevent random cracking in the concrete panels (See Figure 602-27) that tends to emanate from odd shaped inclusions such as manholes and drainage structures. | ||
| + | |||
| + | The load transfer assembly is anchored to the grade and holds the dowel bars in position so they will not move during concrete placement and consolidation. | ||
| + | *The typical distance between joints must match the Standard Plans policy, or custom joint layout drawings that are a part of the contract and plans. | ||
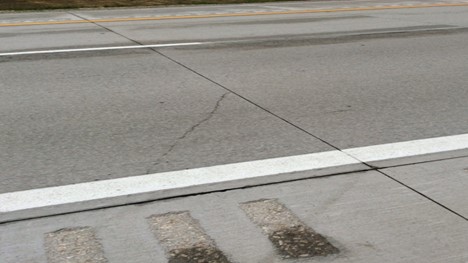
| + | *It will be necessary for the Contractor to mark the centerline of the as-installed assemblies so that future joint saw cuts can be made directly over the center of the dowel bars after the concrete has hardened sufficiently. Usually, this location marking is accomplished by setting a long nail or stake in the grade, matching the centerline of the dowels, set just outside the pavement limits (ribbon attached to the nail or stake), or by setting a nail-marker inside the vertical face of the fresh concrete pavement right over the load transfer assembly centerline (See Figure 602-27A). It is critical to get the saw cut lines to be close to the middle of the dowel bars. | ||
| + | *The load transfer assemblies must be positioned at right angles to the centerline as shown in Figure 602-28. | ||
| + | *After they are properly positioned, they must be secured to the base using six pins or stakes per basket assembly or as directed by the Engineer. | ||
| + | |||
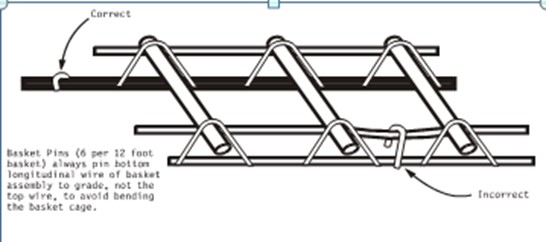
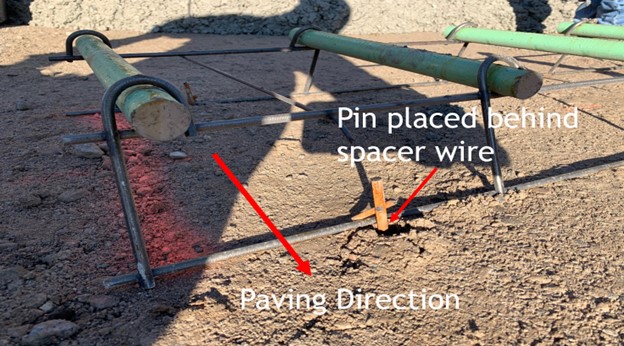
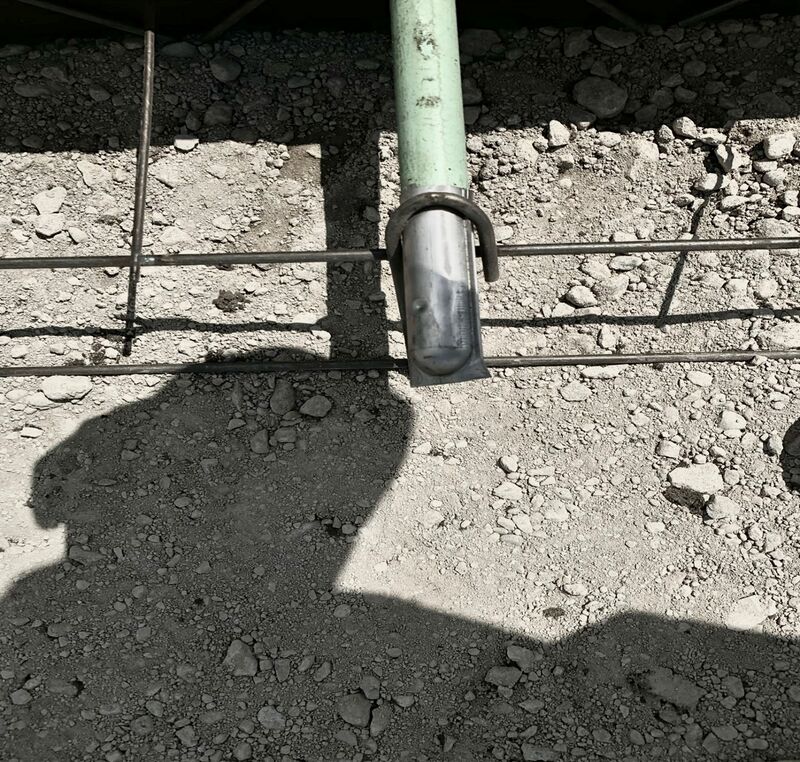
| + | The assembly pins must be in contact, snug, with the lower horizontal spacer wire to function properly. The location of the assembly pins is also critical to prevent the basket from shifting or overturning from the concrete paver pushing the concrete into the assembly as shown in Figure 602-29, 602-30, 602-31, and 602-32. | ||
| + | |||
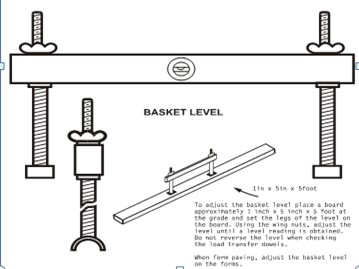
| + | After the contractor completes staking the assembly, the inspector should check vertical alignment with the basket level to ensure that dowels are parallel with the pavement surface and not tilted left-right or up-down significantly (See Figure 602-33). Any apparent misalignment can usually be corrected by the contractor (e.g. by tapping the frame to realign the bars, etc.). The dowel bars should also be inspected for completeness of coating | ||
| + | |||
| + | |||
| + | |||
| + | [[File:602-27.jpg|800px|thumb|center|'''Figure 602-27 Transverse joint in the roadway matching a corner of the drainage structure in the valley gutter. ''']] | ||
| + | |||
| + | |||
| + | |||
| + | [[File:602-27A.jpg|800px|thumb|center|'''Figure 602-27A Marking out the location of the future saw cut with a nail. ''']] | ||
| + | |||
| + | |||
| + | |||
| + | [[File:602-28.jpg|800px|thumb|center|'''Figure 602-28 Positioning Dowel Basket Assemblies.''']] | ||
| + | |||
| + | |||
| + | |||
| + | [[File:602-29.jpg|800px|thumb|center|'''Figure 602-29 Location of Basket Pins and Basket Level. ''']] | ||
| + | |||
| + | |||
| + | |||
| + | |||
| + | [[File:602-30.jpg|800px|thumb|center|'''Figure 602-30 Location of Basket Pins. ''']] | ||
| + | |||
| + | |||
| + | |||
| + | |||
| + | [[File:602-31.jpg|800px|thumb|center|'''Figure 602-31 To prevent the assembly from shifting or overturing due to the concrete being pushed by the paver, the contractor will first place concrete over the assemblies. ''']] | ||
| + | |||
| + | |||
| + | |||
| + | [[File:602-32.jpg|800px|thumb|center|'''Figure 602-32 The inspector will wet check the dowel bar location behind the paver to ensure the assembly did not shift or overturn. ''']] | ||
| + | |||
| + | |||
| + | |||
| + | [[File:602-33.jpg|800px|thumb|center|'''Figure 602-33 Basket Level Tool. ''']] | ||
| + | |||
| − | |||
| − | |||
| − | |||
| − | |||
| − | |||
| − | |||
| − | |||
| − | |||
{{top}} | {{top}} | ||
| − | ====[[# | + | ====[[#Dowel Bar Inserter (DBI)|Dowel Bar Inserter (DBI)]]==== |
| − | |||
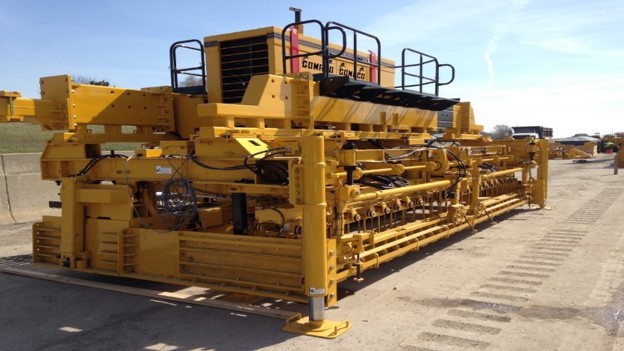
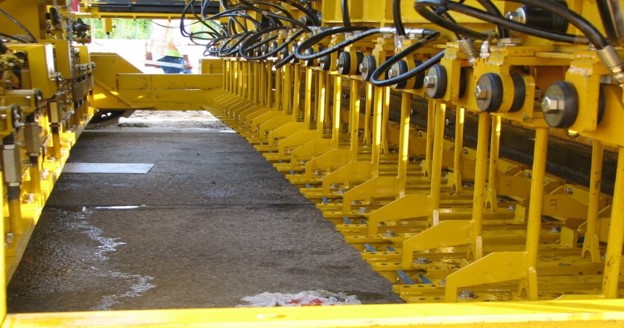
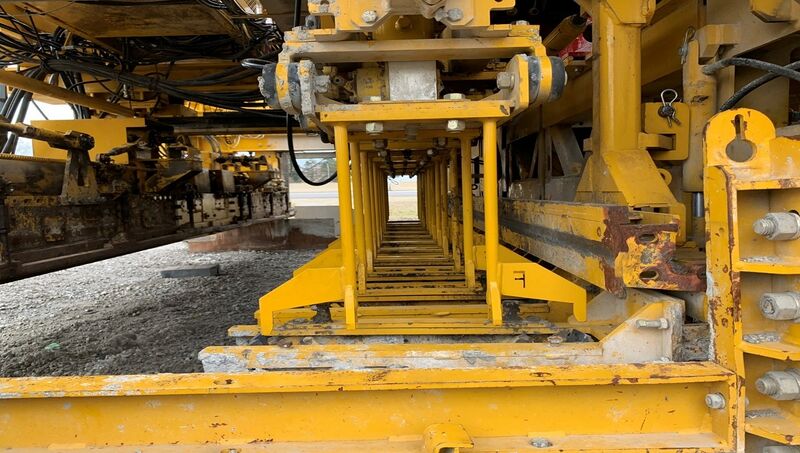
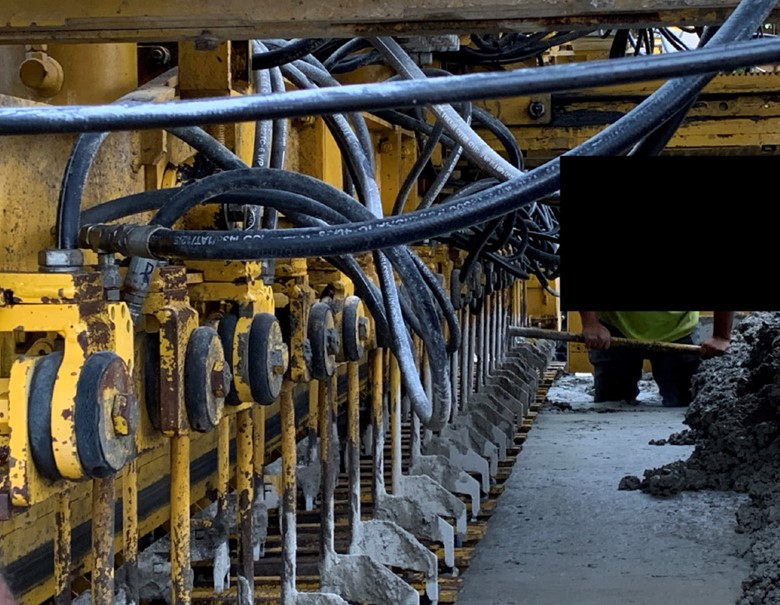
| + | The DBI is an approved mechanical device that automatically installs load transfer bars into the full depth fresh concrete at the required depth and location, and properly consolidates the surrounding concrete. The device must install the bars in a slow and fluid manner and be capable of consolidating the concrete around the dowel bars such that no air voids are created or remain around the bars, without the supplemental use of hand-held vibrators. These modern automated devices may be used in lieu of stationary load transfer assemblies (See Figures 602-34, 602-35, 602-36, 602-37, 602-38, 602-39, and 602-40). | ||
| − | + | When a dowel bar inserter (DBI) is used to install load transfer bars, the bars shall be placed at the same spacing as detailed for dowel bar assemblies in the Standard Plan R-40 series. The pavement shall be placed and consolidated full depth prior to insertion of the dowel bars. | |
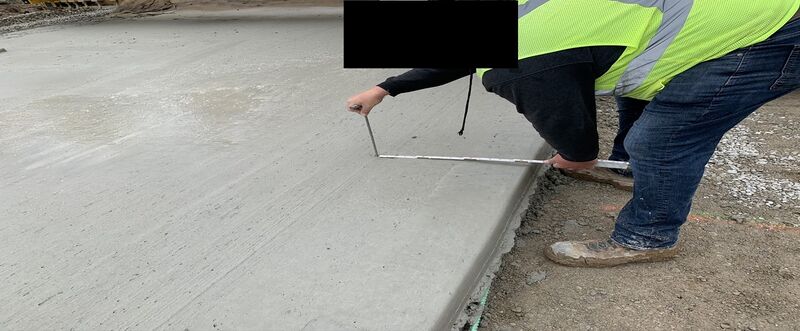
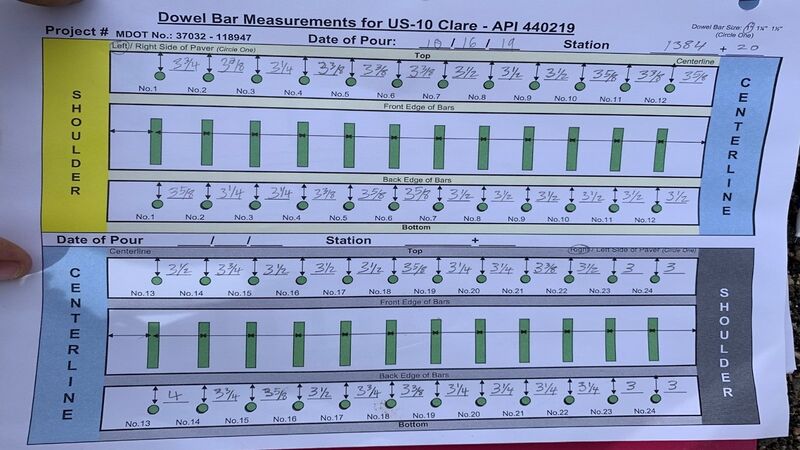
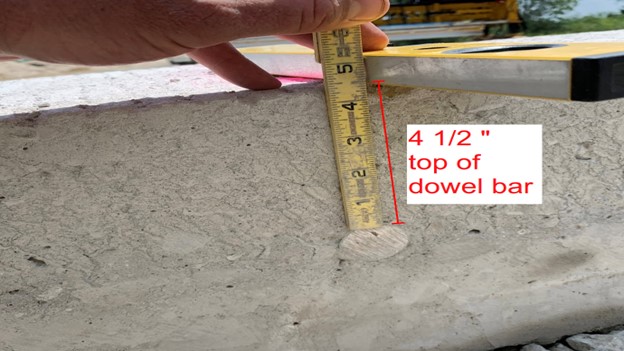
| + | Proper alignment of the dowel bars is crucial to proper joint opening and closing behavior in response to summer to winter expansion and contraction (See Figures 602-41, 602-42, and 602-43). Premature pavement distress such as medium to high severity spalling can develop if a dowel or group of dowels is not properly aligned. The Contractor is required to perform wet checks to verify the dowel bars are at the proper depth and position alignment (vertically and horizontally) in accordance with MDOT Specifications and Standard Plans. The Contractor will also verify the location of the nail to the center of the dowel bar (tolerance +/- 2 inches of side shift, See Figure 602-27A). These wet checks measurements will be made every 500 feet and as required by the Contractors Quality Control Plan. The Engineer will witness these measurements and may request documentation of these measurements (See Figures 602-44, 602-45, and 602-46 for wet checks). | ||
| − | + | The following are forms to document the wet checks at different pavement widths: | |
| + | *Download a copy of the [https://mdotwiki.state.mi.us/images_construction/5/58/12_ft_Wet_Checks.pdf 12 ft Wet Checks]. | ||
| + | *Download a copy of the [https://mdotwiki.state.mi.us/images_construction/e/e8/14_ft_Wet_Checks.pdf 14 ft Wet Checks]. | ||
| + | *Download a copy of the [https://mdotwiki.state.mi.us/images_construction/9/96/24_ft_Wet_Checks.pdf 24 ft Wet Checks]. | ||
| + | *Download a copy of the [https://mdotwiki.state.mi.us/images_construction/2/2c/26_ft_Wet_Checks.pdf 26 ft Wet Checks]. | ||
| + | |||
| + | Any out of tolerance joints shall be marked and replaced at the Contractor’s expense. If the dowels are consistently out of tolerance with respect to alignment and/or depth, the Contractor must stop production paving and take steps to correct the alignment problems. Dowel alignment problems can be created when too much concrete height or thickness, commonly referred to as head, develops in front of the paver that has the DBI mounted to it. The amount of head maintained in front of the paver must be in accordance with the DBI and paver manufacturer’s recommendations to provide consistent proper dowel alignment. | ||
| + | Many other factors can contribute to dowel alignment and depth problems when using a DBI. The important thing to remember is to be sure the DBI is consistent when placing dowels throughout each day’s production. Periodic wet and dry alignment/depth checks are necessary to confirm consistency. The Inspector should also make sure the Contractor is following all the DBI manufacturer’s recommendations for this equipment. | ||
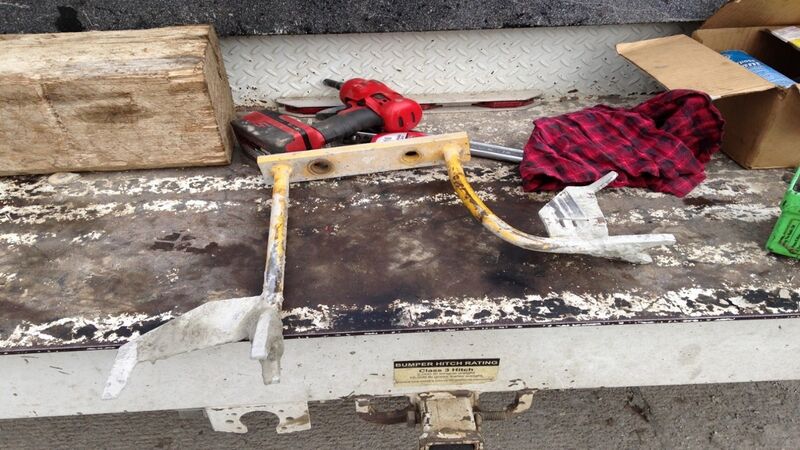
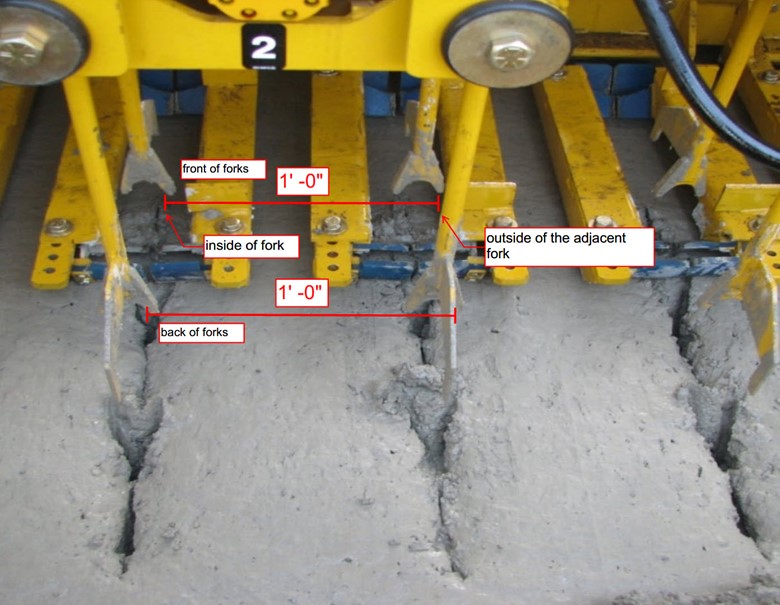
| − | The | + | The insertion forks of the DBI may get bent during production, and this may occur from too much concrete in the dowel bar trays (See Figures 602-47 and 602-48). If an insertion fork bends on the DBI, the Contractor will either bend it back into position or replace it. Then, the Contractor needs to verify the depth and position of the insertion fork on the DBI. The best initial check for horizontal alignment of the dowel bars is for the Contractor to measure the spacing between the front and back of the insertion forks as shown in Figure 602-49. Then, the Contractor needs to wet check the joints where the dowel bars were inserted with the bent forks and then where the forks were corrected to confirm consistency. The Contractor will need to use two chaining pins to wet check the horizonal alignment of the dowel bars. |
| + | Also, as the Contractor is correcting the DBI, the Inspector needs to keep track of any concrete haul units waiting to place concrete and the concrete placed on the grade in front of the paver (the spec book states in subsection 602.03.D, “Place a transverse end-of-pour joint when unavoidable interruptions of concrete placement occur that are longer than 60 minutes from the time the concrete is batched until final finishing of the concrete surface). The Inspector needs to visually inspect the concrete sitting on the grade to see if it appears to be setting up (especially on days where there is a high evaporation rate), as this could impact the consolidation ability around the dowel bars. The Inspector should identify this area in their daily work report and the Engineer may require a core to be taken to verify consolidation. | ||
| + | |||
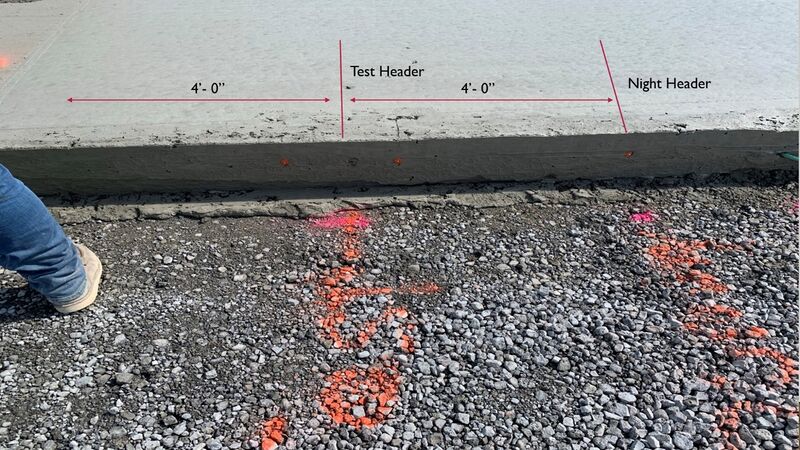
| + | The Contractor must construct and evaluate DBI test headers throughout the project to verify proper consolidation of concrete around the dowel bars and alignment of dowel bars in hardened concrete. Three test headers are required in each direction of travel, but the Engineer may request more depending on if the Contractor uses more than one paver with the DBI setup and the contractor quality control measurements. See Figures 602-50, 602-51, 602-52, 602-53, 602-54, 602-55, 602-56, and 602-57. | ||
| + | |||
| + | Also, if there are issues with the DBI, a test header needs to be made at the end of the days production and the Contractor needs to remove the test header for inspection of the dowel bar placement before restarting the concrete paving operation. Based on the test header results, the Contractor may need to recheck and adjust the DBI forks before restarting the concrete paving operations. | ||
| − | + | The following is a spreadsheet for documenting the test header results into the office file. There is an example filled out in the spreadsheet. The Inspector can record the test header results in the field onto the wet check form and then input the information into the spreadsheet. | |
| − | |||
| − | |||
| − | |||
| − | + | *Download a copy of the [https://mdotwiki.state.mi.us/images_construction/f/f4/Test_Header_Spreadsheet_2020.xlsx Test Header Spreadsheet 2020]. | |
| + | |||
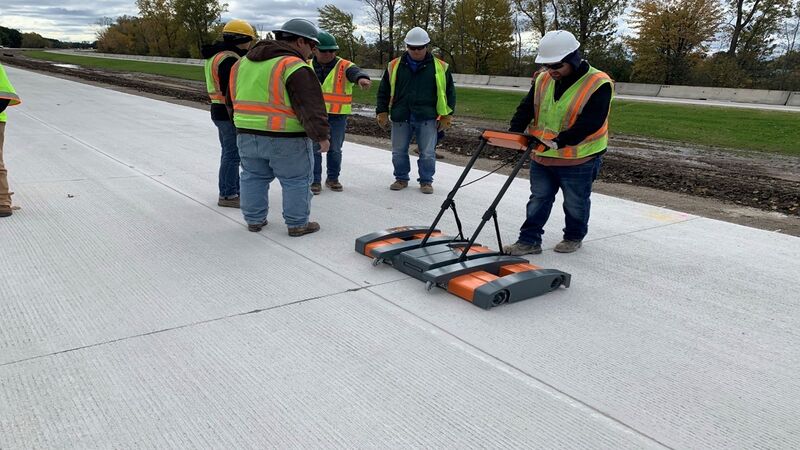
| + | When the DBI is being used, MDOT Lansing Construction Field Services (CFS) will provide the project office the service of the MIT-Dowel Scan non-destructive dowel scanning device. CFS highly recommends the Engineer to have the transverse joints scanned throughout the duration of the project, especially when the contractor starts paving, when changes the paver setup occur, if more than one paver is used with the DBI setup, and when issues arise with the DBI in general. | ||
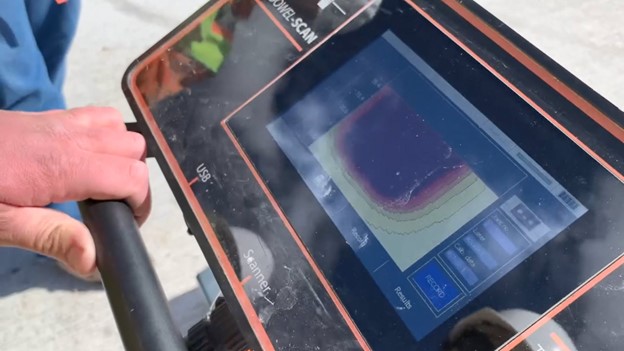
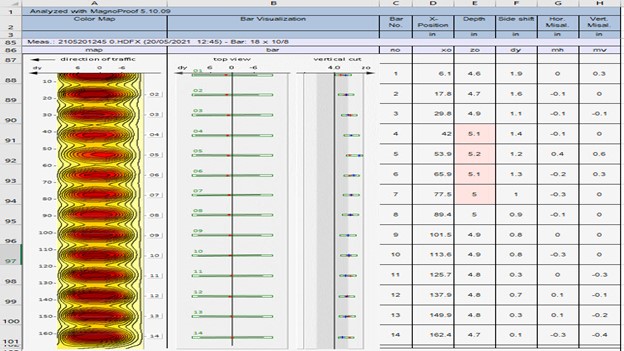
| − | + | The MIT-Dowel Scan device has 10 sensors (magnets) that pick up the magnetic properties of the dowel bars, which create magnetic fields, and then the data is processed to predict embedded depths and alignments (See Figure 602-58). The MIT-Dowel Scan gives you real time imaging and results (See Figure 602-59). The MIT-Dowel Scan data will be shown on an excel spreadsheet identifying the dowel bar spacing, depth, side shift, horizontal misalignment, and vertical misalignment (See Figure 602-60). The MIT-Dowel Scan is extremely accurate for evaluating the DBI paving operations (the dowel bars near the longitudinal joints may have influence of the lane ties so that data can’t be used). The MIT-Dowel Scan accuracy has been confirmed by being compared to test headers and cover meters. Currently, the MIT-Dowel Scan technology is relatively new and is used for information purposes only and not as part of formal quality assurance procedures. There are other DOTs that use the MIT-Dowel Scan in their specifications. The typical process CFS uses to MIT-Dowel Scan the transverse joints, is by scanning about 10 joints every 700 feet to 1000 feet to identify any patterns of potential issues with the dowel bar placement. Then, CFS will give the project office an excel spreadsheet and interpretation of the results. | |
| − | + | [[File:602-34.jpg|800px|thumb|center|'''Figure 602-34 Independent DBI unit to the concrete paver. ''']] | |
| − | |||
| − | + | [[File:602-35.jpg|800px|thumb|center|'''Figure 602-35 Inside view of DBI unit (DBI forks and dowel bar trays). ''']] | |
| + | |||
| + | |||
| + | |||
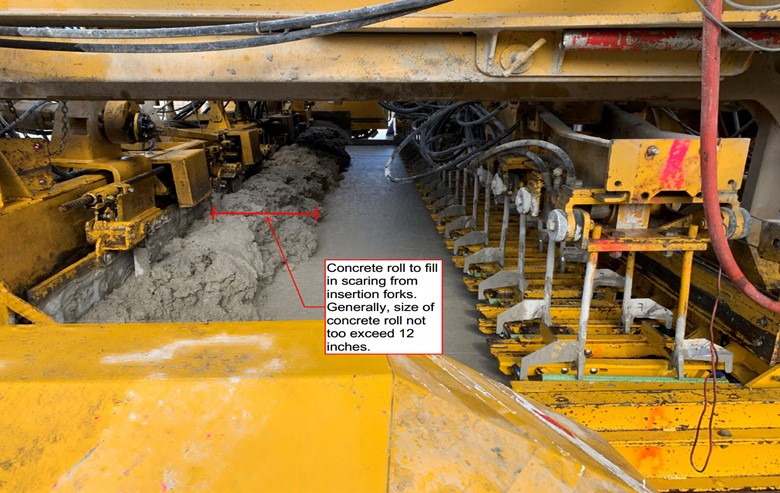
| + | [[File:602-36.jpg|800px|thumb|center|'''Figure 602-36 DBI unit. Gomaco is the manufacture of this machine, and they recommend the concrete roll size inside the DBI unit not to exceed 12 inches. ''']] | ||
| + | |||
| + | |||
| + | |||
| + | [[File:602-37.jpg|800px|thumb|center|'''Figure 602-37 When the concrete roll is too large, the excess concrete will get inside the bar trays. This may occur if there is too much concrete in front of the paver. The concrete needs to be cleaned out of the bar trays to prevent misaligning the dowel bars. Then, the contractor needs to decrease the concrete roll size by adjusting the paver. ''']] | ||
| + | |||
| + | |||
| + | |||
| + | [[File:602-38.jpg|800px|thumb|center|'''Figure 602-38 DBI unit. ''']] | ||
| + | |||
| + | |||
| + | |||
| + | [[File:602-39.jpg|800px|thumb|center|'''Figure 602-39 Replacing the worn out forks for the DBI. ''']] | ||
| + | |||
| + | |||
| + | |||
| + | [[File:602-40.jpg|800px|thumb|center|'''Figure 602-40 Replacing the worn out forks for the DBI. ''']] | ||
| + | |||
| + | |||
| + | |||
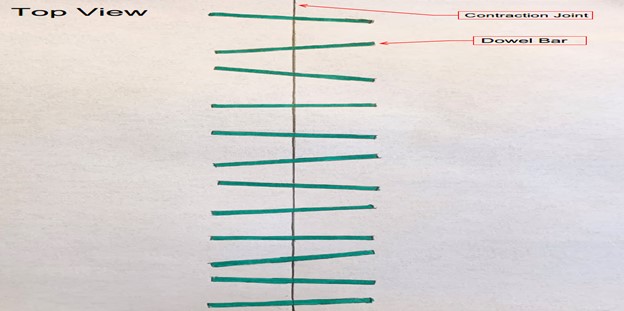
| + | [[File:602-41.jpg|800px|thumb|center|'''Figure 602-41 The two of the most significant factors in joint performance is dowel bar vertical and horizontal skew. Excessive skew in any direction creates potential for locked joints during normal expansion and contraction of the slabs that occur naturally from temperature and moisture changes. In this picture, it shows the vertical alignment of the dowel bars. The dowel bars should be parallel to the surface and centerline of the harden slab. The green line indicates a level dowel bar and the red dash indicates a dowel bar that is skewed and misaligned. Studies have shown that joints have a higher chance of locking up when the dowel bars are oppositely misaligned (where one dowel bar is tipped up and the other is tipped down). ''']] | ||
| + | |||
| + | |||
| + | |||
| + | [[File:602-42.jpg|800px|thumb|center|'''Figure 602-42 Dowel bar horizontal alignment. Joints have a higher chance of locking up when the dowel bars are oppositely misaligned (the dowel bars creating a “V’ shape). ''']] | ||
| + | |||
| + | |||
| + | |||
| + | [[File:602-43.jpg|800px|thumb|center|'''Figure 602-43 Corner cracking that can be caused from dowel bar misalignment. ''']] | ||
| + | |||
| + | |||
| + | |||
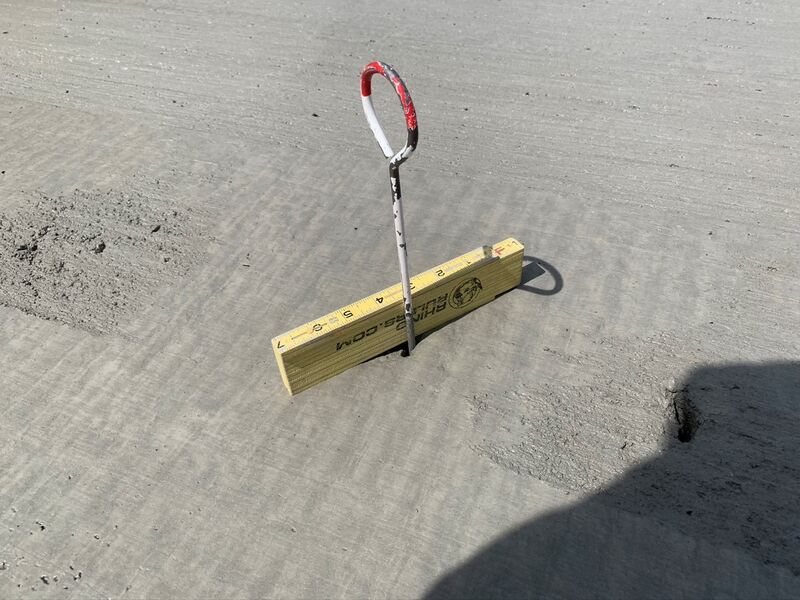
| + | [[File:602-44.jpg|800px|thumb|center|'''Figure 602-44 Helpful tools to do wet checks is a chaining pin and flat edge to match top of pavement (the top of the pavement has a tendency to drop down, so placing a flat edge next to the chaining pin is the best practice to getting an accurate measurement). ''']] | ||
| + | |||
| + | |||
| + | |||
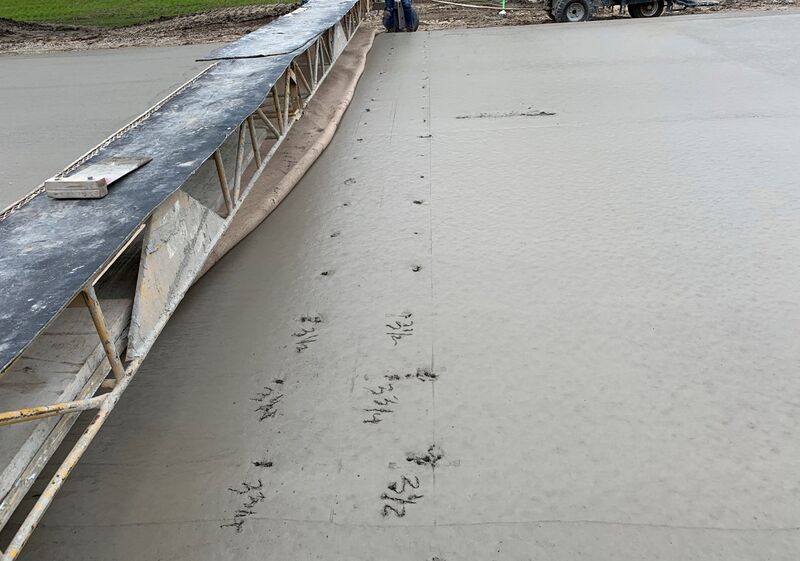
| + | [[File:602-45.jpg|800px|thumb|center|'''Figure 602-45 Wet check. ''']] | ||
| + | |||
| + | |||
| + | |||
| + | [[File:602-46.jpg|800px|thumb|center|'''Figure 602-46 Wet check documentation. ''']] | ||
| + | |||
| + | |||
| + | |||
| + | [[File:602-47.jpg|800px|thumb|center|'''Figure 602-47 Bent forks on the DBI. ''']] | ||
| + | |||
| + | |||
| + | |||
| + | [[File:602-48.jpg|800px|thumb|center|'''Figure 602-48 The contractor bending the insertion forks for the DBI back into the proper position. ''']] | ||
| + | |||
| + | |||
| + | |||
| + | [[File:602-49.jpg|800px|thumb|center|'''Figure 602-49 Verifying the horizontal alignment of the insertion forks.''']] | ||
| + | |||
| + | |||
| + | |||
| + | [[File:602-50.jpg|800px|thumb|center|'''Figure 602-50 Test Header. ''']] | ||
| + | |||
| + | |||
| + | |||
| + | [[File:602-51.jpg|800px|thumb|center|'''Figure 602-51 Locate the end of the dowel bar with the chaining pin, then measure 2 inches from the end of the dowel bar and place a nail on the vertical face of the concrete slab. Then, measure 14 inches and put another nail in the vertical face of the concrete slab. Marking out the test header is important to ensure the dowel bar is not missed when saw cutting. ''']] | ||
| + | |||
| + | |||
| + | |||
| + | [[File:602-52.jpg|800px|thumb|center|'''Figure 602-52 Label test header (dowel bar number, direction of paving, front and back of dowel bar). ''']] | ||
| + | |||
| + | |||
| + | |||
| + | [[File:602-53.jpg|800px|thumb|center|'''Figure 602-53 Test header cut in two sections. ''']] | ||
| + | |||
| + | |||
| + | |||
| + | [[File:602-54.jpg|800px|thumb|center|'''Figure 602-54 Don’t cut test header in 4ft sections. Not able to get accurate measurements with saw cuts. ''']] | ||
| + | |||
| + | |||
| + | |||
| + | [[File:602-55.jpg|800px|thumb|center|'''Figure 602-55 It would be best practice for the Contractor to cover the test header with insulated blankets (helping the concrete gain strength) when the test header is planned to be removed in less than 12 hours (especially when the ambient temperature is less than 60 degrees Fahrenheit), so adjustments on the DBI Unit can be made before the next day of production. Care needs to be taken when removing test headers. The Contractor will generally remove the test header with the forks on a loader. Also note, if the test header is too green and lifted too high with the loader forks, it will likely break around the dowel bars (the Contractor should just drag back the test header on the grade and leave enough clearance to measure the test header). ''']] | ||
| + | |||
| + | |||
| + | |||
| + | [[File:602-56.jpg|800px|thumb|center|'''Figure 602-56 Measuring horizontal alignment. ''']] | ||
| + | |||
| + | |||
| + | |||
| + | [[File:602-57.jpg|800px|thumb|center|'''Figure 602-57 Measuring vertical alignment. ''']] | ||
| + | |||
| + | |||
| + | |||
| + | [[File:602-58.jpg|800px|thumb|center|'''Figure 602-58 MIT-Dowel Scan. ''']] | ||
| − | |||
| − | |||
| − | + | [[File:602-59.jpg|800px|thumb|center|'''Figure 602-59 MIT-Dowel Scan real time imaging and results.''']] | |
| − | |||
| − | |||
| − | + | [[File:602-60.jpg|800px|thumb|center|'''Figure 602-60 MIT-Dowel Scan data shown on an excel spreadsheet. ''']] | |
| − | |||
| − | |||
| − | |||
| − | |||
{{top}} | {{top}} | ||
| + | |||
| + | |||
====[[#Expansion Caps|Expansion Caps]]==== | ====[[#Expansion Caps|Expansion Caps]]==== | ||
| − | + | In general sawed contraction joints will slowly open over time as silt and fine sand infiltrate the joints and cracks and prevent them from fully closing. Therefore, expansion joints are installed intermittently and at strategic locations to absorb this movement. Special caps are used on ends of dowels at expansion joints to accommodate future joint closing or compression over time. Expansion caps must be securely placed on opposite unwelded ends of the bars, with 1 inch space left between the end of the bar and the inside of the cap. Most expansion caps have inverted dimples 1 inch from end of cap as an indicator (See Figure 602-61). When using the slipform paving method, the outside 4 inches of the expansion felt will be removed and replaced after the paver goes. | |
| + | |||
| + | |||
| + | [[File:602-61.jpg|800px|thumb|center|'''Figure 602-61 Expansion Cap. ''']] | ||
| + | |||
| + | |||
| + | {{top}} | ||
| + | |||
| + | ====[[#Expansion Joint Filler|Expansion Joint Filler]]==== | ||
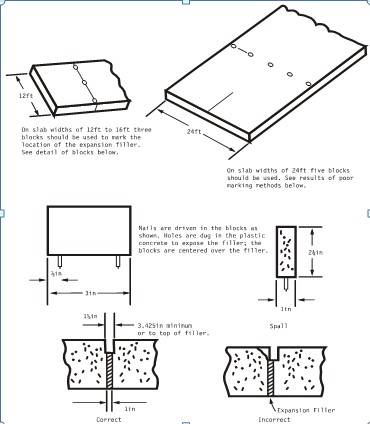
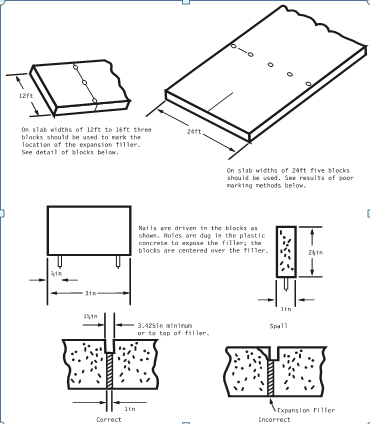
| − | + | During final finishing operations. The previously removed 4-inch end section of the expansion filler material should be replaced and the concrete consolidated around the joint filler. The expansion joint filler location should also be marked for sawing at a later date. The best method of doing this is by working from a bridge spanning the pavement. The expansion filler top is exposed in about five locations across a 24-ft pavement by using a small trowel to remove the concrete. A small block is then placed on top of the expansion filler. The block should extend to the surface and be held in place by nails extending into the filler. Later the joint is sawed out from block to block (See Figure 602-62). | |
| − | |||
| − | [[File: | + | [[File:602-62.jpg|800px|thumb|center|'''Figure 602-62 Transverse Expansion Joints. ''']] |
| − | |||
{{top}} | {{top}} | ||
| + | |||
===[[#Production Paving Projects|Production Paving Projects]]=== | ===[[#Production Paving Projects|Production Paving Projects]]=== | ||
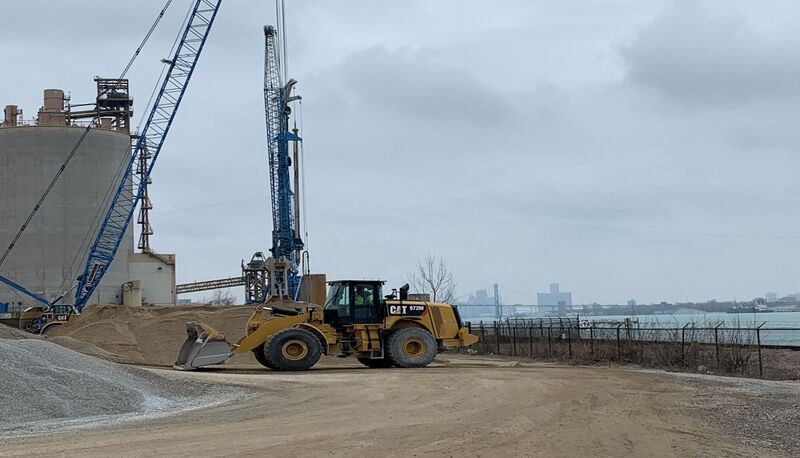
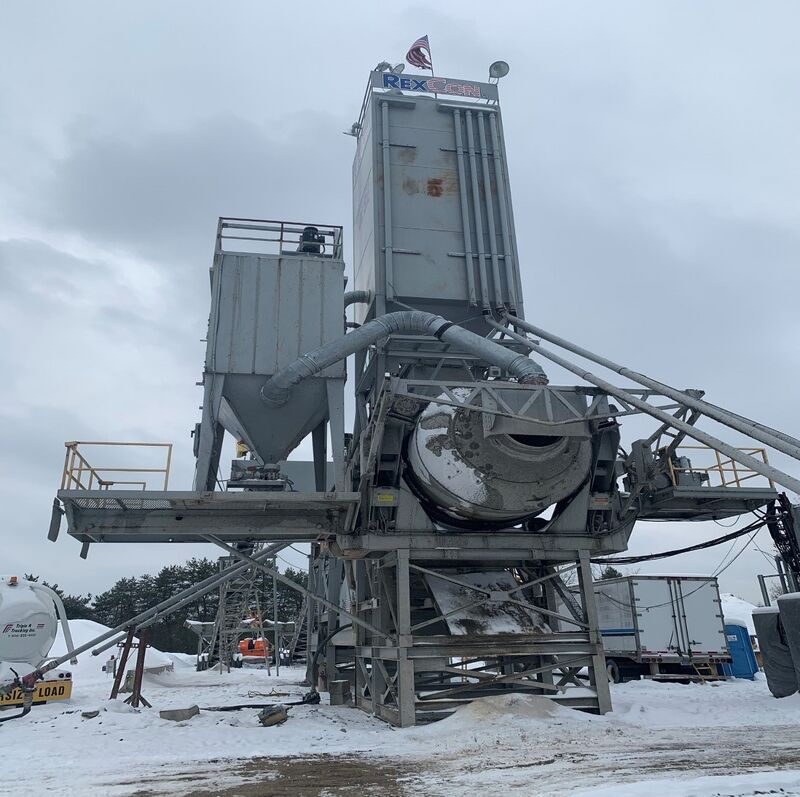
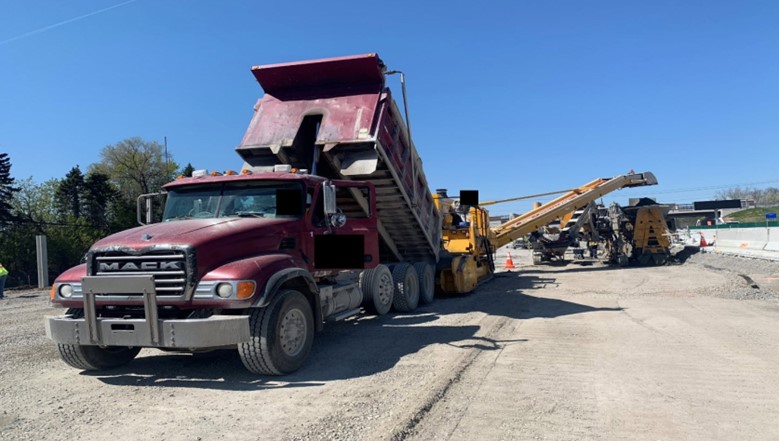
| − | Concrete will be produced in a central mix plant. | + | Concrete will be produced in a central mix plant. Production paving projects will typically be set up with a portable concrete batch plant (See Figure 602-63). Concrete will be transported to the job site in concrete hauling units (dump trucks or agitator trucks) (See Figures 602-64 and 602-65). The allowable haul time will depend on the type of hauling unit and the concrete temperature, as stated in subsection 1001.03.E.3. |
| + | |||
| + | The contractor will provide a ticket system to record the batch numbers with information required by subsection 1001.03.A.3. The inspector collecting the concrete tickets from the concrete hauling units needs to verify the batch weights of the materials are within the required tolerances of subsection 1001.03.A.2 and match the weights of the Job Mix Formula and Optimized Gradations. | ||
| + | |||
| + | |||
| + | [[File:602-63.jpg|800px|thumb|center|'''Figure 602-63 Portable Concrete Batch Plant. ''']] | ||
| − | |||
| − | |||
| − | + | [[File:602-64.jpg|800px|thumb|center|'''Figure 602-64 Concrete Open Trucks (Dump Truck). ''']] | |
| − | + | ||
| + | |||
| + | [[File:602-65.jpg|800px|thumb|center|'''Figure 602-65 Open Top Agitating Units. ''']] | ||
{{top}} | {{top}} | ||
| Line 219: | Line 490: | ||
====[[#Dual Lane Operation|Dual Lane Operation]]==== | ====[[#Dual Lane Operation|Dual Lane Operation]]==== | ||
| − | |||
| − | + | The concrete spreading operation should be kept reasonably close to the pavers so no more than 30 minutes elapse between layers of concrete, or between placing and finishing the concrete (See subsection 602.03.D). | |
| − | A lane tie bar installer is often mounted on the rear and in the center of the | + | Tie bars are placed at the center longitudinal joint. A lane tie bar installer is often mounted on the rear and in the center of the paver. It will place reinforcement bars of proper length and diameter according to Standard Plan R-41 Series. |
| − | + | An Inspector should check the spacing of bars as soon as possible after paving starts. Check the bar depth after finishing operations are complete, as they have a tendency to settle due to the vibration of paving equipment. This is done by using the work bridge to access the longitudinal joint between lanes. | |
| + | |||
| + | {{top}} | ||
| + | |||
| + | |||
| + | ====[[#Slipform Pavers/Riding Finishing Machine|Slipform Pavers/Riding Finishing Machine]]==== | ||
| + | |||
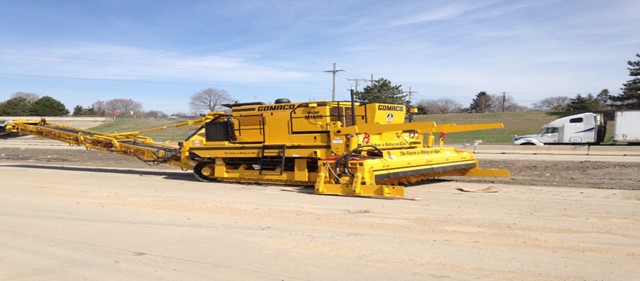
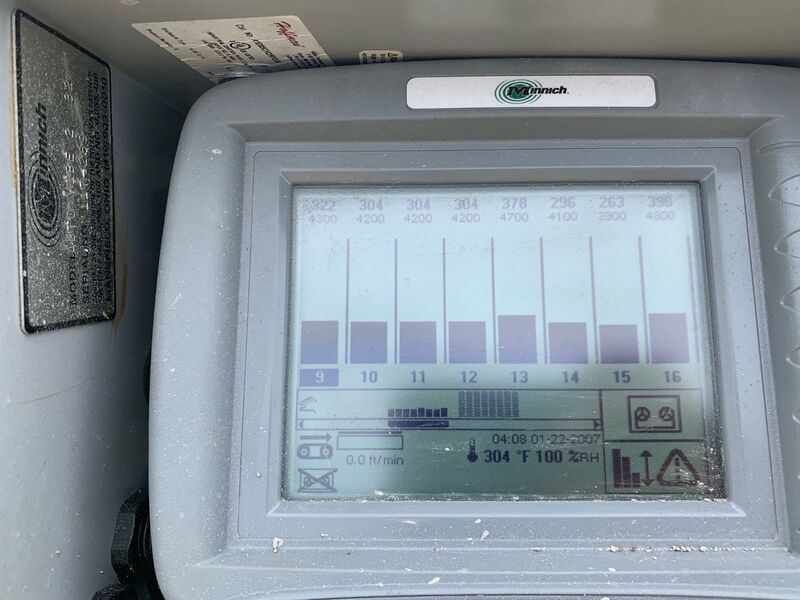
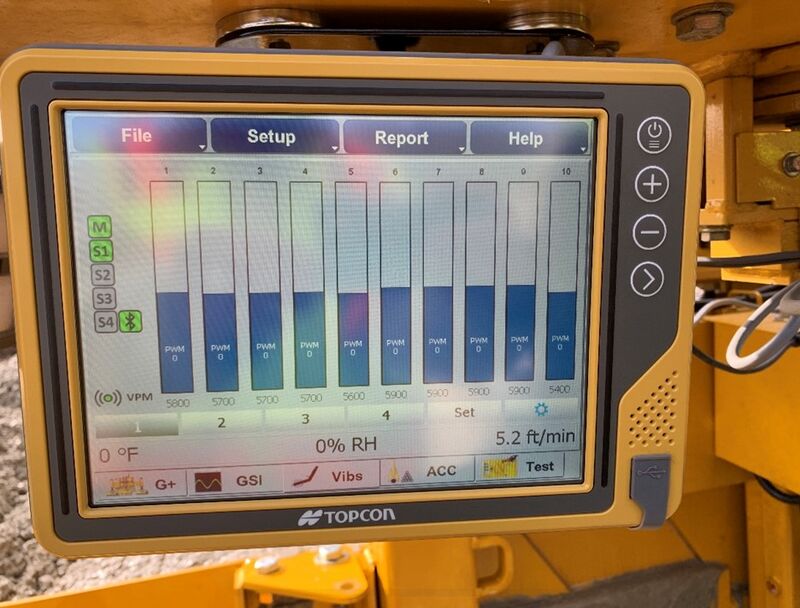
| + | The slipform paver uses a lower slump concrete to minimize edge slump. Therefore, full width vibrators are necessary to eliminate all internal honeycombs. Contractors should have a vibrator monitor system as required by subsection 602.03.A.7 (See Figure 602-66 and 602-67). | ||
| + | |||
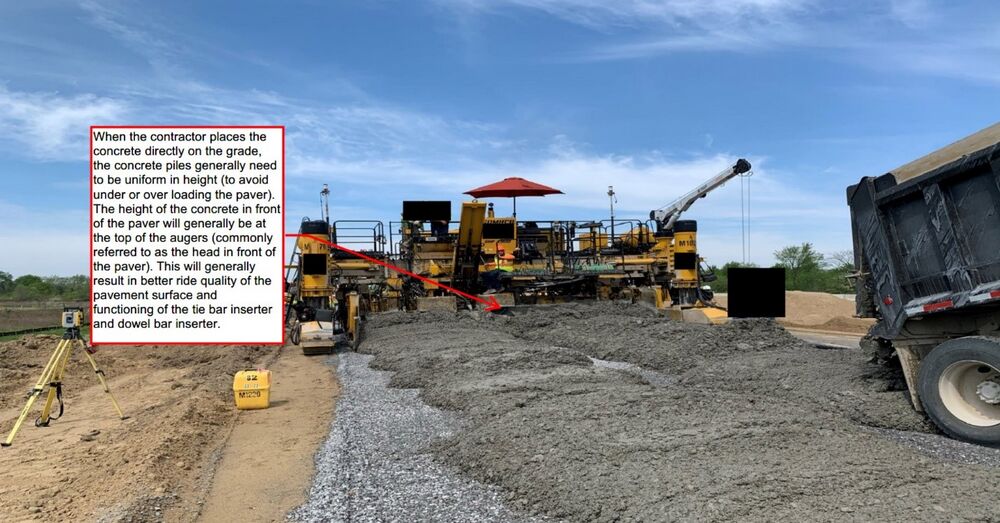
| + | It is important that the slipform paver, or finishing machine, has the correct recommended concrete amount in the screed, or strike-off plates, to prevent overloading that can cause slipping of the track or drive wheels. Drive train slippage will typically result in chatter bump type irregularities on the pavement surface. Also, an inadequate amount of concrete placed in front of the pavers screed will result in low-spot type irregularities on the pavement surface (See Figure 602-68 and 602-69). | ||
| + | |||
| + | Form riding finishing machines, and some slipform pavers, have two oscillating screeds that shape the surface of the concrete. For the best results, the front screeds should have about an 8 inch roll of concrete in front of it. The second should have a smaller roll, about 4 inches. A slow, steady forward movement with a uniform supply of concrete in front of the type of finisher will produce the best surface finish. Slipform pavers are equipped with extrusion plates to form and finish the concrete. Slipform pavers are equipped with spray bars to add water as an aid to finishing but the addition of water should be kept to a minimum. Adding too much water to the surface is to be avoided as it can result in a low strength high shrinkage thin surface zone that can be subject to thin delamination and scaling distress. The contractor should attach burlap to the slipform paver and spray water on the burlap, rather than directly on the fresh concrete surface (See Figure 602-70). | ||
| + | |||
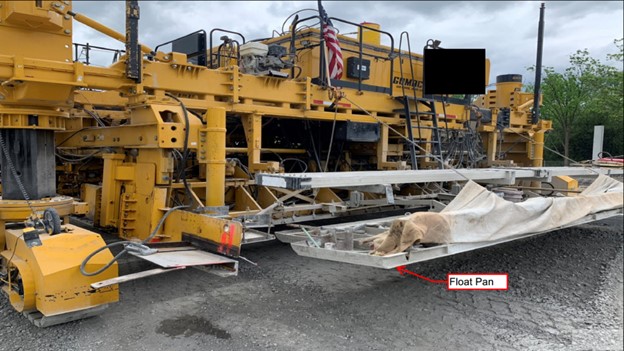
| + | If a pan float, or other mechanical float, is used behind the slipform paver or the finishing machine, it should leave the concrete surface in a substantially finished condition (See Figure 602-71) | ||
| + | |||
| + | Some slipform paving machines are equipped with transverse screeds for additional floating. Tears or open areas indicate improper screed adjustments, inadequate vibration or perhaps a harsh mix. Attempts to correct the equipment should be made before changing the mix. | ||
| + | |||
| + | The slab edge condition being created should be evaluated immediately behind the slipform paver. The edge forming equipment (edgers) used on the paver can be adjusted to minimize edge slump. When the concrete leaves the trailing edge of the edgers, it should slump down and out to the proper width and elevation. Because concrete does move or slump in this way, it is essential to maintain a uniform slump from load to load to match the edger settings. Conventional edgers should be used to round the top corner. It should be left with a radius not exceeding 1/4-inch. Edge slump should be rechecked with the 5-ft straightedge behind all finishing operations. Any edge slump exceeding 3/8 inch should be corrected before the concrete sets. If continuing slumps of up to 1/4-inch occur, the Contractor should adjust the edgers on the trailing end of the side forms to eliminate the slump. | ||
| + | |||
| + | After machine finishing, the slab surface should be checked by the Contractor’s finisher using a 10-ft straightedge and the 5-ft lap method of straight edging. Any high or low areas indicated by the straightedges are to be corrected. The areas needing correction may be hand floated, if necessary, to seal the surface. On slipform paving, the finisher should stop the straightedge about 4 to 6 inches from the edge to keep the edge from slumping due to the added weight of the straightedge. | ||
| + | |||
| + | [[File:602-66.jpg|800px|thumb|center|'''Figure 602-66 Vibration Monitor System (Minnich). ''']] | ||
| + | |||
| + | |||
| + | |||
| + | [[File:602-67.jpg|800px|thumb|center|'''Figure 602-67 Vibration Monitor System (TOPCON). ''']] | ||
| + | |||
| + | |||
| + | |||
| + | [[File:602-68.jpg|1000px|thumb|center|'''Figure 602-68 Placing concrete in front of the paver. ''']] | ||
| + | |||
| + | |||
| + | |||
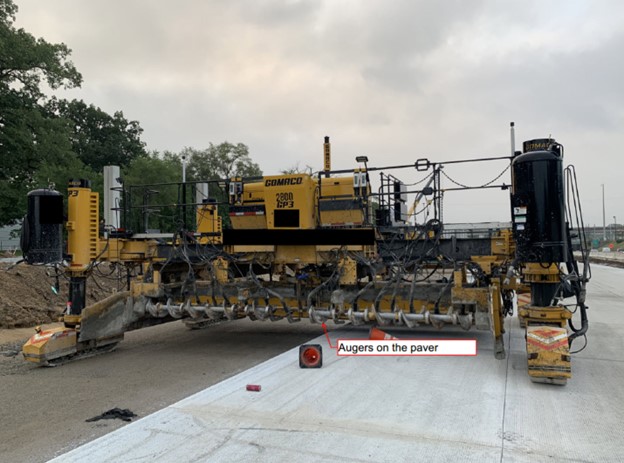
| + | [[File:602-69.jpg|1000px|thumb|center|'''Figure 602-69 Location of the augers on the paver. ''']] | ||
| + | |||
| + | |||
| + | |||
| + | [[File:602-70.jpg|1000px|thumb|center|'''Figure 602-70 Float Pan. ''']] | ||
| − | |||
{{top}} | {{top}} | ||
| − | ====[[# | + | ====[[#Concrete Overlay|Concrete Overlay]]==== |
| + | |||
| + | Concrete overlays can be used over existing asphalt or concrete pavements. MDOT uses what are referred to as bonded and un-bonded overlay designs. Unbonded designs use bond breaker layers to allow the new concrete slabs to detach from the layer below, while bonded designs may use cementitious bonding layers to develop a long-term bond between the new and old pavements. In recent years mostly un-bonded type designs have been used. The design thickness values for overlays typically range from about 4 to 10 inches. Thin overlays, less than about 6 inches, typically do not use steel bars or dowels, but use special fiber reinforcements in the slabs along with short slabs with saw cut spacings less than about 6 feet. Overlays greater than about 6 inches typically do use dowel and tie bars for joints in the design and often use longer slabs with saw cut spacings up to about 12 feet. | ||
| + | |||
| + | The existing pavement typically undergoes surface preparation and repairs that could include milling/abrading of the surface, cleaning, HMA or concrete joint repairs. The prepared surface is then overlaid with a bituminous/asphalt or wax type bond breaker layer, or a layer of separation geotextile fabric before the new concrete surface is paved (See Figure 602-71 and 602-72). In some cases, where grades permit, a layer of HMA, 1 to 3 inches in thickness is placed as what is called a stress relieving interlayer (SRI) over the original pavement to develop stronger and more uniform support for the new overlay. | ||
| + | |||
| + | Random unscheduled daily yield checks, using the random number sheet, on the volume produced by the batch plant should be performed to verify the amount of concrete produced per batch by comparing the apparent yield thickness or distance to actual thickness or distance measurements. This volumetric yield check can then be applied to all batches leaving the plant and compared to the computed total volume placed during the day’s production. The yield check can provide a simple verification of the batch ticket volume printed by the batch plant. This procedure should be part of the Contractor’s quality control plan and periodically verified through MDOT quality assurance testing where appropriate. This method of checking the volume of concrete should be used wherever concrete is being paid for by volume. | ||
| + | |||
| + | |||
| + | [[File:602-71.jpg|1000px|thumb|center|'''Figure 602-71 Concrete overlay with HMA bond breaker layer. ''']] | ||
| + | |||
| + | |||
| + | |||
| + | [[File:602-72.jpg|1000px|thumb|center|'''Figure 602-72 Concrete overlay with HMA bond breaker layer. ''']] | ||
| + | |||
| + | |||
| + | {{top}} | ||
| + | |||
| + | ====[[#Grade Control|Grade Control]]==== | ||
| + | |||
| + | Grade control is critical when paving a concrete overlay. Overruns can be controlled by monitoring the grade of the surface the overlay is to be placed on prior to paving the bond breaker layer and the overlay. Recorded string line depth checks on the grade control prior to paving the overlay are important to monitor the volume of concrete to be placed and keep it close to the actual plan quantity. | ||
| + | |||
| + | Grade control is again the critical item for controlling Contractor material quantities, and final profiles when paving miscellaneous concrete. Smaller miscellaneous areas are typically formed prior to paving miscellaneous concrete. The forms can benefit the grade control process. However, matching the grades in approaches, and ramp gore areas can lead to pavements that do not drain properly or have a rough initial ride quality for the public. | ||
| + | |||
| + | If not included in the plans, a set of detailed grades should be computed and plotted prior to the beginning of the project to attempt to alleviate grade problems. The detailed grades should be computed from the plan profiles for the adjacent pavement. After the grades are computed, they should be plotted to determine the proposed gore/approach cross sections prior to beginning the project. If the detailed grades are determined prior to paving, the Inspector and Project Engineer can typically fine tune adjust the mainline and/or ramp grades to tie-in better and provide smoother transitions for gores and approach pavement. | ||
| + | |||
| + | |||
| + | {{top}} | ||
| + | |||
| + | ====[[#Concrete Texturing|Concrete Texturing]]==== | ||
| + | |||
| + | Following floating, the surface is to be textured longitudinally with a burlap drag (see subsection 602.03.K). Even though the final grooving (tining) will be created by metal tine rakes, it is important that the slab be properly textured initially with burlap to give the surface a slightly roughened micro-texture, gritty texture with exposed sand grains, to better interact with tire rubber for friction. | ||
| + | |||
| + | About 36 to 60 inches of burlap width should be in contact with the pavement surface as it is dragged. Two layers of burlap may be required to impart a suitable gritty surface. The burlap should be cleaned of built-up mortar intermittently as needed, at least daily, and replaced when it is no longer effective. It should be kept moist to avoid dry burlap from absorbing water from the concrete surface. | ||
| + | |||
| + | When slipform paving, it is better not to have the burlap drag extend over the edges, as it may cause the concrete to edge-slump or tear the edges. The outer 4 inches of the surface near the edges should be hand dragged by the finishers doing the edging. | ||
| + | |||
| + | A strip of artificial turf grass mat may be used as an alternate to burlap and in some low-speed traffic areas a turf drag is the final texturing used for the surface. After the burlap/turf drag process, concrete surface in higher speed traffic areas are typically grooved transversely or longitudinally with a steering controlled texturing machine to achieve better high speed hydroplaning resistance. A manual texturing device, often a hand-held tinning rake, may be used for small area miscellaneous pavement. The Contractor must place grooves with a width and depth of ⅛-inch, with a tolerance of 1⁄32-inch, spaced ¾-inch on center with a tolerance of 1⁄16-inch. Do not groove the pavement surface within 1½ inches of longitudinal joints. Grooves should not be overlapped. Overlapping decreases the spacing, which results in tearing and dragging of fresh concrete along the surface during texturing. The grooves should be installed in one continuous pass across the entire pavement surface. Do not allow grooves to dig too deep as this can start to move coarse aggregates present near the top of the fresh concrete and cause tearing/dragging of the fresh concrete surface resulting in reduced ride quality numbers and unnecessary tire-pavement noise and damage to the concrete surface. Grooves that are too shallow can have reduced tire hydroplaning resistance during heavy rain events. | ||
| + | |||
| + | Texturing operations shall not delay curing. Timely application of curing compound is critical to the final strength and durability of the concrete pavement. Proper and timely application of the curing compound must take precedence over texturing the surface with the texture machines or rakes. If texturing has to be delayed, it will have to be cut into the surface at a later date when the concrete has attained the minimum required design strength. When texturing is delayed, the Contractor shall submit a plan for the Engineer’s approval for texturing the pavement after the concrete has reached the strength required and describing groove cutting equipment and slurry collection procedures. This work shall be at the Contractor’s expense. Therefore, it is imperative that the texture operations stay close to the fresh concrete placement operations and not fall critically behind because the cost of mobilizing a diamond cutting blade type groove cutting operation after the fact is high. | ||
| + | |||
| + | |||
| + | |||
| + | {{top}} | ||
| + | |||
| + | |||
| + | ====[[#Grooving Device|Grooving Device]]==== | ||
| + | |||
| + | The grooving device or texturing machine must be a tracked machine accurately adjusted to the crown and the pavement slope to provide uniform contact force and attack angle between the metal tines and the pavement. It must also be adjusted to lift off the pavement just as the tine head reaches the fresh concrete slab edge to avoid breaking down the edges when slipform paving. Check the grooving shapes periodically to see that the operator is obtaining a uniform surface, with groove depths from 1/8 to 1/4 inch. Following grooving, the Contractor is to stencil station numbers in the fresh concrete pavement at 16 inches from the edge of the pavement so the roadway station numbers can be read when driving on the shoulder in the direction of traffic (see subsection 602.03.L.) | ||
| + | |||
| + | {{top}} | ||
| + | |||
| + | ====[[#Membrane Curing|Membrane Curing]]==== | ||
| + | |||
| + | Membrane curing compound is to be applied as soon as the free water from the concrete mixture has left the surface to trap remaining water in place and prevent drying or desiccation of the surface. Often the same machine is used for texturing and applying the curing compound. In this case, the membrane is applied immediately following texturing. In some cases, separate texturing and curing machines are used and curing machines can fall behind paving and texturing. In all cases texturing and curing operations need to stay close to the paver and not fall behind to a point where concrete set or surface drying is occurring. Getting the curing compound applied at the proper time overrules texturing operations. For example, if the texturing operations are having difficulties or breakdowns, curing operations must proceed without texture grooving and texture grooves will have to be cut into hardened pavement at a later date. | ||
| + | |||
| + | The Contractor must mix the curing compound before use according to the manufacturer’s recommendation before the compound is transferred from the drums to the tank on the curing machine. It should be constantly re-circulated or stirred during application. | ||
| + | |||
| + | One coat is required for non-textured surfaces and two coats on grooved surfaces. Coverage is to be a minimum of 1 gallon per 25 square yards for each coat. The slab edge sides should be spray cured promptly if the forms are removed before the required strength is met. Depending on the wind, sometimes the curing compound may have to be applied in two different directions to get proper coverage. The final coverage should achieve full coverage without obvious darker reflections from below due to low coverage or poor spray nozzle function. | ||
| + | |||
| + | |||
| + | |||
| + | {{top}} | ||
| + | |||
| + | ====[[#Header Joints|Header Joints]]==== | ||
| + | |||
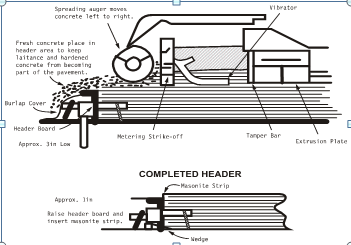
| + | A daily paving operation is normally ended using a transverse contraction or expansion joint and a night header is installed. An adjustable header board (See Figure 602-73, 602-74, and 602-75) is staked at the center of the load transfer device assembly. The header top should be left at least ½ inch below the pavement surface and the finishing equipment passed over the header. | ||
| + | |||
| + | The area adjacent to the header must be filled with fresh concrete. However, partially hardened concrete, or laitance, carried in the vibratory box shall not be used in this area. Just before the finishing equipment passes over the header, the concrete adjacent to the header should be vibrated with a handheld vibrator. It is a good idea to spread burlap or plastic over the projecting ends of the dowels to facilitate cleanup of excess concrete. | ||
| + | |||
| + | Since the header board may not match the crown of the pavement, Contractor’s often insert pieces of ¼ inch Masonite board behind the header board and adjust it to the exact elevation of the finished pavement after the finishing equipment has passed over the header joint. The finishers will now be able to straightedge the pavement up to and across the header. | ||
| + | |||
| + | When slipform paving, the last 10 feet or so of the longitudinal bulkhead joint adjacent to the header should be formed to prevent the slab from becoming over width. An over width section will cause spalling of the edge when the paver is backed to the header. | ||
| + | |||
| + | A transverse end of pour joint is also acceptable and is commonly referred to as a runoff header or plastic tube header. See the Standard Plan R-39 series for details. A transverse end of pour joint runoff header includes a plastic tube basket that is pinned to the grade. Concrete is placed and vibrated through the runoff header and beyond it by at least 5 feet. Once the concrete has hardened, a joint, centered over the plastic tube basket, is sawn full depth and the concrete is removed on the waste side to provide a clean smooth face against which the next day’s paving operation can start. Smooth dowel bars are installed in the plastic tubes and paving resumes. | ||
| + | |||
| + | When paving resumes, the Contractor needs to use care as they pull away from the header to avoid damaging the green concrete. As the slipform paver or finishing machine starts forward, there is a tendency for the concrete to cling to the screeds and the float pans, leaving the surface low in these areas. After the concrete is placed, the header should be thoroughly vibrated to eliminate voids. It is important that the Contractor straightedge this area carefully. | ||
| + | |||
| + | Date and stationing should be stenciled in the concrete by the Contractor, on the night and morning sides of the header. | ||
| + | |||
| + | |||
| + | |||
| + | [[File:602-73.jpg|1000px|thumb|center|'''Figure 602-73 Header Board. ''']] | ||
| + | |||
| + | |||
| + | |||
| + | [[File:602-74.jpg|1000px|thumb|center|'''Figure 602-74 Header Board. ''']] | ||
| + | |||
| + | |||
| + | |||
| + | [[File:602-75.jpg|1000px|thumb|center|'''Figure 602-75 Header Board. ''']] | ||
| + | |||
| + | |||
| + | |||
| + | {{top}} | ||
| + | |||
| + | ===[[#OPENING TO TRAFFIC|OPENING TO TRAFFIC]]=== | ||
| + | |||
| + | Often the Contractor will want to use the new pavement as a haul road for heavy construction trucks at the earliest possible time, or want to place a wheel or track on new pavement edge to pave the adjacent lane. Other times it will be important to open an intersection or drive to traffic as soon as possible. The concrete strength tests must show that the concrete has reached a minimum strength limit, or maturity before heavy vehicles are allowed. | ||
| + | |||
| + | The Inspector and Contractor should try to anticipate the need for early openings and arrange to make an extra set of test beams when the concrete in question is being cast. These test beams should be cured under environmental conditions as similar as practical to the pavement being cast. | ||
| + | |||
| + | Follow [https://mdotwiki.state.mi.us/images_construction/9/95/2020-Standard-Specifications-Construction.pdf#page=65 Table 104-2 in subsection 104.11.B.4] of the Standard Specifications for Construction, to determine when equipment may be allowed on the pavement. No load is to be permitted on the pavement until the centerline joint is sawed, the contraction joints relief cut, the expansion joints sawed out to full width and temporary or permanent seals installed. Curing is to be continued until a flexural strength of 550 psi has been obtained. | ||
| + | |||
| + | When job control beam strength results are not available, the curing membrane surface treatment film is not to be disturbed or broken by Contractor’s equipment or other traffic until the concrete has attained 70 percent of the required minimum strength as determined from the [https://mdotwiki.state.mi.us/images_construction/9/95/2020-Standard-Specifications-Construction.pdf#page=64 table 104-1]. | ||
| + | |||
| + | |||
| + | |||
| + | |||
| + | {{top}} | ||
| + | |||
| + | ===[[#PAVEMENT CORING|PAVEMENT CORING]]=== | ||
| + | |||
| + | MDOT will take cores, before final acceptance, from pavement, shoulder, and base course to determine the thickness of the pavement according to [http://www.michigan.gov/documents/mdot_MTM_CombinedManual_83501_7.pdf MTM 201]. Refer to [https://mdotwiki.state.mi.us/images_construction/9/95/2020-Standard-Specifications-Construction.pdf#page=342 subsection 602.04]. | ||
| + | |||
| + | {{top}} | ||
| + | ==[[#INSPECTION & TESTING|INSPECTION & TESTING]]== | ||
| + | |||
| + | The State-Wide Concrete Paving Specialist will visit the project when paving starts to assist in determining equipment suitability, to discuss other concrete related items and to assist with getting the project properly started. | ||
| + | |||
| + | {{top}} | ||
| + | |||
| + | ====[[#Inspection During and Following Concrete Placement|Inspection During and Following Concrete Placement]]==== | ||
| + | The Inspector should review the trimming, placing, spreading, consolidation, finishing, texturing and curing equipment the Contractor plans to use to see if it is appropriate for the quantity and type of paving included on the project. Screeds and pan floats must be checked for proper slope adjustment. | ||
| + | |||
| + | The Inspector should verify that the curing compound sprayer is in proper working condition before paving starts. If in doubt, the Contractor should demonstrate its capability. Check to see that the Contractor has all the necessary hand tools, such as 5 foot and 10 foot straightedges, floats, edgers, and stencils. If forms are used, they should be checked for straightness, general condition, condition of locks, etc. before form setting operations begin. | ||
| + | |||
| + | Collect and maintain all concrete delivery tickets each day. At completion of a pour, tabulate the tickets to determine the total concrete received. Compare this to the theoretical measured amount placed to compute the overrun or underrun. The cause of any underrun should be determined and corrections should be made immediately. Possible causes include too thin or thick pavement, narrow width of slab, incorrect measurements or improper scale readings at the concrete plant. | ||
| + | |||
| + | Night header joints should receive the Inspector’s attention, as they are often the location of bumps in the finished pavement. Stretch a string line parallel to the centerline from 10 feet behind the header to 30 feet in front to check the header for the need of corrective work in the start-up area while the concrete is plastic. | ||
| + | |||
| + | Inspect the previous day’s pavement for uniformity of texturing and curing. Have areas been missed, or textured too shallow or too deep? Are there thin spots or streaks in the curing membrane? Has the edge of the slab been completely coated with curing compound? Check for any honeycomb in the edge and have it patched. It is recommended to monitor the texturing operation when started. This will aid the Contractor in providing a quality product everyone will be satisfied with. | ||
| + | |||
| + | Within about 24 hours after placement, the relief sawing of the transverse joints should be complete or in progress. Look for any random cracks in the new pavement that would indicate sawing was not completed in a timely manner. Also, look at the relief saw cuts for excessive raveling, indicating they were sawed too soon. Check for correct depth of the saw cuts. | ||
| + | |||
| + | When sawing of the joints to final width begins, the Inspector should check on the width and the depth (Standard Plan R-39 series). The location of saw cuts for contraction joints should be over the centerline of the load transfer assembly. It is important that the expansion joint saw cuts be made exactly over the expansion felt. This is accomplished by sawing from block to block as explained under Placing and Finishing the Concrete. | ||
| + | |||
| + | The centerline longitudinal joint will be sawed within 24 hours, but not until the concrete has hardened sufficiently so that no raveling or spalling occurs. All traffic must be kept off the pavement until the longitudinal joint has been sawed. Since the upper 1 inch of the longitudinal joint must be sawed a minimum of 1/4 inch wide, and the lower one-third need only be 1/8 inch wide, the Contractor will often use two saws operating in tandem. (Standard Plan R-41 series). | ||
| + | |||
| + | Once the joints are sawed, the sawing slurry is to be immediately cleaned up and removed and the joint saw cuts are sand blasted, or air blasted and cleaned in preparation for sealing. The joints will typically be sealed with hot poured rubber. | ||
| + | |||
| + | |||
| + | {{top}} | ||
| + | |||
| + | |||
| + | ====[[#Hot and Cold Weather|Hot and Cold Weather]]==== | ||
| + | |||
| + | During hot weather, additional precautions must be taken to obtain high quality pavement. Concrete placement is prohibited when the concrete temperature exceeds 90°F. Even with concrete temperature at 80°F, it may be difficult for the final finishing and texturing to be completed before the concrete hardens. The warmer it is outside, the faster the concrete will set up. Under warm dry conditions, there is often a strong desire by the Contractor’s finishers to add water to the pavement surface to lubricate their floats and straightedges. Any water added is to be in the form of mist from a fog sprayer. This limits the amount of water added and minimizes dilution of the cement paste on the concrete surface. | ||
| + | |||
| + | For hot weather conditions, the Inspector should refer to Table 706-1 of the Standard Specifications for Construction. This table gives evaporation rates for conditions for paving concrete based on air temperature, concrete temperature, relative humidity, and wind velocity. If the evaporation rate exceeds 0.15 lbs/ft2/hr from the table, then the Contractor should not pave. In any combination of weather conditions, the Contractor must be able to ensure to the Department that they can prevent premature drying of the pavement surface during the paving process. | ||
| − | + | In extreme weather conditions, timely application of the curing compound is not always the complete solution to preventing premature drying of the pavement surface. Extreme weather conditions can require additional steps to aid in the prevention of premature surface drying and other adverse effects caused by hot weather. Continuous, constant temperature moist curing, covering the entire surface of the pavement with continuously wet burlap, and reducing the concrete mix temperature (cement, aggregate, and/or water temperature) are examples of other options for helping reduce the impact of hot weather on concrete pavement. Except for when continuous moist curing is used, the curing compound should still be applied when using these options for paving in hot weather. The Contractor’s Quality Control Plan must be reviewed before paving begins. The Quality Control Plan must contain adequate detail regarding the plan for properly curing the concrete in accordance with MDOT standards. | |
| − | + | Protection from cold weather is the Contractor’s responsibility. The Standard Specifications allow use of plastic tarps as cover when temperatures are expected to be below 40 during curing. If temperatures below freezing 32 degrees are forecast during the curing period, the contract is required to use heavy insulating blankets for frost protection. Although concrete will withstand brief periods below freezing temperature curing, it is considered good practice to provide a protective covering of insulated blankets when freezing temperatures are anticipated. When cold weather is anticipated, the pavement should be covered as soon as possible. However, the pavement must be able to support the weight of the insulating blankets without damaging the surface. | |
| − | + | If the Contractor neglects to cover the pavement in a timely manner and the temperatures drop below freezing during the curing period, the Inspector should note the areas involved and notify the Engineer. Concrete exposed to freezing during curing will typically exhibit rapid scaling of the exposed surface and limited strength development, perhaps not meeting minimum requirements even when a good mixture was used due to ice damage. Arrangements can be made to take special cores from the area in question to determine whether the concrete has been damaged. | |
| − | |||
| − | + | {{top}} | |
| − | + | ====[[#Rain Damage|Rain Damage]]==== | |
| + | Protection from damage by rain is the Contractor’s responsibility and the Inspector should avoid giving the Contractor any instructions as to covering the concrete, or other protective measures. If the Contractor is unable to texture the pavement, or the texture is washed away, they will be required to groove the hardened concrete if the rain damage was limited to the pavement surface. | ||
| − | + | If serious rain damage occurs, such as breaking down of slipformed edges or erosion of the surface by water running off the pavement, repairs should be made as soon as the rain stops. Water on the surface will not be allowed to be worked into the concrete. The Quality Control Plan needs to provide adequate detail regarding an immediate (at the time the pavement was damaged) corrective action for rain damaged concrete pavement. | |
| + | |||
| + | If the rain has damaged the curing membrane, this should be corrected by respraying the area after the rain has stopped and just as the free water evaporates. | ||
| − | |||
{{top}} | {{top}} | ||
| − | ====[[# | + | ====[[#Miscellaneous Paving|Miscellaneous Paving]]==== |
| + | |||
| + | In addition to the main paving operation, most projects will include some miscellaneous paving. This might be semi-production work on service roads or ramps. Other times it will involve strictly hand work at street intersections. The quantity of paving involved will dictate the type of equipment to be used. As with production pavement, the Inspector should verify that methods and equipment proposed are in acceptable working condition and appropriate for the type of paving. | ||
| + | |||
| + | Trimming the base will usually be a combination of a road grader and hand methods. Forms are used for hand work. Radii of less than 150 feet will require flexible forms (see [https://mdotwiki.state.mi.us/images_construction/9/95/2020-Standard-Specifications-Construction.pdf#page=327 subsection 602.03]). Concrete may be placed without a spreader providing it can be placed with no segregation. | ||
| + | |||
| + | All areas along forms and joints will be consolidated with a vibrator. The vibrator will be inserted vertically into the concrete to ensure complete consolidation and will not be used to move the concrete. Screeding of the surface will usually be by a form-riding finishing machine or a hand-pulled vibrating strike off. Sometimes roller screeds or lightweight slipform pavers are used. Straight-edge ride smoothness evaluation of gaps and other miscelaneous areas subject to high-speed traffic is important. A string line check of these areas is also helpful. | ||
| − | + | Burlapping, groove texturing, and curing will normally be done with handheld equipment. Make sure grooving is done in one continuous pass from edge to edge. Do not permit grooving each way from the centerline, as a poor appearance will result. | |
| − | + | Applying the curing compound will be done from a bridge or by using a boom so uniform coverage can be obtained. | |
| − | |||
{{top}} | {{top}} | ||
| − | |||
| − | + | ||
| + | |||
| + | |||
| + | |||
| + | |||
| + | |||
{{top}} | {{top}} | ||
| + | ----------------------------------------------------------- | ||
| + | |||
| + | |||
====[[#Grade Control|Grade Control]]==== | ====[[#Grade Control|Grade Control]]==== | ||
| Line 275: | Line 743: | ||
{{top}} | {{top}} | ||
| − | |||
| − | |||
| − | |||
| − | |||
====[[#Concrete Texturing|Concrete Texturing]]==== | ====[[#Concrete Texturing|Concrete Texturing]]==== | ||
| Line 598: | Line 1,062: | ||
[[Category:Construction Manual]] | [[Category:Construction Manual]] | ||
| + | [[Category:Division 6]] | ||
| + | [[Category:Section 602]] | ||
Latest revision as of 13:30, 8 May 2024
GENERAL
-Reserved-
MATERIALS
Acceptance of Materials
Before paving operations start, the paving Inspector should verify that the Contractor’s proposed materials to be incorporated in the pavement have been approved for use through testing or via pre-approved products lists as required for the contract. Most materials will be stockpiled in the Contractor’s yard on the project site. Also, this is often the location of the batching plant.
|
| |
|---|---|
|
|
When the load transfer assemblies arrive on the project site, call Region materials personnel so they can verify that the assemblies were built in accordance with the standard plans. Documentation of Acceptance by Region materials personnel is required. Figures 602-1 and 602-2 show load transfer assemblies stored on the job site. |
|
|
Check to see if the dowel bars and the fiber joint filler material are certified. Sampling and testing may be required. |
|
|
After the Contractor starts to set the load transfer assemblies on the grade, they must be visually inspected for:
|
|
|
The entire bar is to be coated with an approved epoxy coating to prevent corrosion, and the entire bar’s length is to be coated with an approved material to prevent concrete from adhering to the bar (typically beeswax). |
|
|
Any material of uncertain origin should be piled separately and not used until it is determined that it meets specification requirements. |
|
|
Visually inspect the handling and storage of all materials used in the concrete paving operation. |
|
|
Contractor must cover load transfer assemblies when they are to be stored on site for extended periods (more than 6 months). |
Straight and Bent Tie Bars
Tie bars should be checked for certification or sampled and tested when they arrive on a project. Straight Tie Bar examples (See Figure 602-4, 602-5, 602-6, 602-7). Bent Tie Bar examples (See Figures 602-8, 602-9, 602-10, 602-11, 602-12, and 602-13).
Curing Compound
- Check certification or sample and test each batch or lot.
- Material may be in drums or in a large tank. Inspection consists of seeing that the material is not contaminated or diluted and that it is mixed according to the manufacturer’s recommendations (See Figure 602-14).
- A curing compound should not be used when stored from one construction season to the next without resampling and testing.
- Check yield of material to confirm correct coverage. Proper coverage as soon as practical is important for reducing evaporation of the concrete mixture water from the top of the fresh concrete and for reducing/reflecting solar heat input into the pavement as the concrete sets and gains strength. Very high concrete temperatures at set and shortly after are generally not good in terms of expected long term performance for the concrete pavement due to potential for increased slab shrinkage and warping. For white membrane type curing compounds, coverage should result in a full white color without grey spots from underlying concrete reflecting through due to inadequate thickness or poor spray pattern or nozzles. During cold weather conditions, protect the curing compound from freezing as shown in Figure 602-15.
EQUIPMENT
Subsection 602.03 of the Standard Specifications for Construction sets forth the equipment requirements for the concrete paving operations. The specific equipment requirements described in the Standard Specifications have been reduced in the 2020 version of the Standard Specifications. Because equipment used today has become more precise and sophisticated, the Department is less concerned about the specific type or piece of equipment the Contractor uses and more focused on measuring and quantifying the results.
Equipment capacity and capability arriving at the job site will likely not be the same for a small urban widening project versus a high production rural interstate freeway project. For example, a small old paver may not be able to meet high initial smoothness specifications for an interstate freeway final pavement surface, and a new modern paver may be necessary to achieve a very smooth condition. If there are questions about the equipment condition and/or suitability, contact the Engineer or the MDOT State-Wide Concrete Paving Specialist.
PRECONSTRUCTION
Early in the construction project, at the pre-construction meeting, the Contractor will submit a formal proposed Materials Source List. This list may identify some of the proposed suppliers of products to be used in the pavement and offer an initial review. A minimum of 14 days prior to paving operations, the Contractor is to submit the official Quality Control Plan for Concrete. This document will include the proposed concrete mixture designs Job Mix Formulas (JMF’s) and information on proposed pavement placement and consolidation methods and procedures for verification of as-placed dowel and tie bar locations. It is best for the field engineer or technician to review the paving QC plan before construction begins as part of job planning. It is best to gather the internal project paving control team together for a project briefing to go over the proposed materials and procedures and required testing plans before the start of the paving.
CONSTRUCTION
Placing and Finishing Concrete
The Lansing Office concrete paving staff specialist will typically visit the project when paving starts to assist in verifying equipment suitability and troubleshooting related issues to get the project properly started. The daily paving inspector should note the trimming, placing, spreading, consolidation, finishing, texturing, and curing equipment the Contractor uses each day within the daily work reports, along with any unusual issues encountered with equipment or paving operations. The paving inspector must coordinate with the project and region materials control staff for quality assurance testing needed for the paving materials
Minimum Project Requirements
The Contractor will have determined how, using equipment or hand work, they will do the following:
- Trim the base to the required elevation grade.
- Deliver and place the concrete on the grade in a timely manner and without contamination or segregation as shown in Figure 602-16, 602-17, 602-18, 602-19, 602-20, 602-21, 602-22, 602-23, and 602-24.
- Install lane ties and dowel bars for joints, and other reinforcement as required.
- Consolidate and finish the concrete including straight edging and floating.
- Apply the required texturing and edge treatments to the fresh concrete surface.
- Apply the required curing procedures and products for the pavement, and
- Saw clean and seal the required joints.
Smaller concrete pour areas are often placed by hand and within stationary forms, rather than using formless ‘slip-form’ type paving techniques. More specialized concrete forms can serve the dual purpose of containing the plastic concrete and supporting a trackway for lightweight concrete placing and finishing equipment, such as roller screeds, to ride on.
Grade Condition
Proper subgrade preparation and high-quality subbase and base design and construction is the foundation to long lasting concrete pavements. The exposed subgrade area for the entire project needs to be evaluated and repaired/improved as necessary prior to placement of subbase and base layers or final pavements. When the stability of the subgrade is in question, the Engineer should consult with the region soils personnel for the proper solution. The Engineer will promptly inspect the grade to decide whether drying and re-compacting in place, undercutting and replacement of weak soil, or in-place lime/cement type subgrade improvement is necessary and determine the limits of subgrade stabilization (refer to subsection 205.03.E.). An effective method for determining the limits of undercutting is by test-rolling (proof rolling) the subgrade using a suitable heavy loaded vehicle. Test-rolling is a good procedure for visually determining the subgrades uniformity and stability. Refer to MDOT Wiki Division 2 - Section 205 for the procedure of test-rolling. Once weak areas are identified, the geotechnical evaluation team may use various procedures including test holes, test pits/excavations and probing devices such as the U.S. Army style dynamic cone penetrometer to determine the depth of weak soils requiring treatment or removal.
After the aggregate base or open-graded drainage course (OGDC) is placed shaped and compacted, it is brought to final grade, usually by an automatic trimmer machine. The automatic trimmer operates off a string line or by automated machine guidance (3D controls) to control the vertical and horizontal alignment. The automated machine obtains its position with an onboard computer communicating to the global positioning systems (GPS), total stations, lasers, or combinations of similar methods while referencing the Contractor’s model developed for the project. Control string lines, if used, must be tight and checked for excessive sag between securing posts and corrected as necessary before the final trimming of the aggregate base surface elevation, as most slipform paving equipment will travel on the aggregate base or OGDC for final grade (See Figure 602-25).
Contractors are supposed to use appropriate haul routes that are built strong enough to support the needed heavy traffic without significantly damaging or yielding the subgrade beneath the final pavement areas. It is critical for jobs that have weaker clayey subgrades and/or thinner base designs, that the prepared base is not used as a haul road in areas that have not been designed as and/or approved as a haul route. If the prepared aggregate base is damaged by construction equipment prior to placing concrete, refer to subsection 602.03.B.
In the past, the Department required the Contractor to use a concrete spreader and material transfer machine to place the concrete on the grade in front of the paver. Recently, the Department granted the Contractors the general privilege of driving the concrete hauling units directly on the grade to place the concrete in front of the paver. A heavy-duty base and subbase system placed on hard/dense natural soils will likely survive this traffic. However, a low-traffic road type design with thin base and subbase at a site having marginal to weak subgrades may not survive much traffic or weight moving around on top of the base layer material. With this privilege, subsection 602.03.D. of the Standard Specifications for Construction states, “When the Engineer determines that damage occurs to the base course from hauling units, discontinue production until the cause of the damage has been evaluated and corrected” (e.g. excessive rutting and looking for geotextile separator coming to the surface of the base course), (See Figure 602-26). When there is large rutting or yielding damage to the base course, that damage is typically being reflected from damaged/displaced subgrade below the base (rutting in the subgrade reduces the strength of the subgrade and compaction effects and increases moisture susceptibility).
To prevent damaging the foundation support with the concrete hauling units, the Contractor needs to minimize the hauling time on the base course by properly using the designated haul road and setting up truck access points in front of the paver as necessary to get on and off the grade. Also, at these truck access points the base course may become more disturbed due to the frequent concrete hauling units turning on the grade. If the Inspector notices the base is being damaged by the concrete hauling units, then the Contractor needs to implement a corrective action to their process of placing concrete. For projects having weak subgrade and/or thin base layers experiencing excessive damage, it may be necessary for the Contractor to place less concrete in each hauling unit or completely stay off the grade and use a material transfer machine to place the concrete into the paver. The Contractor will typically use a roller too smooth out minor deflections in the base course, which is required to provide a level surface to place the load transfer assemblies on).
Load Transfer Assemblies
After the base is properly compacted and fine trimmed, dowel bar type load transfer assemblies are placed at planned transverse joint locations. The Inspector should work closely with the Contractor’s crew while they are setting these assemblies. Make sure the joint layouts are in accordance with R-43 Series of the Standard Plans (e.g. match mainline joints to the 22 foot point and 2 foot point of the gores, mainline joints matching the ramps joints, and expansion joints). Custom joint layout patterns are typically used for roundabouts and unusually shaped placement areas. It is preferred that joints line up with drainage structures that are in the curb and gutter or valley gutter castings and manholes to help prevent random cracking in the concrete panels (See Figure 602-27) that tends to emanate from odd shaped inclusions such as manholes and drainage structures.
The load transfer assembly is anchored to the grade and holds the dowel bars in position so they will not move during concrete placement and consolidation.
- The typical distance between joints must match the Standard Plans policy, or custom joint layout drawings that are a part of the contract and plans.
- It will be necessary for the Contractor to mark the centerline of the as-installed assemblies so that future joint saw cuts can be made directly over the center of the dowel bars after the concrete has hardened sufficiently. Usually, this location marking is accomplished by setting a long nail or stake in the grade, matching the centerline of the dowels, set just outside the pavement limits (ribbon attached to the nail or stake), or by setting a nail-marker inside the vertical face of the fresh concrete pavement right over the load transfer assembly centerline (See Figure 602-27A). It is critical to get the saw cut lines to be close to the middle of the dowel bars.
- The load transfer assemblies must be positioned at right angles to the centerline as shown in Figure 602-28.
- After they are properly positioned, they must be secured to the base using six pins or stakes per basket assembly or as directed by the Engineer.
The assembly pins must be in contact, snug, with the lower horizontal spacer wire to function properly. The location of the assembly pins is also critical to prevent the basket from shifting or overturning from the concrete paver pushing the concrete into the assembly as shown in Figure 602-29, 602-30, 602-31, and 602-32.
After the contractor completes staking the assembly, the inspector should check vertical alignment with the basket level to ensure that dowels are parallel with the pavement surface and not tilted left-right or up-down significantly (See Figure 602-33). Any apparent misalignment can usually be corrected by the contractor (e.g. by tapping the frame to realign the bars, etc.). The dowel bars should also be inspected for completeness of coating
Dowel Bar Inserter (DBI)
The DBI is an approved mechanical device that automatically installs load transfer bars into the full depth fresh concrete at the required depth and location, and properly consolidates the surrounding concrete. The device must install the bars in a slow and fluid manner and be capable of consolidating the concrete around the dowel bars such that no air voids are created or remain around the bars, without the supplemental use of hand-held vibrators. These modern automated devices may be used in lieu of stationary load transfer assemblies (See Figures 602-34, 602-35, 602-36, 602-37, 602-38, 602-39, and 602-40).
When a dowel bar inserter (DBI) is used to install load transfer bars, the bars shall be placed at the same spacing as detailed for dowel bar assemblies in the Standard Plan R-40 series. The pavement shall be placed and consolidated full depth prior to insertion of the dowel bars.
Proper alignment of the dowel bars is crucial to proper joint opening and closing behavior in response to summer to winter expansion and contraction (See Figures 602-41, 602-42, and 602-43). Premature pavement distress such as medium to high severity spalling can develop if a dowel or group of dowels is not properly aligned. The Contractor is required to perform wet checks to verify the dowel bars are at the proper depth and position alignment (vertically and horizontally) in accordance with MDOT Specifications and Standard Plans. The Contractor will also verify the location of the nail to the center of the dowel bar (tolerance +/- 2 inches of side shift, See Figure 602-27A). These wet checks measurements will be made every 500 feet and as required by the Contractors Quality Control Plan. The Engineer will witness these measurements and may request documentation of these measurements (See Figures 602-44, 602-45, and 602-46 for wet checks).
The following are forms to document the wet checks at different pavement widths:
- Download a copy of the 12 ft Wet Checks.
- Download a copy of the 14 ft Wet Checks.
- Download a copy of the 24 ft Wet Checks.
- Download a copy of the 26 ft Wet Checks.
Any out of tolerance joints shall be marked and replaced at the Contractor’s expense. If the dowels are consistently out of tolerance with respect to alignment and/or depth, the Contractor must stop production paving and take steps to correct the alignment problems. Dowel alignment problems can be created when too much concrete height or thickness, commonly referred to as head, develops in front of the paver that has the DBI mounted to it. The amount of head maintained in front of the paver must be in accordance with the DBI and paver manufacturer’s recommendations to provide consistent proper dowel alignment.
Many other factors can contribute to dowel alignment and depth problems when using a DBI. The important thing to remember is to be sure the DBI is consistent when placing dowels throughout each day’s production. Periodic wet and dry alignment/depth checks are necessary to confirm consistency. The Inspector should also make sure the Contractor is following all the DBI manufacturer’s recommendations for this equipment.
The insertion forks of the DBI may get bent during production, and this may occur from too much concrete in the dowel bar trays (See Figures 602-47 and 602-48). If an insertion fork bends on the DBI, the Contractor will either bend it back into position or replace it. Then, the Contractor needs to verify the depth and position of the insertion fork on the DBI. The best initial check for horizontal alignment of the dowel bars is for the Contractor to measure the spacing between the front and back of the insertion forks as shown in Figure 602-49. Then, the Contractor needs to wet check the joints where the dowel bars were inserted with the bent forks and then where the forks were corrected to confirm consistency. The Contractor will need to use two chaining pins to wet check the horizonal alignment of the dowel bars.
Also, as the Contractor is correcting the DBI, the Inspector needs to keep track of any concrete haul units waiting to place concrete and the concrete placed on the grade in front of the paver (the spec book states in subsection 602.03.D, “Place a transverse end-of-pour joint when unavoidable interruptions of concrete placement occur that are longer than 60 minutes from the time the concrete is batched until final finishing of the concrete surface). The Inspector needs to visually inspect the concrete sitting on the grade to see if it appears to be setting up (especially on days where there is a high evaporation rate), as this could impact the consolidation ability around the dowel bars. The Inspector should identify this area in their daily work report and the Engineer may require a core to be taken to verify consolidation.
The Contractor must construct and evaluate DBI test headers throughout the project to verify proper consolidation of concrete around the dowel bars and alignment of dowel bars in hardened concrete. Three test headers are required in each direction of travel, but the Engineer may request more depending on if the Contractor uses more than one paver with the DBI setup and the contractor quality control measurements. See Figures 602-50, 602-51, 602-52, 602-53, 602-54, 602-55, 602-56, and 602-57.
Also, if there are issues with the DBI, a test header needs to be made at the end of the days production and the Contractor needs to remove the test header for inspection of the dowel bar placement before restarting the concrete paving operation. Based on the test header results, the Contractor may need to recheck and adjust the DBI forks before restarting the concrete paving operations.
The following is a spreadsheet for documenting the test header results into the office file. There is an example filled out in the spreadsheet. The Inspector can record the test header results in the field onto the wet check form and then input the information into the spreadsheet.
- Download a copy of the Test Header Spreadsheet 2020.
When the DBI is being used, MDOT Lansing Construction Field Services (CFS) will provide the project office the service of the MIT-Dowel Scan non-destructive dowel scanning device. CFS highly recommends the Engineer to have the transverse joints scanned throughout the duration of the project, especially when the contractor starts paving, when changes the paver setup occur, if more than one paver is used with the DBI setup, and when issues arise with the DBI in general.
The MIT-Dowel Scan device has 10 sensors (magnets) that pick up the magnetic properties of the dowel bars, which create magnetic fields, and then the data is processed to predict embedded depths and alignments (See Figure 602-58). The MIT-Dowel Scan gives you real time imaging and results (See Figure 602-59). The MIT-Dowel Scan data will be shown on an excel spreadsheet identifying the dowel bar spacing, depth, side shift, horizontal misalignment, and vertical misalignment (See Figure 602-60). The MIT-Dowel Scan is extremely accurate for evaluating the DBI paving operations (the dowel bars near the longitudinal joints may have influence of the lane ties so that data can’t be used). The MIT-Dowel Scan accuracy has been confirmed by being compared to test headers and cover meters. Currently, the MIT-Dowel Scan technology is relatively new and is used for information purposes only and not as part of formal quality assurance procedures. There are other DOTs that use the MIT-Dowel Scan in their specifications. The typical process CFS uses to MIT-Dowel Scan the transverse joints, is by scanning about 10 joints every 700 feet to 1000 feet to identify any patterns of potential issues with the dowel bar placement. Then, CFS will give the project office an excel spreadsheet and interpretation of the results.
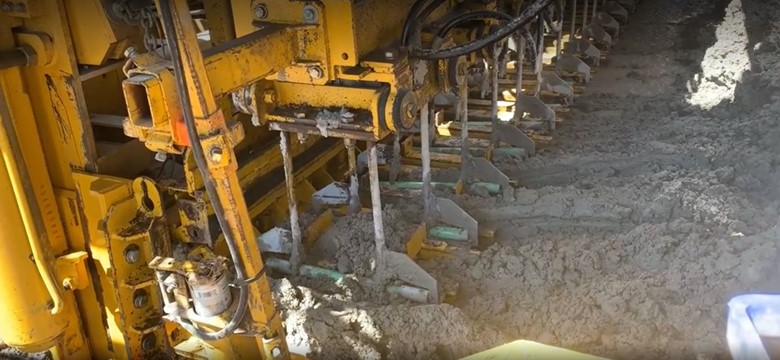
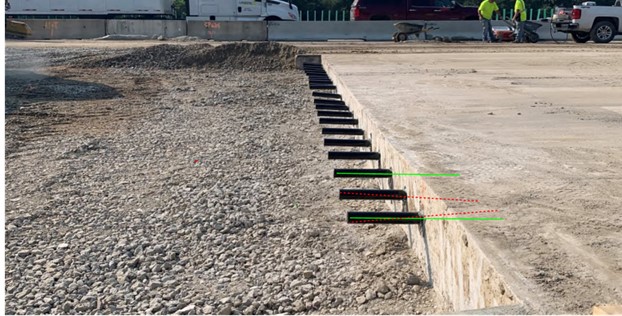
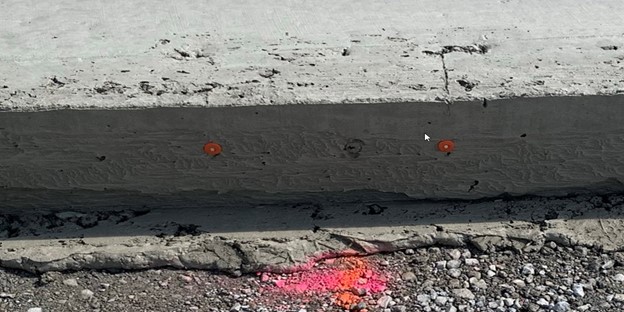
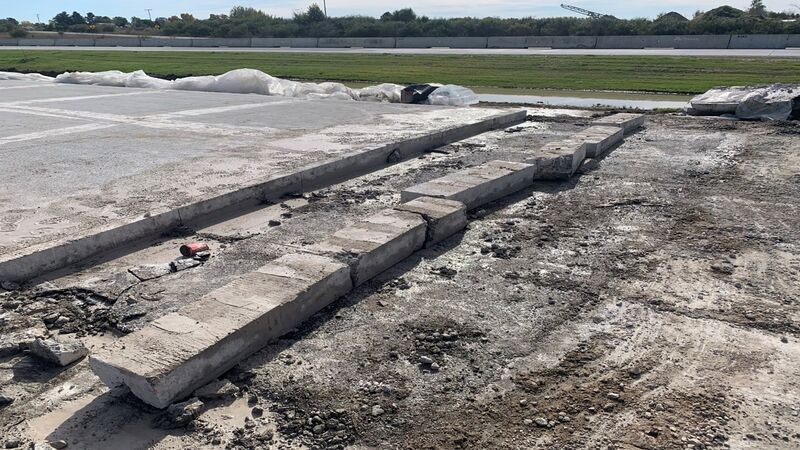
Expansion Caps
In general sawed contraction joints will slowly open over time as silt and fine sand infiltrate the joints and cracks and prevent them from fully closing. Therefore, expansion joints are installed intermittently and at strategic locations to absorb this movement. Special caps are used on ends of dowels at expansion joints to accommodate future joint closing or compression over time. Expansion caps must be securely placed on opposite unwelded ends of the bars, with 1 inch space left between the end of the bar and the inside of the cap. Most expansion caps have inverted dimples 1 inch from end of cap as an indicator (See Figure 602-61). When using the slipform paving method, the outside 4 inches of the expansion felt will be removed and replaced after the paver goes.
Expansion Joint Filler
During final finishing operations. The previously removed 4-inch end section of the expansion filler material should be replaced and the concrete consolidated around the joint filler. The expansion joint filler location should also be marked for sawing at a later date. The best method of doing this is by working from a bridge spanning the pavement. The expansion filler top is exposed in about five locations across a 24-ft pavement by using a small trowel to remove the concrete. A small block is then placed on top of the expansion filler. The block should extend to the surface and be held in place by nails extending into the filler. Later the joint is sawed out from block to block (See Figure 602-62).
Production Paving Projects
Concrete will be produced in a central mix plant. Production paving projects will typically be set up with a portable concrete batch plant (See Figure 602-63). Concrete will be transported to the job site in concrete hauling units (dump trucks or agitator trucks) (See Figures 602-64 and 602-65). The allowable haul time will depend on the type of hauling unit and the concrete temperature, as stated in subsection 1001.03.E.3.
The contractor will provide a ticket system to record the batch numbers with information required by subsection 1001.03.A.3. The inspector collecting the concrete tickets from the concrete hauling units needs to verify the batch weights of the materials are within the required tolerances of subsection 1001.03.A.2 and match the weights of the Job Mix Formula and Optimized Gradations.
Dual Lane Operation
The concrete spreading operation should be kept reasonably close to the pavers so no more than 30 minutes elapse between layers of concrete, or between placing and finishing the concrete (See subsection 602.03.D).
Tie bars are placed at the center longitudinal joint. A lane tie bar installer is often mounted on the rear and in the center of the paver. It will place reinforcement bars of proper length and diameter according to Standard Plan R-41 Series.
An Inspector should check the spacing of bars as soon as possible after paving starts. Check the bar depth after finishing operations are complete, as they have a tendency to settle due to the vibration of paving equipment. This is done by using the work bridge to access the longitudinal joint between lanes.
Slipform Pavers/Riding Finishing Machine
The slipform paver uses a lower slump concrete to minimize edge slump. Therefore, full width vibrators are necessary to eliminate all internal honeycombs. Contractors should have a vibrator monitor system as required by subsection 602.03.A.7 (See Figure 602-66 and 602-67).
It is important that the slipform paver, or finishing machine, has the correct recommended concrete amount in the screed, or strike-off plates, to prevent overloading that can cause slipping of the track or drive wheels. Drive train slippage will typically result in chatter bump type irregularities on the pavement surface. Also, an inadequate amount of concrete placed in front of the pavers screed will result in low-spot type irregularities on the pavement surface (See Figure 602-68 and 602-69).
Form riding finishing machines, and some slipform pavers, have two oscillating screeds that shape the surface of the concrete. For the best results, the front screeds should have about an 8 inch roll of concrete in front of it. The second should have a smaller roll, about 4 inches. A slow, steady forward movement with a uniform supply of concrete in front of the type of finisher will produce the best surface finish. Slipform pavers are equipped with extrusion plates to form and finish the concrete. Slipform pavers are equipped with spray bars to add water as an aid to finishing but the addition of water should be kept to a minimum. Adding too much water to the surface is to be avoided as it can result in a low strength high shrinkage thin surface zone that can be subject to thin delamination and scaling distress. The contractor should attach burlap to the slipform paver and spray water on the burlap, rather than directly on the fresh concrete surface (See Figure 602-70).
If a pan float, or other mechanical float, is used behind the slipform paver or the finishing machine, it should leave the concrete surface in a substantially finished condition (See Figure 602-71)
Some slipform paving machines are equipped with transverse screeds for additional floating. Tears or open areas indicate improper screed adjustments, inadequate vibration or perhaps a harsh mix. Attempts to correct the equipment should be made before changing the mix.
The slab edge condition being created should be evaluated immediately behind the slipform paver. The edge forming equipment (edgers) used on the paver can be adjusted to minimize edge slump. When the concrete leaves the trailing edge of the edgers, it should slump down and out to the proper width and elevation. Because concrete does move or slump in this way, it is essential to maintain a uniform slump from load to load to match the edger settings. Conventional edgers should be used to round the top corner. It should be left with a radius not exceeding 1/4-inch. Edge slump should be rechecked with the 5-ft straightedge behind all finishing operations. Any edge slump exceeding 3/8 inch should be corrected before the concrete sets. If continuing slumps of up to 1/4-inch occur, the Contractor should adjust the edgers on the trailing end of the side forms to eliminate the slump.
After machine finishing, the slab surface should be checked by the Contractor’s finisher using a 10-ft straightedge and the 5-ft lap method of straight edging. Any high or low areas indicated by the straightedges are to be corrected. The areas needing correction may be hand floated, if necessary, to seal the surface. On slipform paving, the finisher should stop the straightedge about 4 to 6 inches from the edge to keep the edge from slumping due to the added weight of the straightedge.
Concrete Overlay
Concrete overlays can be used over existing asphalt or concrete pavements. MDOT uses what are referred to as bonded and un-bonded overlay designs. Unbonded designs use bond breaker layers to allow the new concrete slabs to detach from the layer below, while bonded designs may use cementitious bonding layers to develop a long-term bond between the new and old pavements. In recent years mostly un-bonded type designs have been used. The design thickness values for overlays typically range from about 4 to 10 inches. Thin overlays, less than about 6 inches, typically do not use steel bars or dowels, but use special fiber reinforcements in the slabs along with short slabs with saw cut spacings less than about 6 feet. Overlays greater than about 6 inches typically do use dowel and tie bars for joints in the design and often use longer slabs with saw cut spacings up to about 12 feet.
The existing pavement typically undergoes surface preparation and repairs that could include milling/abrading of the surface, cleaning, HMA or concrete joint repairs. The prepared surface is then overlaid with a bituminous/asphalt or wax type bond breaker layer, or a layer of separation geotextile fabric before the new concrete surface is paved (See Figure 602-71 and 602-72). In some cases, where grades permit, a layer of HMA, 1 to 3 inches in thickness is placed as what is called a stress relieving interlayer (SRI) over the original pavement to develop stronger and more uniform support for the new overlay.
Random unscheduled daily yield checks, using the random number sheet, on the volume produced by the batch plant should be performed to verify the amount of concrete produced per batch by comparing the apparent yield thickness or distance to actual thickness or distance measurements. This volumetric yield check can then be applied to all batches leaving the plant and compared to the computed total volume placed during the day’s production. The yield check can provide a simple verification of the batch ticket volume printed by the batch plant. This procedure should be part of the Contractor’s quality control plan and periodically verified through MDOT quality assurance testing where appropriate. This method of checking the volume of concrete should be used wherever concrete is being paid for by volume.
Grade Control
Grade control is critical when paving a concrete overlay. Overruns can be controlled by monitoring the grade of the surface the overlay is to be placed on prior to paving the bond breaker layer and the overlay. Recorded string line depth checks on the grade control prior to paving the overlay are important to monitor the volume of concrete to be placed and keep it close to the actual plan quantity.
Grade control is again the critical item for controlling Contractor material quantities, and final profiles when paving miscellaneous concrete. Smaller miscellaneous areas are typically formed prior to paving miscellaneous concrete. The forms can benefit the grade control process. However, matching the grades in approaches, and ramp gore areas can lead to pavements that do not drain properly or have a rough initial ride quality for the public.
If not included in the plans, a set of detailed grades should be computed and plotted prior to the beginning of the project to attempt to alleviate grade problems. The detailed grades should be computed from the plan profiles for the adjacent pavement. After the grades are computed, they should be plotted to determine the proposed gore/approach cross sections prior to beginning the project. If the detailed grades are determined prior to paving, the Inspector and Project Engineer can typically fine tune adjust the mainline and/or ramp grades to tie-in better and provide smoother transitions for gores and approach pavement.
Concrete Texturing
Following floating, the surface is to be textured longitudinally with a burlap drag (see subsection 602.03.K). Even though the final grooving (tining) will be created by metal tine rakes, it is important that the slab be properly textured initially with burlap to give the surface a slightly roughened micro-texture, gritty texture with exposed sand grains, to better interact with tire rubber for friction.
About 36 to 60 inches of burlap width should be in contact with the pavement surface as it is dragged. Two layers of burlap may be required to impart a suitable gritty surface. The burlap should be cleaned of built-up mortar intermittently as needed, at least daily, and replaced when it is no longer effective. It should be kept moist to avoid dry burlap from absorbing water from the concrete surface.
When slipform paving, it is better not to have the burlap drag extend over the edges, as it may cause the concrete to edge-slump or tear the edges. The outer 4 inches of the surface near the edges should be hand dragged by the finishers doing the edging.
A strip of artificial turf grass mat may be used as an alternate to burlap and in some low-speed traffic areas a turf drag is the final texturing used for the surface. After the burlap/turf drag process, concrete surface in higher speed traffic areas are typically grooved transversely or longitudinally with a steering controlled texturing machine to achieve better high speed hydroplaning resistance. A manual texturing device, often a hand-held tinning rake, may be used for small area miscellaneous pavement. The Contractor must place grooves with a width and depth of ⅛-inch, with a tolerance of 1⁄32-inch, spaced ¾-inch on center with a tolerance of 1⁄16-inch. Do not groove the pavement surface within 1½ inches of longitudinal joints. Grooves should not be overlapped. Overlapping decreases the spacing, which results in tearing and dragging of fresh concrete along the surface during texturing. The grooves should be installed in one continuous pass across the entire pavement surface. Do not allow grooves to dig too deep as this can start to move coarse aggregates present near the top of the fresh concrete and cause tearing/dragging of the fresh concrete surface resulting in reduced ride quality numbers and unnecessary tire-pavement noise and damage to the concrete surface. Grooves that are too shallow can have reduced tire hydroplaning resistance during heavy rain events.
Texturing operations shall not delay curing. Timely application of curing compound is critical to the final strength and durability of the concrete pavement. Proper and timely application of the curing compound must take precedence over texturing the surface with the texture machines or rakes. If texturing has to be delayed, it will have to be cut into the surface at a later date when the concrete has attained the minimum required design strength. When texturing is delayed, the Contractor shall submit a plan for the Engineer’s approval for texturing the pavement after the concrete has reached the strength required and describing groove cutting equipment and slurry collection procedures. This work shall be at the Contractor’s expense. Therefore, it is imperative that the texture operations stay close to the fresh concrete placement operations and not fall critically behind because the cost of mobilizing a diamond cutting blade type groove cutting operation after the fact is high.
Grooving Device
The grooving device or texturing machine must be a tracked machine accurately adjusted to the crown and the pavement slope to provide uniform contact force and attack angle between the metal tines and the pavement. It must also be adjusted to lift off the pavement just as the tine head reaches the fresh concrete slab edge to avoid breaking down the edges when slipform paving. Check the grooving shapes periodically to see that the operator is obtaining a uniform surface, with groove depths from 1/8 to 1/4 inch. Following grooving, the Contractor is to stencil station numbers in the fresh concrete pavement at 16 inches from the edge of the pavement so the roadway station numbers can be read when driving on the shoulder in the direction of traffic (see subsection 602.03.L.)
Membrane Curing
Membrane curing compound is to be applied as soon as the free water from the concrete mixture has left the surface to trap remaining water in place and prevent drying or desiccation of the surface. Often the same machine is used for texturing and applying the curing compound. In this case, the membrane is applied immediately following texturing. In some cases, separate texturing and curing machines are used and curing machines can fall behind paving and texturing. In all cases texturing and curing operations need to stay close to the paver and not fall behind to a point where concrete set or surface drying is occurring. Getting the curing compound applied at the proper time overrules texturing operations. For example, if the texturing operations are having difficulties or breakdowns, curing operations must proceed without texture grooving and texture grooves will have to be cut into hardened pavement at a later date.
The Contractor must mix the curing compound before use according to the manufacturer’s recommendation before the compound is transferred from the drums to the tank on the curing machine. It should be constantly re-circulated or stirred during application.
One coat is required for non-textured surfaces and two coats on grooved surfaces. Coverage is to be a minimum of 1 gallon per 25 square yards for each coat. The slab edge sides should be spray cured promptly if the forms are removed before the required strength is met. Depending on the wind, sometimes the curing compound may have to be applied in two different directions to get proper coverage. The final coverage should achieve full coverage without obvious darker reflections from below due to low coverage or poor spray nozzle function.
Header Joints
A daily paving operation is normally ended using a transverse contraction or expansion joint and a night header is installed. An adjustable header board (See Figure 602-73, 602-74, and 602-75) is staked at the center of the load transfer device assembly. The header top should be left at least ½ inch below the pavement surface and the finishing equipment passed over the header.
The area adjacent to the header must be filled with fresh concrete. However, partially hardened concrete, or laitance, carried in the vibratory box shall not be used in this area. Just before the finishing equipment passes over the header, the concrete adjacent to the header should be vibrated with a handheld vibrator. It is a good idea to spread burlap or plastic over the projecting ends of the dowels to facilitate cleanup of excess concrete.
Since the header board may not match the crown of the pavement, Contractor’s often insert pieces of ¼ inch Masonite board behind the header board and adjust it to the exact elevation of the finished pavement after the finishing equipment has passed over the header joint. The finishers will now be able to straightedge the pavement up to and across the header.
When slipform paving, the last 10 feet or so of the longitudinal bulkhead joint adjacent to the header should be formed to prevent the slab from becoming over width. An over width section will cause spalling of the edge when the paver is backed to the header.
A transverse end of pour joint is also acceptable and is commonly referred to as a runoff header or plastic tube header. See the Standard Plan R-39 series for details. A transverse end of pour joint runoff header includes a plastic tube basket that is pinned to the grade. Concrete is placed and vibrated through the runoff header and beyond it by at least 5 feet. Once the concrete has hardened, a joint, centered over the plastic tube basket, is sawn full depth and the concrete is removed on the waste side to provide a clean smooth face against which the next day’s paving operation can start. Smooth dowel bars are installed in the plastic tubes and paving resumes.
When paving resumes, the Contractor needs to use care as they pull away from the header to avoid damaging the green concrete. As the slipform paver or finishing machine starts forward, there is a tendency for the concrete to cling to the screeds and the float pans, leaving the surface low in these areas. After the concrete is placed, the header should be thoroughly vibrated to eliminate voids. It is important that the Contractor straightedge this area carefully.
Date and stationing should be stenciled in the concrete by the Contractor, on the night and morning sides of the header.
OPENING TO TRAFFIC
Often the Contractor will want to use the new pavement as a haul road for heavy construction trucks at the earliest possible time, or want to place a wheel or track on new pavement edge to pave the adjacent lane. Other times it will be important to open an intersection or drive to traffic as soon as possible. The concrete strength tests must show that the concrete has reached a minimum strength limit, or maturity before heavy vehicles are allowed.
The Inspector and Contractor should try to anticipate the need for early openings and arrange to make an extra set of test beams when the concrete in question is being cast. These test beams should be cured under environmental conditions as similar as practical to the pavement being cast.
Follow Table 104-2 in subsection 104.11.B.4 of the Standard Specifications for Construction, to determine when equipment may be allowed on the pavement. No load is to be permitted on the pavement until the centerline joint is sawed, the contraction joints relief cut, the expansion joints sawed out to full width and temporary or permanent seals installed. Curing is to be continued until a flexural strength of 550 psi has been obtained.
When job control beam strength results are not available, the curing membrane surface treatment film is not to be disturbed or broken by Contractor’s equipment or other traffic until the concrete has attained 70 percent of the required minimum strength as determined from the table 104-1.
PAVEMENT CORING
MDOT will take cores, before final acceptance, from pavement, shoulder, and base course to determine the thickness of the pavement according to MTM 201. Refer to subsection 602.04.
INSPECTION & TESTING
The State-Wide Concrete Paving Specialist will visit the project when paving starts to assist in determining equipment suitability, to discuss other concrete related items and to assist with getting the project properly started.
Inspection During and Following Concrete Placement
The Inspector should review the trimming, placing, spreading, consolidation, finishing, texturing and curing equipment the Contractor plans to use to see if it is appropriate for the quantity and type of paving included on the project. Screeds and pan floats must be checked for proper slope adjustment.
The Inspector should verify that the curing compound sprayer is in proper working condition before paving starts. If in doubt, the Contractor should demonstrate its capability. Check to see that the Contractor has all the necessary hand tools, such as 5 foot and 10 foot straightedges, floats, edgers, and stencils. If forms are used, they should be checked for straightness, general condition, condition of locks, etc. before form setting operations begin.
Collect and maintain all concrete delivery tickets each day. At completion of a pour, tabulate the tickets to determine the total concrete received. Compare this to the theoretical measured amount placed to compute the overrun or underrun. The cause of any underrun should be determined and corrections should be made immediately. Possible causes include too thin or thick pavement, narrow width of slab, incorrect measurements or improper scale readings at the concrete plant.
Night header joints should receive the Inspector’s attention, as they are often the location of bumps in the finished pavement. Stretch a string line parallel to the centerline from 10 feet behind the header to 30 feet in front to check the header for the need of corrective work in the start-up area while the concrete is plastic.
Inspect the previous day’s pavement for uniformity of texturing and curing. Have areas been missed, or textured too shallow or too deep? Are there thin spots or streaks in the curing membrane? Has the edge of the slab been completely coated with curing compound? Check for any honeycomb in the edge and have it patched. It is recommended to monitor the texturing operation when started. This will aid the Contractor in providing a quality product everyone will be satisfied with.
Within about 24 hours after placement, the relief sawing of the transverse joints should be complete or in progress. Look for any random cracks in the new pavement that would indicate sawing was not completed in a timely manner. Also, look at the relief saw cuts for excessive raveling, indicating they were sawed too soon. Check for correct depth of the saw cuts.
When sawing of the joints to final width begins, the Inspector should check on the width and the depth (Standard Plan R-39 series). The location of saw cuts for contraction joints should be over the centerline of the load transfer assembly. It is important that the expansion joint saw cuts be made exactly over the expansion felt. This is accomplished by sawing from block to block as explained under Placing and Finishing the Concrete.
The centerline longitudinal joint will be sawed within 24 hours, but not until the concrete has hardened sufficiently so that no raveling or spalling occurs. All traffic must be kept off the pavement until the longitudinal joint has been sawed. Since the upper 1 inch of the longitudinal joint must be sawed a minimum of 1/4 inch wide, and the lower one-third need only be 1/8 inch wide, the Contractor will often use two saws operating in tandem. (Standard Plan R-41 series).
Once the joints are sawed, the sawing slurry is to be immediately cleaned up and removed and the joint saw cuts are sand blasted, or air blasted and cleaned in preparation for sealing. The joints will typically be sealed with hot poured rubber.
Hot and Cold Weather
During hot weather, additional precautions must be taken to obtain high quality pavement. Concrete placement is prohibited when the concrete temperature exceeds 90°F. Even with concrete temperature at 80°F, it may be difficult for the final finishing and texturing to be completed before the concrete hardens. The warmer it is outside, the faster the concrete will set up. Under warm dry conditions, there is often a strong desire by the Contractor’s finishers to add water to the pavement surface to lubricate their floats and straightedges. Any water added is to be in the form of mist from a fog sprayer. This limits the amount of water added and minimizes dilution of the cement paste on the concrete surface.
For hot weather conditions, the Inspector should refer to Table 706-1 of the Standard Specifications for Construction. This table gives evaporation rates for conditions for paving concrete based on air temperature, concrete temperature, relative humidity, and wind velocity. If the evaporation rate exceeds 0.15 lbs/ft2/hr from the table, then the Contractor should not pave. In any combination of weather conditions, the Contractor must be able to ensure to the Department that they can prevent premature drying of the pavement surface during the paving process.
In extreme weather conditions, timely application of the curing compound is not always the complete solution to preventing premature drying of the pavement surface. Extreme weather conditions can require additional steps to aid in the prevention of premature surface drying and other adverse effects caused by hot weather. Continuous, constant temperature moist curing, covering the entire surface of the pavement with continuously wet burlap, and reducing the concrete mix temperature (cement, aggregate, and/or water temperature) are examples of other options for helping reduce the impact of hot weather on concrete pavement. Except for when continuous moist curing is used, the curing compound should still be applied when using these options for paving in hot weather. The Contractor’s Quality Control Plan must be reviewed before paving begins. The Quality Control Plan must contain adequate detail regarding the plan for properly curing the concrete in accordance with MDOT standards.
Protection from cold weather is the Contractor’s responsibility. The Standard Specifications allow use of plastic tarps as cover when temperatures are expected to be below 40 during curing. If temperatures below freezing 32 degrees are forecast during the curing period, the contract is required to use heavy insulating blankets for frost protection. Although concrete will withstand brief periods below freezing temperature curing, it is considered good practice to provide a protective covering of insulated blankets when freezing temperatures are anticipated. When cold weather is anticipated, the pavement should be covered as soon as possible. However, the pavement must be able to support the weight of the insulating blankets without damaging the surface.
If the Contractor neglects to cover the pavement in a timely manner and the temperatures drop below freezing during the curing period, the Inspector should note the areas involved and notify the Engineer. Concrete exposed to freezing during curing will typically exhibit rapid scaling of the exposed surface and limited strength development, perhaps not meeting minimum requirements even when a good mixture was used due to ice damage. Arrangements can be made to take special cores from the area in question to determine whether the concrete has been damaged.
Rain Damage
Protection from damage by rain is the Contractor’s responsibility and the Inspector should avoid giving the Contractor any instructions as to covering the concrete, or other protective measures. If the Contractor is unable to texture the pavement, or the texture is washed away, they will be required to groove the hardened concrete if the rain damage was limited to the pavement surface.
If serious rain damage occurs, such as breaking down of slipformed edges or erosion of the surface by water running off the pavement, repairs should be made as soon as the rain stops. Water on the surface will not be allowed to be worked into the concrete. The Quality Control Plan needs to provide adequate detail regarding an immediate (at the time the pavement was damaged) corrective action for rain damaged concrete pavement.
If the rain has damaged the curing membrane, this should be corrected by respraying the area after the rain has stopped and just as the free water evaporates.
Miscellaneous Paving
In addition to the main paving operation, most projects will include some miscellaneous paving. This might be semi-production work on service roads or ramps. Other times it will involve strictly hand work at street intersections. The quantity of paving involved will dictate the type of equipment to be used. As with production pavement, the Inspector should verify that methods and equipment proposed are in acceptable working condition and appropriate for the type of paving.
Trimming the base will usually be a combination of a road grader and hand methods. Forms are used for hand work. Radii of less than 150 feet will require flexible forms (see subsection 602.03). Concrete may be placed without a spreader providing it can be placed with no segregation.
All areas along forms and joints will be consolidated with a vibrator. The vibrator will be inserted vertically into the concrete to ensure complete consolidation and will not be used to move the concrete. Screeding of the surface will usually be by a form-riding finishing machine or a hand-pulled vibrating strike off. Sometimes roller screeds or lightweight slipform pavers are used. Straight-edge ride smoothness evaluation of gaps and other miscelaneous areas subject to high-speed traffic is important. A string line check of these areas is also helpful.
Burlapping, groove texturing, and curing will normally be done with handheld equipment. Make sure grooving is done in one continuous pass from edge to edge. Do not permit grooving each way from the centerline, as a poor appearance will result.
Applying the curing compound will be done from a bridge or by using a boom so uniform coverage can be obtained.
Grade Control
Grade control is critical when paving a concrete overlay. Overruns can be controlled by monitoring the grade of the surface the overlay is to be placed on prior to paving the bond breaker layer and the overlay. Recorded string line depth checks on the grade control prior to paving the overlay are important to monitor the volume of concrete to be placed and keep it close to the actual plan quantity.
Grade control is again the critical item for controlling Contractor material quantities, and final profiles when paving miscellaneous concrete. Smaller miscellaneous areas are typically formed prior to paving miscellaneous concrete. The forms can benefit the grade control process. However, matching the grades in approaches, and ramp gore areas can lead to pavements that do not drain properly or have a safe profile for the public. If not included in the plans, a set of detail grades should be computed and plotted prior to the beginning of the project to attempt to alleviate grade problems. The detail grades should be computed from the plan profiles for the adjacent pavement. After the detail grades are computed, they should be plotted to determine the proposed gore/approach cross sections prior to beginning the project. If the detail grades are determined prior to any paving, with the approval of the Engineer, the inspector can typically adjust the mainline and/or ramp grades to allow for a safe gore and approach pavement.
Conventional edgers should be used to round the top corner. It should be left with a radius not exceeding 1/4 inch (6 mm). Edge slump should be rechecked with the 5 foot (1.5 m) straightedge behind all finishing operations. Any edge slump exceeding 3/8 inch (9 mm) should be corrected before the concrete sets. If continuing slumps of up to 1/4 inch (6 mm) occur, the Contractor should adjust the edgers on the trailing end of the side forms to eliminate the slump.
Concrete Texturing
Following floating, the surface is to be textured longitudinally with a burlap drag. Even though the final texturing will be by metal tines, it is important that the slab be properly textured initially with burlap to give the surface a slightly roughened, gritty texture.
Usually 36 to 60 inches (900 to 1500 mm) of burlap should be in contact with the pavement surface. Two layers of burlap may be required to impart a gritty surface. The burlap should be cleaned of built-up mortar daily and replaced when it is no longer effective. It should be kept moist to avoid removing water from the concrete surface.
When slipform paving, it is better not to have the burlap drag extend over the edges, as it may cause the concrete to slump, or tear the edges.
When completing the metal tining, texturing operations shall not delay curing. Timely application of curing compound is critical to the final strength and durability of the concrete pavement. Application of the curing compound must take precedence over texturing the surface with the metal tines. If texturing has to be delayed, it will follow at a later date when the concrete has attained 28 days design compressive strength. In this case, the Contractor shall submit a plan for the Engineer’s approval for texturing the pavement after the concrete has reached the strength required to support the equipment. This work shall be at the Contractor’s expense.
The last 4 inches (100 mm), can be hand dragged by the finishers doing the edging.
A strip of artificial grass mat may be used in place of burlap. After burlapping, the surface is to be grooved transversely or longitudinally with a wire tine comb. Either machine or hand methods may be used. The tine grooves should be 1/8 to 1/4 inch (3 to 6 mm) deep, 1/8 inch (3 mm) wide, on about 1/2 inch (13 mm) centers for Transverse tinning and 1/8inch to 1/4inch deep, 1/8 inch wide and 3/4 inch on centers for longitudinal tinning. Tine marks should not be overlapped. Overlapping decreases the spacing, which results in breakage. The grooves should be one continuous pass across the entire pavement surface.
Tining Device
The tining device must be a tracked machine accurately adjusted to the crown and the pavement slope to ensure uniform contact between the tines and the pavement. It must also be adjusted to lift off the pavement just as the tine head reaches the edge to avoid breaking down the edges when slipform paving. Check the tining periodically to see that the operator is obtaining a uniform surface, with groove depths from 1/8 to 1/4 inch (3 mm to 6 mm). Following tining, the Contractor is to stencil the pavement 12 inches (300 mm) from the edge of the pavement so the numbers can be read in the direction of traffic.
See spec book for mean texture depth requirements per ASTM E965
Membrane Curing
Membrane curing compound is to be applied as soon as the free water has left the surface. Often the same machine is used for tining, curing and applying the compound. Usually this is as soon as tining is complete. However, texturing shall not delay the curing compound application. If it becomes necessary to apply the curing compound prior to texturing, the texturing must be completed after the concrete has obtained its 28 day design compressive strength.
Make sure the curing compound has been mixed according to the manufacturer’s recommendation before the compound is transferred from the drums to the tank on the curing machine.
It should be constantly re-circulated or stirred during application.
Insist on a uniform application of each of the two coats for textured surfaces. One coat is required for non-textured surfaces. Coverage is 1 gallon per 25 square yards (1 liter per 5 m2) for each coat.
The important point is to get enough material on the exposed surface to completely seal the tops, bottoms and sides of the grooves with an unbroken membrane. Timely coverage is critical to the final strength and durability of the concrete.
The slab edges should be spray cured promptly if the forms are removed before the desired strength is met.
Depending on the wind, sometimes the curing compound may have to be applied in two different directions to get proper coverage.
Header Joints
Night header joints should receive the inspector’s attention, as they are often the location of bumps in the finished pavement.
Paving is normally suspended on a transverse contraction or expansion joint.
An adjustable header board is staked in place in the center of the load transfer device assembly.
The header top should be left at least 1/2 inch (12 mm) below the pavement surface and the finishing equipment passed over the header.
The area adjacent to the header must be filled with fresh concrete.
Do not permit partially hardened concrete, or laitance, carried in the vibratory box to be used in this area.
Just before the finishing equipment passes over the header, the concrete adjacent to the header should be vibrated with a hand held vibrator.
It is a good idea to spread burlap or plastic over the projecting ends of the dowels to facilitate cleanup of excess concrete. Since the header board may not match the crown of the pavement, it is a good idea to insert pieces of 1/4 inch (6 mm) Masonite behind the header board to be adjusted to the exact elevation of the finished pavement after the finishing equipment has passed over the header joint (Figure 602-8).
The finishers will now be able to straightedge the pavement up to and across the header. When slipform paving, the last 10 feet (3 m) or so of the longitudinal bulkhead joint adjacent to the header should be formed to prevent the slab from becoming over width. This over width will cause spalling of the edge when the paver is backed to the header.
A run off header is also acceptable and is commonly referred to as a plastic tube header. See standard plan R-39-I for detail. A run off header is a plastic tube basket header that's pinned to the grade, concrete is placed and vibrated through it and beyond by at least 5 feet. Once the concrete has hardened, the joint is sawn in half, full depth, and removed. Smooth dowel bars are installed in the plastic tubes and paving resumes.
Leaving the header is also an operation that needs close attention. The header board should be removed carefully to avoid damage to the green concrete.
After the concrete is placed, the header should be thoroughly vibrated to eliminate voids. As the slipform paver or finishing machine starts forward, there is a tendency for the concrete to cling to the screeds and the float pans, leaving the surface low in these areas. It is important that the Contractor straightedge this area carefully. Stretch a string line parallel to the centerline from 10 feet (3 m) behind the header to 30 feet (9 m) in front to check the header for the need of corrective work while the concrete is plastic.
Date and stationing should be stenciled in the concrete by the Contractor, on the night and morning sides of the header.
INSPECTION DURING AND FOLLOWING CONCRETE PLACEMENT
Inspect the previous day’s pavement for uniformity of texturing and curing. Have areas been missed, or textured too shallow or too deep? Are there thin spots or streaks in the curing membrane? Has the edge of the slab been completely coated with curing compound? Check for any honeycomb in the edge and have it patched.
At this time, the relief sawing of the transverse joints should be complete or in progress. Look for any random cracks that would indicate sawing was not completed in a timely manner. Also, look at the relief saw cuts for excessive raveling, indicating they were sawed too soon. Check for correct depth of the saw cuts.
When sawing of the joints to final width begins, the inspector should check on the width and the depth (Standard Plan R-39 Series). Location of saw cuts for contraction joints should be over the center of the assembly. It is important that the expansion joint saw cuts be made exactly over the expansion felt. This is accomplished by sawing from block to block as explained under Finishing the Concrete.
The centerline longitudinal joint will be sawed within 24 hours, but not until the concrete has hardened sufficiently that no raveling or spalling occurs. All traffic must be kept off the pavement until the longitudinal joint has been sawed. Since the upper 1 inch (25 mm) of the longitudinal joint must be sawed a minimum of 1/4 inch (5 mm) wide, and the lower one-third need only be 1/8 inch (3 mm) wide, the Contractor will often use two saws operating in tandem. (Standard Plan R-41 Series).
Transverse joints will be sealed with hot poured rubber.
Hot and Cold Weather
During hot weather, additional precautions must be taken to obtain high quality pavement. Concrete placement is prohibited when the concrete temperature exceeds 90°F (32°C). Even with concrete temperature at 80°F (27°C), it may be difficult for the final finishing and texturing to be completed before the concrete hardens. Under these conditions, there is a strong desire by the Contractor’s finishers to add water to the pavement surface to lubricate their floats and straightedges. Any water added is to be in the form of mist from a fog sprayer. This limits the amount of water added and minimizes dilution of the cement paste on the concrete surface.
For hot weather conditions, the inspector can refer to Table 706-1 of the Standard Specifications for Construction. This table gives evaporation rates for conditions for paving concrete based on air temperature, concrete temperature, relative humidity, and wind velocity. If the evaporation rate exceeds 0.15 lbs/ft2/hr from the table, then the Contractor should not pave. In any combination of weather conditions, the Contractor must be able to ensure to the Department that they can prevent premature drying of the pavement surface during the paving process.
In extreme weather conditions, timely application of the curing compound is not always the complete solution to preventing premature drying of the pavement surface. Extreme weather conditions can require additional steps to aid in the prevention of premature surface drying and other adverse effects caused by hot weather. Continuous, constant temperature moist curing, covering the entire surface of the pavement with continuously wet burlap, and reducing the concrete mix temperature (cement, aggregate and/or water temperature) are examples of other options for helping reduce the impact of hot weather on concrete pavement. With the exception of continuous moist curing, the curing compound should still be applied when using these options for paving in hot weather. The Contractor’s Quality Control Plan must be reviewed before paving begins. The Quality Control Plan must contain adequate detail regarding the plan for properly curing the concrete in accordance with MDOT and American.
Protection from cold weather is the Contractor’s responsibility. Although concrete will withstand below freezing temperature due to heat of hydration, it is considered good practice to provide a protective covering of insulated blankets or straw when freezing temperatures are anticipated. When cold weather is anticipated, the pavement should be covered as soon as possible. However, the pavement must be able to support the weight of the insulating blankets or straw without damaging the surface.
If the Contractor neglects to cover the pavement in a timely manner, and the temperatures drop below freezing during the curing period, the inspector should note the areas involved and notify the Engineer. Arrangements can be made to take special cores from the area in question to determine whether or not the concrete has been damaged.
Rain Damage
Protection from damage by rain is the Contractor’s responsibility and the inspector should avoid giving the Contractor any instructions as to covering the concrete, or other protective measures. If the Contractor is unable to texture the pavement, or the texture is washed away, they will be required to groove the hardened concrete.
If serious rain damage occurs, such as breaking down of slipformed edges or erosion of the surface by water running off the pavement, repairs should be made as soon as the rain stops. Water on the surface should be carefully removed with straightedges to avoid working the water into the concrete. Fresh concrete should then be added and the surface refinished.
If the rain has damaged the curing membrane, this should be corrected by respraying the area after the rain has stopped.
Miscellaneous Paving
In addition to the main paving operation, most projects will involve some miscellaneous paving. This might be semi-production work on service roads or ramps. Other times it will involve strictly hand work at street intersections.
The quantity of paving involved will dictate the type of equipment to be used. As with production pavement, the inspector should ensure that methods and equipment proposed will ensure quality work.
Trimming the base will usually be a combination of a road grader and hand methods.
Forms are used for hand work. Radii of less than 150 feet (45 m) will require flexible forms.
Concrete may be placed without a spreader providing it can be placed without segregation.
All areas along forms and joints will be consolidated with a vibrator. The vibrator will be inserted vertically into the concrete to ensure complete consolidation and will not be used to move the concrete.
Screeding of the surface will usually be by a form-riding finishing machine or a hand-pulled vibrating strike off. Sometimes roller screeds or lightweight slipform pavers are used.
Straightedging gaps and other areas subject to high-speed traffic is important. A string line check of these areas is also helpful.
Burlapping, tine texturing and curing will normally be done with hand held equipment. Make sure tining is done in one continuous pass from edge to edge. Do not permit tining each way from centerline, as a poor appearance will result.
Applying the curing compound will be done from a bridge or by using a boom so uniform coverage can be obtained.
Concrete Shoulders
When concrete shoulders are called for on the plans, they will be constructed according to the current specifications and Standard Plan R-112 Series.
Preparation of the grade is similar to that required for pavement; shaped to the required line, grade and cross section and compacted to the required specific density. The edge of the pavement should be cleaned of any dirt or other foreign material. Shoulders adjacent to pavement will require lane ties to keep the shoulder from separating from the pavement.
Expansion joint filler is placed in line with opposite expansion joints in the pavement as per Standard Plan R-42 Series. Load transfer devices are omitted from concrete shoulders.
Just before concrete is placed, the edge of pavement and the entire base should be dampened.
See the Standard Plan R-45 Series
Concrete is usually placed on the grade directly from hauling units. Normally a modified slipform paver will be used to strike off, consolidate and finish the shoulder concrete.
Immediately behind the machine in the finishing operation, check the surface for proper slope or crown.
Edges will be inspected for slump, thickness and to ensure that they are all free from contamination by base material.
Floating will be done only as necessary to close the surface.
Relief cuts must be sawed to the proper depth to control cracking. After curing, the joints are to be sawed to the final width and depth and sealed with the same seal as used in the pavement.
Rumble strips will be placed according to the standard plan.
Texturing is done with a burlap drag or a stiff broom.
The surface and outside edge should be coated with white membrane curing compound at a rate of 1 gallon per 25 square yards (1 liter per 5 m2).
Base Course Paving
Another type of miscellaneous paving is concrete base course. This is usually a widening placed adjacent to an existing pavement which is in need of resurfacing.
General construction methods are similar to those described above for concrete pavement. A few important differences are mentioned here.
The edge of the existing pavement may be in poor condition. Check the plans to determine if any corrective work is required on this edge before casting concrete against it.
Base course mat are non-reinforced. Plane-of-weakness joints may be either formed or sawed. No joint seals are required. No load transfer assemblies are used in base course. Review the Standard Plan R-42 Series for joint layout and header joints in non-reinforced base course.
Straightedge tolerance is more liberal, 3/8 inch in 10 feet (9 mm in 3 m). Texturing is done by burlap drag. The surface should not be tined, as it will be difficult to clean before placing the overlay.
Cure with a transparent compound instead of white. Only one application is required at the rate of 1 gallon per 25 square yards (1 liter per 5 m2) of surface.
OPENING TO TRAFFIC
Often the Contractor will want to use the new pavement as a haul road for his batch trucks at the earliest possible time, or he may want to place a wheel or track on new pavement edge to pave the adjacent lane. Other times it will be important to open an intersection or drive to traffic as soon as possible.
The inspector and Contractor should try to anticipate the need for early openings and arrange to make an extra set of beams when the concrete in question is being cast. These beams should be cured under environmental conditions similar to the pavement being cast.
The follow the Table 104.1 in from Section 104 of the Standard Specifications for Construction, to determine when equipment may be allowed on the pavement.
No load is to be permitted on the pavement until the centerline joint is sawed, the contraction joints relief cut, the expansion joints sawed out to full width and temporary or permanent seals installed. Curing is to be continued until a flexural strength of 550 psi (3.8 MPa) has been obtained.
When job control beams are not available, the curing surface treatment film will not be broken by Contractor’s equipment or other traffic until the concrete has attained 70 percent of the anticipated minimum strength as determined from the following table.
STREET INSPECTOR’s REPORT
Inspector’s Report of Concrete Placed, Form 1174R, is the primary report required of the paving inspector. It should be prepared for each day that pavement is cast. In addition to the original copy to the Engineer and a copy to the Construction Services Section, the inspector should retain a copy.
Any unusual happenings should be noted in the remarks section of the report. Often this is most important when a problem develops and the circumstances surrounding the problem are being reconstructed later. Any material accepted on the basis of visual inspection should be noted in the remarks. The back of the form should be used for sketches, when necessary, to describe any irregular areas.
In addition to the daily report, the field book prepared before the project started can be used to note additional information concerning the paving operation. Depending on the type of project, it may be necessary for the street inspector to complete an Inspector’s Daily Report, Form 1122B documenting traffic control, equipment used or other work activities in progress.
Reports and documentation requirements should be reviewed with the Engineer before paving starts.
Keep in mind that some quantities must be documented at the time of placement while others can be checked later. An example of the former is areas where high-strength concrete is used and is to be paid for.
PAVEMENT CORING
To determine pavement, shoulder and base course thickness , cores shall be taken from the pavement before its final acceptance to determine the thickness of the pavement according to MTM 201. Refer to subsection 602.04 of the Standard Specifications for Construction and the following flow chart (see Figure 602-9) for this determination.
INSPECTOR’S CHECKLIST
Transporting Central Mixed Concrete
- Determine that elapsed time is within specification limits for temperature and type of hauling unit.
- Hauling units should be mortar tight.
- Trucks should be washed out as necessary to prevent buildup of hardened concrete.
Job Site Quality Assurance
- All testing equipment on the job before start of concrete operations: air meters, slump cone and related tools and concrete thermometer.
- Perform test according to Special Provision 604B.
Slipform Paving
- Grade, including track line, will be trimmed and booked and a permit to place concrete will be issued before concrete can be placed
- Any disturbed area to be recompacted to the specified density.
- Sight along stringline for sags, adequate supports and general condition. On tight radius ramps, stringline stakes may be required at 10 to 13 foot (3 m to 4 m) spacing.
- Depth checks on base to be taken after trimming as required.
- Use stringline to check for proper crown or cross slope from grade stakes to top of aggregate base and record on Form 1145. Inform Contractor or his representative on the job site of grade checks. Issue permit to place for placing load transfer devices as directed.
- Load transfer assemblies should be observed for coating and to make sure they are at right angles to the stringline, parallel to grade and properly spaced and pinned. Check the free end of the expansion dowel for proper space between cap and end of dowel.
- Base shall be moist at time of placing concrete.
- Spreader and pave must have proper crown setting.
- Operator of spreader must use care to avoid moving dowel bar assembly from pinned position. Equal amounts of concrete must be placed on each side of the expansion joints to avoid moving.
- Operation of spray cure machine to be verified before paving starts.
- Concrete spread to cover entire base
- Observe operation of lane tie bar installer. Inserted ties to be spaced as indicated in the Standard PlansR-41.keep inserted ties out of the load transfer assembly area. Have a field pull out test made after the first day’s pour.
- Paveing operation should ibrate concrete full width and depth of pour. Observe vibrators frequently to see that they are all operative.Contractor should have some means of observing vibration
- Observe wet crown checks taken from the Contractor throughout the day.
- Measure spacing depth of lane tie bars behind the paver. .
- To get a smooth surface the surcharge of concrete ahead of the pave should not overload the paver and should be uniform across the grade.
- Pavement is to be checked by Contractor with 10 foot (3 m) straightedge behind paver. Look especially for dips at baskets.
- Edge slump should be checked frequently behind paver and again behind the texturing equipment with a 5 foot (1.5 m) straightedge.
- Machine finishing and floating should leave a minimum of hand finishing. . Floats and straightedge must not be pulled over edge of slab, as edges will slump.
- Pavement is to be edged to remove any overhanging projections of concrete. Edging should be delayed as necessary to minimize edge slumping.
- Pavement surfaces to be dragged longitudinally with burlap and tined according to spec..
- Observe Contractor stenciling the station numbers at the correct location and direction.
- White pigmented compound is required for curing concrete pavement, curb and gutter and sidewalk. Transparent or clear compound is required for curing concrete base course at the specified rate.
- Mechanical agitation of curing compound is required.
- For tined surfaces, curing compounds shall be applied in two applications, each at the specified rate. Check for proper yield and record.
- Curing compound shall be applied as received. No thinning is allowed.
- Enough pavement should be checked the following morning to determine the quality of workmanship. Advise the Contractor of all deficiencies. Record all findings. Mark areas for review by the Engineer.
- Where adjacent pavement lanes are constructed in separate pours, keep equipment from operating on the recently placed pavement until the pavement has attained adequate strength, as determined by test beams and table in specifications.
Form Paving
Review the items for form paving. In addition, the following should be checked.
- Forms are to be measured for proper height. Forms to be a minimum of 10 foot (3 m) long. Base width equal to or greater than the thickness of the pavement.
- Condition of forms checked with 10 foot (3 m) straightedge before project starts and daily as project is paved. Forms that do not meet specifications are to be rejected.
- Stringline required to establish form grade shall be sufficiently taut to eliminate sag.
- Forms to be set directly on trimmed base or on base trimmed with form grader.
- Three pins of adequate length used in each form. Each form to lock to adjacent form.
- If forms are set on disturbed base, material under forms shall be tamped on both inside and outside of form.
- Top of form shall be free of mortar prior to setting.
- Forms to be oiled before each use.
- Sufficient forms shall be in place ahead of the paver so they may be checked for line and grade in advance of placing concrete. The minimum length of forms in place shall be equal to the anticipated length of pavement to be placed in 2 hours.
- Surplus base material left inside of forms is to be removed.
- Depth to base from stringline at top of forms measured and recorded.
- Vibratory strike board or roller screed shall be used on hand work.
- Screeds on finishing machine and/or spreader finisher adjusted to proper crown.
- Proper quantity of concrete being carried ahead of each screed.
- A Vibrator must be used thoughout the entire pour.
- Observe operator of finishing machine. Care should be taken to avoid moving the premolded fiber filler in the expansion joints from the vertical position.
- After form removal, inspect edges of pavement for honeycomb.
Sawing and Sealing Joints/Longitudinal Joints
- The longitudinal joint shall be sawed within 24 hours.
- Saw is to be equipped with guide to maintain alignment.
- Check size of saw cut 1/8 inch (3 mm) x( 1/3 the pavement depth). Top 1 inch (25 mm) must be 1/4 inch (6 mm) wide for seal,refer to standard plan R-41.
- Bulkhead joints must be sawed and sealed with hot pour sealant.
- Joint faces should be cleaned by sandblasting or other approved method and blown clean before sealing with hot poured sealant.
- Joint should be completely filled, but not overfilled.
Transverse Joints
- A standby concrete saw is required for relief cuts.
- Two-stage sawing is required, except for slag aggregate. First stage is to be completed as soon as possible without raveling. See Standard Plan R-39 Series.
- Second stage sawing is to be done after the concrete has gained at least 30 percent of its strength. Centered over relief cut (see plans and Standard Plan R-39 Series for sizes of joint groove for type of seal being used).
- Temporary or permanent seals must be installed in expansion joints before construction traffic uses pavement. Construction traffic may run over contraction joints after relief sawing, and when the concrete has met minimum strength requirements.
- Clean joint with oil-free compressed air before sealing. Inspect for stones or other foreign material.
MEASUREMENT AND PAYMENT
-Reserved-
