Change Orders
Sections
CHANGE ORDERS
Change orders allow you to legally change a signed contract, including adding new items of work to the contract, increasing/decreasing quantities of existing items, making time extensions, setting final quantities, and specification changes. Please remember that depending on policies, system configurations, and roles, you may not have access to all the AASHTOWare Project Construction & Materials functionality shown in this Users’ guide.
Adding a Change Order to a Contract
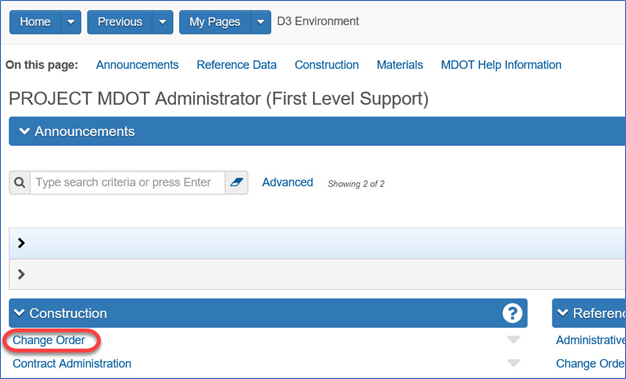
1. Navigate to the Change Order component.
2. Click the component Actions button and choose the Select Contract to Add Change Order action.
3. Search for and select the appropriate contract.
4. Click the Create Change Order on Contract button.
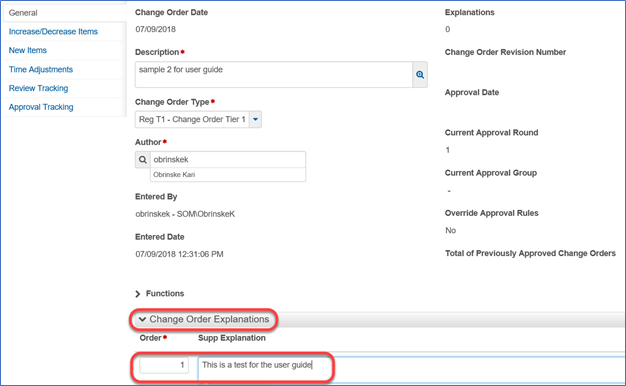
5. The following fields must be completed:
- Change Order Date - enter the date of the change order.
- Description - enter a description for the change order.
- Change Order Type - click the drop-down arrow and select the classification for the change order.
- Author - search for and select the user ID for the person creating the change order.
6. The following fields will self-populate:
- Entered By - indicates the name of the person who added the record.
- Entered Date - indicates the date and time the record was added.
- Explanations - indicates the number of explanations associated to the change order, from the Change Order Explanations section in the lower part of the window.
- Change Order Revision Number - indicates that number of times that the change order was revised.
- Approval Date - indicates the date the change order was approved, when applicable.
- Current Approval Round - specifies the current round of approval that has been achieved for the change order.
- Current Approval Group - specifies the approval group corresponding to the current level of approval.
- Override Approval Rules - indicates whether standard approval rules are superseded for the change order.
- Total of Previously Approved Change Orders - indicates the total amount of all other change orders for this contract that have reached approval status.
7. Click the Save button.
Change Order Explanations
Explanation information can be added for the change order in the Change Order Explanations section. You can add your own explanation. The system enters a sequence number in the Order field, which can be changed.
To add an explanation to a change order:
1. In the Change Orders Explanation section, in the Reference Explanation Name field, enter the order and the supplemental explanation for the item, as appropriate.
2. Click the Save button.
Changing Item Quantities with a Change Order
Sometimes during construction on an project, there may be a need to increase or decrease the quantity of a work item that was approved in the executed contract. The Increase/Decrease Items tab contains a row for each item quantity being changed on this change order. The rows are divided into two sections, one for general quantity changes on items that are not completed in the project and the other for quantity changes needed to balance completed items.
1. Click the Increase/Decrease Items tab.
2. In the Increase/Decrease Items section, click the Select Items button.
3. Search for and select the item(s) to change.
4. Click the Add to Change Order button.
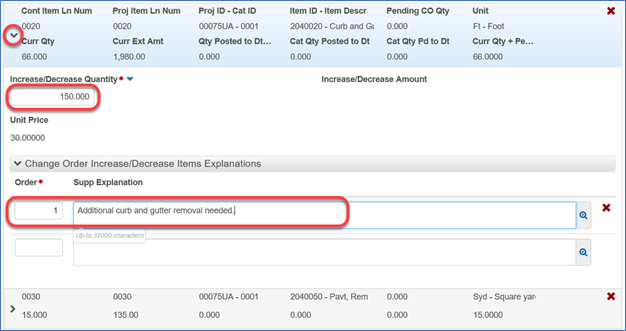
5. Click the arrow to expand the row.
6. In the Increase/Decrease Quantity field, enter the change to the approved quantity for the contract project item.
7. In the Change Order Increase/Decrease Items Explanations section, enter the order and the supplemental explanation for the item, as appropriate.
8. Click the Save button.
Balancing Completed Items
At the time a work item is marked complete on a contract, the quantity used might not match the approved quantity on the contract; that is, the remaining item quantity might not be zero. A portion of the approved quantity might not have been used and is therefore left over, or the project may have overrun the approved quantity of the item.
Use the Balance Completed Items section to balance the quantity for a completed item, that is, to provide it with a zero quantity. The system automatically calculates the correct increase or decrease needed to balance the completed item.
| NOTE |
|---|
| A non-lump sum item must be marked complete on the Contract Items screen for this process to work. |
1. Click the Increase/Decrease Items tab
2. In the Balance Completed Items section, click the Balance Completed Items button.
3. Search for and select the item(s) to balance.
4. Click the Balance Completed Items button.
5. In the Balance Completed Items Explanations section, enter the order and the supplemental explanation for the item, as appropriate.
6. Click the Save button.
| NOTE |
|---|
| The system will list all the non lumpsum items on the contract that have been marked complete. |
Adding New Items to a Contract with a Change Order
Sometimes during a construction project, the contractor will need to complete items of work that were not included in the executed contract. This is one of the most common reasons for creating a change order. Any kind of item can be added to the contract on a change order, including new reference items, contract items and, unattached items.
| NOTE |
|---|
| There are three distinct areas on the New Items tab of the Change Order; the New Items section for extras and adding new items to the contract, the Unattached Items section for attaching unattached items, and the Contract Items section for creating modified originals. Each section should be used for the corresponding item type you are trying to add to the contract. |
1. Click the New Items tab.
2. In the New Items section, click the Select New Item button.
3. In the Item field, search for and select the item to add to the change order.
4. Click the row for the project/category to which the item will be added.
5. Click the Add to Change Order button.
6. Click the expand arrow for the row.
7. The following fields must be completed:
- Project Item Line Number - verify or modify the project item line number.
- Contract Item Line Number - verify or modify the contact item line number.
- Quantity -enter the number of units of the item that are required.
- Unit Price - enter the unit price for the item at the contract project level.
- Supplemental Description - enter an additional description for the item, if appropriate.
- Item Reason - click the drop-down arrow and select the reason for adding the item.
- Contractor - click the drop-down arrow and select the appropriate contractor.
- Change Order New Item Explanations section, enter the order and the supplemental explanation for the item, as appropriate.
8. The following fields will self-populate:
- Item Source - indicates source of where the item originated.
- Extended Amount - shows the extended amount for the new item on the change order.
9. Click the Save button.
Adding Unattached Items
An unattached item is an item that was added to the contract after the contract was executed. Unattached items are included in contract categories and can be tracked on daily work reports but are not recognized as contract items by the system and cannot be included in a contract payment until they are added to the contract through a change order and the change order is approved.
| NOTE |
|---|
| For this section to work properly, at least one unattached item should already have been added on the Contract Items screen. |
1. In the Unattached Items section, click the Select Unattached Item button.
The system displays a row for each unattached item that was created on the contract.
2. Click the row for the appropriate unattached item to add to the change order.
3. Click the Add to Change Order button.
4. Click the expand arrow for the row, if necessary.
5. Verify the project item line number in the Project Item Line Number field.
6. Verify the contact item line number in the Contract Item Line Number field.
7. The following fields must be completed:
- Quantity - enter the number of units of the item that are required.
- Unit Price - enter the unit price for the item at the contract project level.
- Supplemental Description - enter an additional description for the item, if appropriate.
- Item Reason - click the drop-down arrow and select the reason for adding the item.
- Contractor - click the drop-down arrow and select the appropriate contractor.
8. The following fields will self-populate:
- Item Source - indicates source of where the item originated.
- Extended Amount - shows the extended amount for the new item on the change order.
9. Enter the order and the supplemental explanation for the item, as appropriate, in the Change Order New Item Explanations section.
10. Click the Save button.
Modifying Contract Items (Modified Originals)
Contract items are items that are already associated with this contract but need to be added to one or more additional projects or categories. Previously these were called modified original items.
1. In the Contract Items section, click the Select Contract Item button.
2. Search for and select the item(s) to add to the change order in the Contract Item field.
3. Click the row for the project/category to which the item will be added.
4. Click the Add to Change Order button.
5. Click the expand arrow for the row.
6. The following fields must be completed:
- Project Item Line Number - verify or modify the project item line number.
- Quantity - enter the number of units of the item that are required.
- Item Reason - click the drop-down arrow and select the reason for adding the item.
- Contractor - click the drop-down arrow and select the appropriate contractor.
7. The following fields will self-populate:
- Contract Item Line Number - identifies the line item within the contract.
- Item Source - indicates where the contract item originated.
- Unit Price - indicates the price for the item at the contract proposal level.
- Extended Amount - indicates the extended amount for the new item on the change order.
- Supplemental Description - displays additional information describing the entity.
8. Enter the order and the supplemental explanation for the item, as appropriate in the Change Order New Item Explanations section.
9. Click the Save button.
Adjusting Contract Time with a Change Order
A common reason for creating a change order is to adjust the completion date for a milestone or contract because work has fallen behind or been completed ahead of schedule. The Time Adjustments tab contains an accordion list of all the time adjustments that have been recorded in the change order.
| NOTE |
|---|
| If the Time Type for the adjustment is Available Time or Calendar Time, you can change the value in the Adjustment Time Units field. When you save the change, the system automatically recalculates the value in the Adjustment Completion Date field. |
| NOTE |
|---|
| If the Time Type is Contract Time, you can change the Adjustment Completion Date field. When you save the change, the system automatically recalculates the value in the Adjustment Time Units field. |
1. Click the Time Adjustments tab.
2. Click the Select Contract Time button.
3. Search for and select the contract time records to adjust.
4. Click the Add Time Adjustments to Change Order button.
5. The following fields must be completed:
a. Adjustment Time Units field, enter the number of time units to add or remove from the associated contract time on this change order.
6. In the Time Adjustment Explanations section, enter the order and the supplemental explanation for the time extension, as appropriate.
7. Click the Save button.
Managing Change Order Reviewers
Prior to starting the change order approval process, you can send the change order for review by multiple reviewers. The change order must be in Draft or Pending Review status to be reviewed.
| NOTE |
|---|
| The change order will not go to the approvers until the reviewer has approved it! |
1. Click the Review Tracking tab.
2. Click the Select Reviewers button.
3. Search for and select the reviewer(s) to add to the change order.
4. Click the Save button.
| NOTE |
|---|
| To see the reviewer(s) decision, click the expand arrow. |
To cancel a reviewer(s) for a change order:
1. Click the row Actions button and select the Cancel Reviewer action.
Managing Change Order Approvals
When a user submits the change order for approval, the system automatically adds the default approval groups before changing the change order's status to Pending Approval. The system does this based on the Change Order Type field selected on the general tab. The steps described in this section should only be followed if the default approval groups need to be modified in some way.
| NOTE |
|---|
| Only follow these steps to manually add or modify the change order approval groups. |
To add approval groups to a change order:
1. Click the Approval Tracking tab.
2. Click the list Actions button on the Add Approval Group and select the Assign Default Approval Groups action.
Depending on your role, you may be able to manually add one or more approval groups to the change order and override the default approval structure. Although, this should not be necessary.
1. Click the Add Approval Group button.
2. Search for and select the reference approval group(s) to add.
3. In the Override Comments field, enter information about why the approval groups are being added.
4. Click the Save button.
Submitting a Change Order for Approval
When the change order is ready, it must be submitted for approval to begin the approval processes.
1. On the Contract Change Order Summary for the appropriate change order, click the component Actions button, and select the Submit for Approval task.
2. Click the Save button.
Viewing a Contract Change Order
The Contract Change Order Overview lists all the change orders for a contract and contains all the information currently recorded in a change order. Select a change order to view its details.
1. There are various functions available within the change order:
- Increasing or decreasing the approved quantities of items.
- Adding new items to the contract, including whether negative prices and quantities are allowed.
- Increasing or decreasing contract times.
- Processing a change order without the approval of the prime contractor.
- Editing textual content of the contract
| NOTE |
|---|
| Change Orders can only be edited by certain roles and only when the Change order is in Draft status. |
2. Recorded item or time entries are listed within the change order tabs. Some or all of these functions can be included in a change order.
Reviewing a Change Order
You can review a change order only when it is in Pending Review status. When reviewing the change order, reviewers make their recommendations to either approve or reject the change order. If the change order is approved at all review levels, it will go to the first approver on the approval group. If any reviewer rejects the review, it will go back to the creator of the change order.
1. In the Contract Change Order Summary, click the component Actions button.
2. To approve the review of the change order, select the Approve task.
3. To reject the review of the change order, select the Reject task.
4. In the Approval Decision Comments field, enter a comment about the decision to approve or reject the change order.
5. Click the Save button.
Approving or Rejecting a Change Order
To approve a change order:
1. Click the component Actions button and select the Approve or Reject action.
2. In the Approval Decision Comments field, enter a comment about the decision to approve or reject the change order.
3. Click the Save button.
Tracking Approvals for a Change Order
The Approval Tracking tab on the Contract Change Order Summary contains an accordion list of approval records for the change order, sorted by round and approval group.
To track the approvals on a change order:
1. Click the Approval Tracking tab.
2. Click the expand arrow for the approval group to view.
3. View the information.
Generating the Change Order Report
The Change Order Report contains all the information about the selected change orders
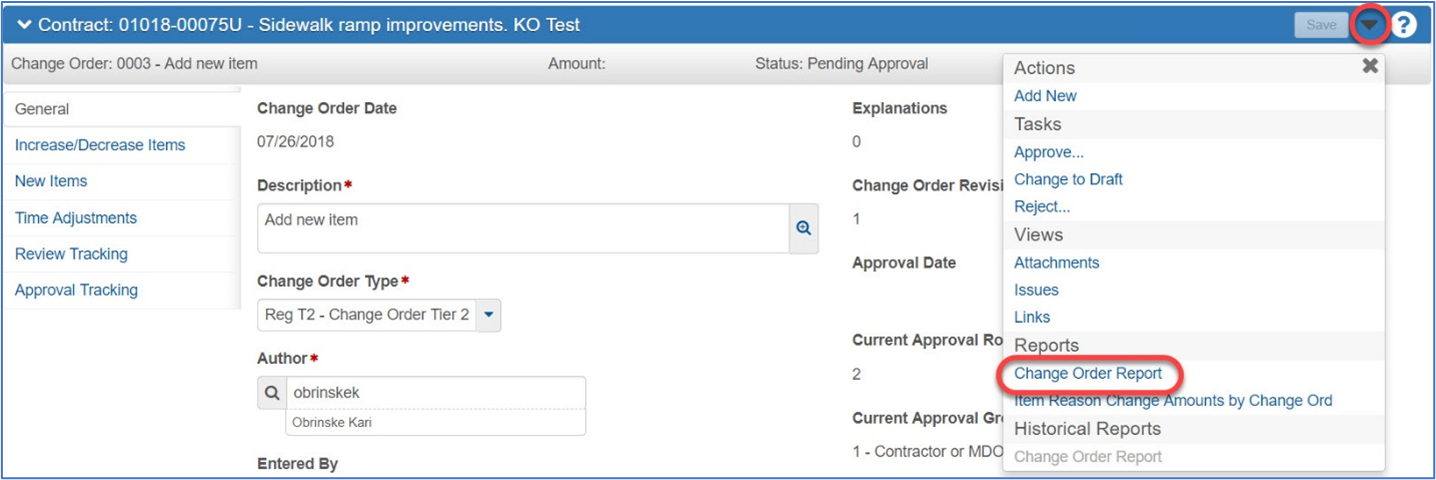
1. Click the component Actions button
2. From the Reports section, select the Change Order Report.
3. Select the Output Type.
4. Select the Report Layout Source.
5. Click the Execute button.
Appendix A
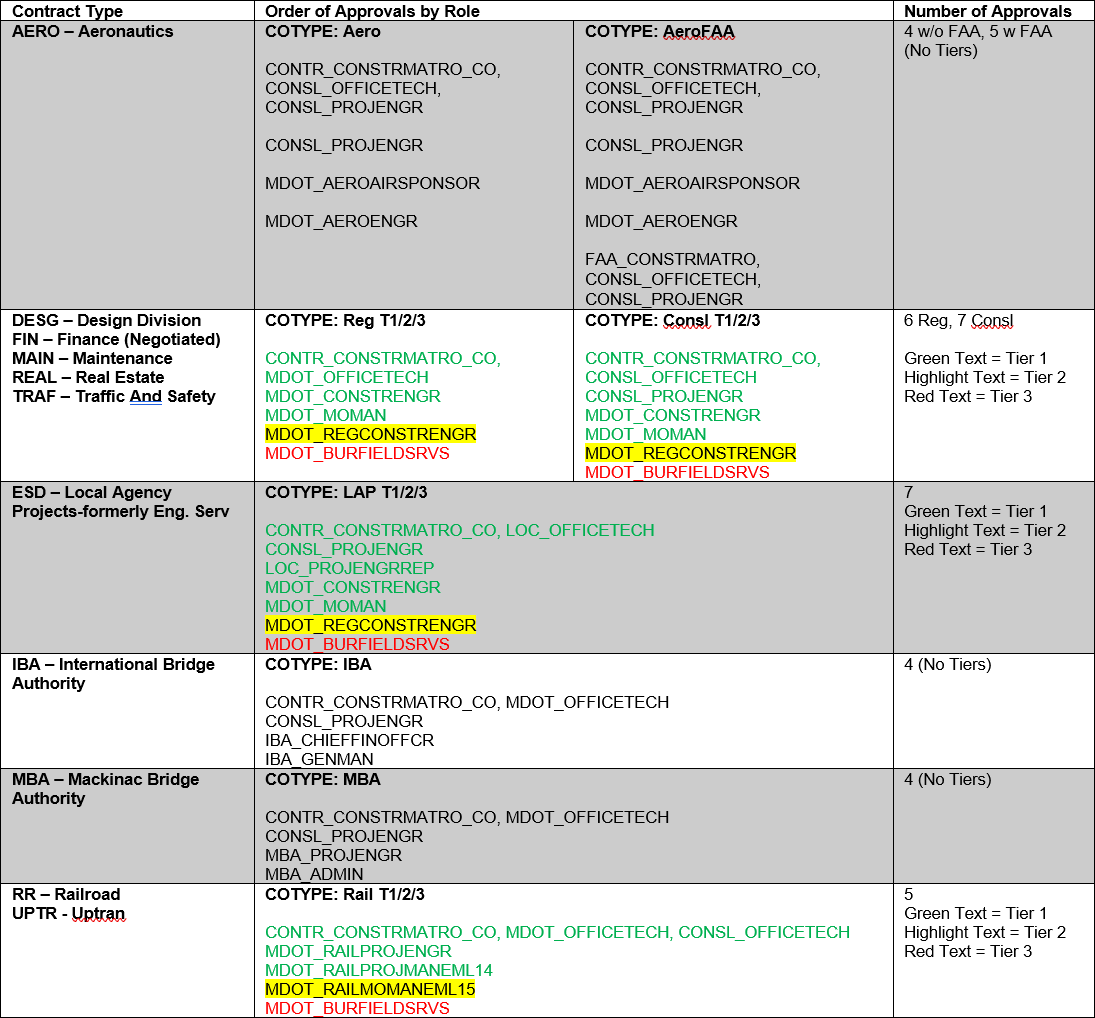
The following is a list of contract types and roles that have access to approve Change Orders for Michigan.
Note: To view which contract type your contract is, see the Contract Administration Summary >General tab.
