Daily Work Reports
Sections
DAILY WORK REPORTS
Adding Daily Work Reports
There are several ways to create a daily work report. The steps below show one of the fastest ways to create a DWR without entering the contract.
| NOTE |
|---|
| For information about how DWRs can be created with the Mobile Inspector application, contact the MDOT Construction Technology help desk at MDOT-ConstructionSoftware@michigan.gov |
1. From the Home screen, Select the Daily Work Report Overview quick link.
2. Click the component Actions button and choose the Select Contract to Add DWR action.
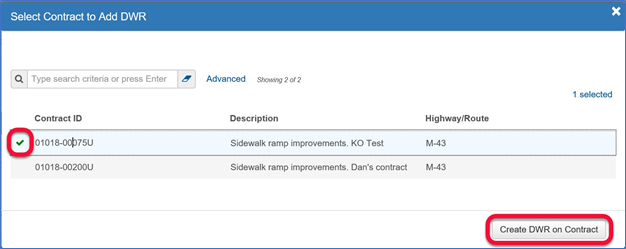
3. Search for and Select the contract ID in which to add a DWR.
4. Click the Create DWR on Contract button. You will be taken to the General tab.
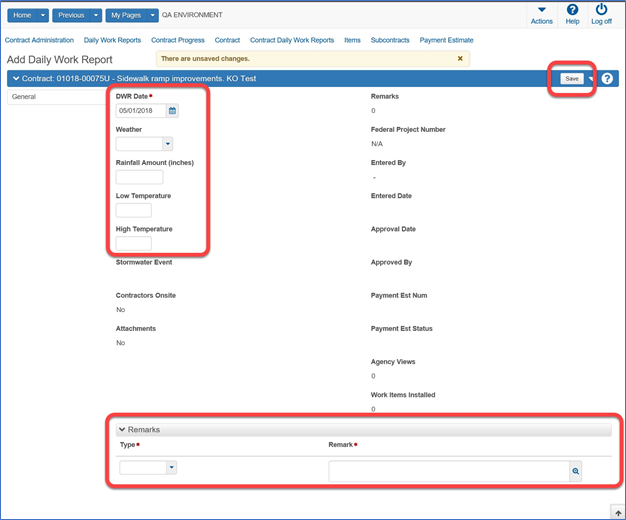
5. The following fields must be completed:
- DWR Date field, enter the date for the DWR using the calendar or manual entry.
- Weather field, click the drop-down arrow and select the appropriate weather condition.
- Rainfall Amount field, enter the amount of rainfall recorded for the DWR date, if appropriate.
- Low Temperature field, enter the low temperature recorded for the DWR date.
- High Temperature field, enter the high temperature recorded for the DWR date.
- Remarks section, in the Type field, click the drop-down arrow and select the appropriate remark type
- Remarks section, in the Remarks field, enter remarks for the day.
6. The following fields will self-populate:
- SECIR Report field - indicates whether a Storm Water Environmental Compliance Inspection Report may be required (to be used in a future release of the software).
- Contractors Onsite field - indicates whether a contractor is recorded on the DWR.
- Attachments field - indicates whether there are attachments associated with this DWR.
- Remarks field - indicates the number of remarks.
- Federal Project Number field - indicates the project number assigned by the federal government.
- Entered By field - indicates the user ID and name of the person that created the DWR.
- Entered Date field - indicates the date and time the record was added to the system.
- Approval Date field - indicates the date that the DWR was approved.
- Approved By field - indicates the user who approved the DWR.
- Payment Est Num field - indicates the number generated by the system and assigned to the contract payment estimate when it is created.
- Payment Est Status field - indicates the status of the payment estimate.
- Agency Views field - indicates whether agency views are associated with a contract item posted to this DWR.
- Work Items Installed field - indicates whether any work items are recorded on the DWR.
7. Click the Save button.
Daily Work Report Notes
The notes captured in the Notes section of the Daily Work Report are like sticky notes on a paper document. They are not part of the official DWR. Notes may contain any type of information related to the DWR and can be added or deleted at any time, regardless of the DWR status.
Notes should not be used for recording information that should be documented in the official DWR!
| NOTE |
|---|
| Many roles have the ability to create DWR notes but only the Office Technician roles can delete DWR notes. |
1. From the Home screen, Select the Contract Progress Overview component.
2. Select the Contract ID in which the DWR is located.
3. Select the Daily Work Reports tab.
4. Select the Daily Work Report you want to add notes to.
5. Click the Notes tab.
6. Click the New button.
7. Enter the appropriate information in the DWR Note field.
8. Click the Save button.
Recording Time Information on a Daily Work Report
The Contract Time Tab is used to charge contract time against Work Day and Calendar Day contracts. This tab is not used for Completion Date contracts.
1. From the Home screen, Select the Contract Progress Overview component.
2. Select the Contract ID in which the DWR is located.
3. Select the Daily Work Reports tab.
4. Select the Daily Work Report you want to record time information on.
5. Select the Contract Time tab.
6. Search for and select the time ID to modify, and click the expand arrow for the time ID.
7. The following fields must be completed:
- Contractor Working check the box to indicate the contractor was working on the DWR date.
- Hours Available field, enter the number of time units available for the contractor to work.
- Hours Worked field, enter the number of time units the contractor worked.
- Controlling Operation field, enter the primary type of work related to the time charge.
- Delay Reason field, enter a description of circumstances or events impeding progress of work related to the contract time.
- Comments field, enter any additional information about the record.
- Time Charged field, enter the number of time units charged.
- Work Start Time field, enter the date and time of day the contractor began work.
- Work Stop Time field, enter the date and time of day the contractor stopped work.
8. Click the Save button.
Adding Contractors On Site
The Contractors On Site tab is used to record the contractors that will be part of this DWR.
| NOTE |
|---|
| The contractor must be listed on the Contractors On Site tab if you wish to post any items to that contractor. |
1. From the Home screen, Select the Contract Progress Overview component.
2. Select the Contract ID in which the DWR is located.
3. Select the Daily Work Reports tab.
4. Select the Daily Work Report you want to add contractors to.
5. Select the Contractors On Site tab.
6. Click the Select Contractors button.
7. Search for and Select the contractor(s) for this DWR by Clicking on the row(s).
8. Click the Add to DWR Contractors button.
9. The following fields will self-populate:
- Contractor field indicates the contractor(s) you selected.
- Prime field indicates whether the contractor is the prime contractor on the contract.
- DBE Certified field indicates whether this contractor is certified as a DBE vendor.
- Equipment field indicates whether the contractor has equipment being reported on this DWR.
- Personnel field indicates whether this contractor has personnel being reported on this DWR.
10. The following fields are optional:
- Start Time field - enter the time of day this contractor was first observed on site.
- End Time field - enter the time of day this contractor was last observed on site.
- Hours field - enter the total time the contractor was observed on site.
11. Click the Save button.
Adding Contractor Equipment on a Daily Work Report
1. From the Home screen, Select the Contract Progress Overview component.
| NOTE |
|---|
| MDOT has chosen to use a standardized equipment list. Specific or special equipment information should be recorded in the comments field of the equipment being used. |
2. Select the Contract ID in which the DWR is located.
3. Select the Daily Work Reports tab.
4. Select the Daily Work Report you want to add Equipment to.
5. Select the Contractor Equipment tab.
6. Click the row Actions button for the contractor associated with this DWR and choose the Select Equipment action.
7. Search for and Select the appropriate contract vendor equipment ID(s).
8. Click the Add to DWR Contractor Equipment button.
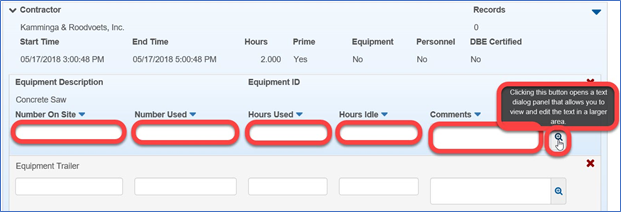
9. The following fields are optional:
- Number On Site field, enter the number of pieces of the equipment on site on the DWR date.
- Number Used field, enter the number of pieces of the equipment used on site on the DWR date.
- Hours Used field, enter the number of hours the equipment was used on the DWR date.
- Hours Idle field, enter the number of hours the equipment was idle on the DWR date.
- Comments field, enter any additional information about the record (Tip: clicking the magnifying glass opens a text dialog panel for the comments field).
10. Click the Save button.
Adding Contractor Personnel on a Daily Work Report
1. From the Home screen, Select the Contract Progress Overview component.
2. Select the Contract ID in which the DWR is located.
3. Select the Daily Work Reports tab.
4. Select the Daily Work Report you want to add Personnel to.
5. Select the Contractor Personnel tab.
6. For the appropriate contractor, click the row Actions button, and choose the Select Personnel action.
| NOTE |
|---|
| MDOT has chosen to use a standardized personnel list. Specific or special personnel information should be recorded in the comments field of the personnel listed. |
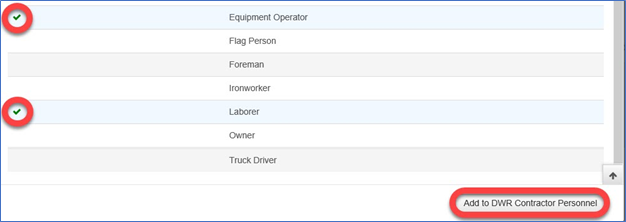
7. Select the personnel records to associate with the DWR.
8. Click the Add to DWR Contractor Personnel button.
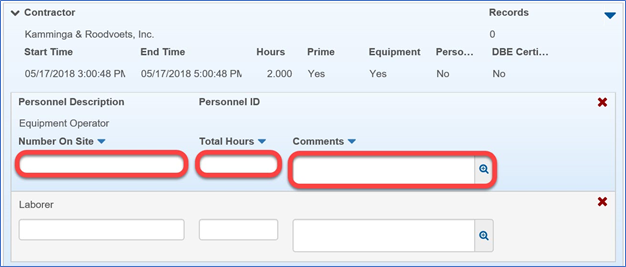
9. The following fields are optional:
- Number On Site field, enter the count of how many of this type of personnel to record on this DWR date for this contractor.
- Total Hours field, enter the total number of hours worked by this person for this DWR contractor on this date.
- Comments field, enter any additional information about the record (Tip: clicking the magnifying glass opens a text dialog panel for the comments field).
10. Click the Save button.
Posting Item and Material Quantities to a Daily Work Report
1. From the Home screen, Select the Contract Progress Overview component.
2. Select the Contract ID in which the DWR is located.
3. Select the Daily Work Reports tab.
4. Select the Daily Work Report you want to post items to.
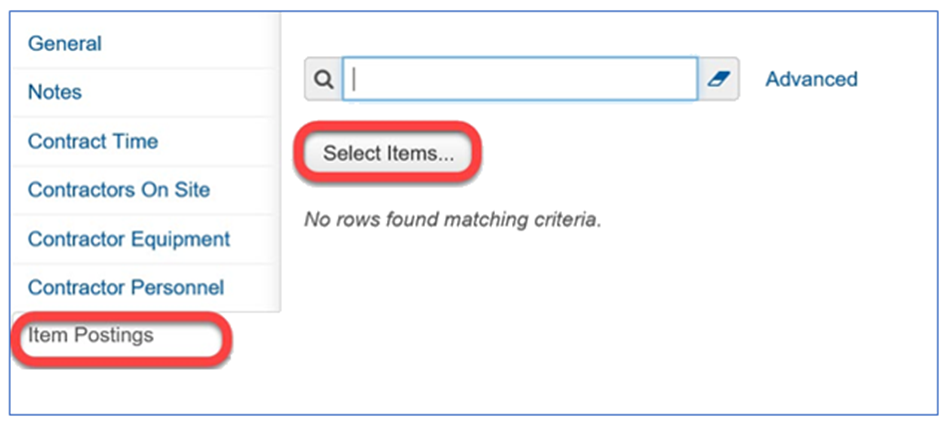
5. Select the Item Postings tab.
6. Click the Select Items button.
7. Search for and Select the contract line number(s) to add to the DWR.
8. Click the Save button.
9. Click the expand arrow for the newly added item posting.
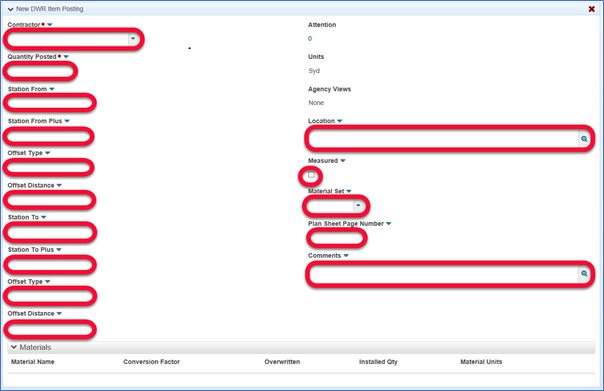
10. The following fields will self-populate:
- Attention field indicates the number of attention flags recorded for this entity.
- Units field indicates the type of measurement used to determine the quantity of the reference item.
- Agency Views field indicates if there are agency views or not on this DWR.
11. The following fields must be completed:
- Contractor field, click the drop-down arrow and select the contractor that performed the work for this item posting.
- Quantity Posted field, enter the quantity of the item installed by the contractor on this date.
- Station Fromfield, enter the beginning station for the item posting.
- Station From Plus field, enter the distance from the beginning station for the item posting.
- Offset Type field, enter the offset type for the beginning station for the item posting.
- Offset Distance field, enter the offset distance for the beginning station for the item posting.
- Station To field, enter the ending station for the item posting.
- Station To Plus field, enter the distance from the ending station for the item posting.
- Offset Type field, enter the offset type for the ending station for the item posting.
- Offset Distance field, enter the offset distance for the ending station for the item posting.
- Location field, enter the location where the work was performed for the DWR item posting.
- Measured check box, check if the item quantity installed is measured, or leave the box unchecked if the installed quantity is interim.
- Material Set field, click the drop-down arrow and select the material set associated with the item, if appropriate.
- Plan Sheet Page Number field, enter the number of the plan sheet page on which this work item is found.
- Comments field, enter any additional information about the item posting.
12. Click the Save button.
13. The list of materials associated with the material set you have chosen will now populate at the bottom of your item posting.
14. The following fields will self-populate
- Material Name field indicates the name of the material being used.
- Conversion Factor field indicates the item-material conversion factor used to determine the installed quantity
- Overwritten field indicates if the user has updated the installed quantity field
- Installed Qty field indicates the quantity of material placed in the field for the listed material
- Material Units field indicates unit of the material being used.
15. Update the Installed Qty field if needed.
16. The following fields must be completed:
- Source ID indicates the source of the material.
- VI and Accepted indicates the material was VI'd and accepted for placement.
- Comments field is available for any material comments that need to be recorded.
17. Click the Save button.
Adding Attachments and Links to a DWR
The application provides an easy way to integrate outside information of various kinds into your project. Examples of the types of files you might attach include Microsoft® Word documents, Excel spreadsheets, PDFs, digital photographs and other types of graphic files.
To add an attachment:
1. From the Home screen, Select the Contract Progress Overview component.
2. Select the Contract ID in which the DWR is located.
3. Select the Daily Work Reports tab.
4. Select the Daily Work Report you want to add attachments to.
5. Click the component Actions button and select Attachments.
6. Click the Select File button.
7. Navigate to and select the file you wish to attach.
8. The following fields will self-populate:
- Name field indicates the file name.
- Historical Report field indicates if the file was created by the historical report process.
- Size field indicates the file size.
- Additional Roles Count field indicates additional security features of the attachment.
9. The following fields are optional:
- Description field – enter a description for the attachment
- Attorney/Client Privilege – select this is the file is associated with attorney/client privilege
10. Click the Save button.
Links are like attachments except that you don’t need to have the actual file. Just the URL, URN, or some other link to where the file is located.
| NOTE |
|---|
| Links are a great option for referencing files that are already stored in ProjectWise.
Just use the URN! (in PW right click the file > Send Links > Copy Document URNs to Clipboard) |
To add a link:
1. From the Home screen, Select the Contract Progress Overview component.
2. Select the Contract ID in which the DWR is located.
3. Select the Daily Work Reports tab.
4. Select the Daily Work Report you want to add links to.
5. Click the component Actions button and select Links.
6. Click the New' button. A new link row will appear.
7. The following fields will self-populate:
- Additional Roles Count field indicates additional security features of the link.
8. The following fields are required:
- Link Name field – enter the name of the document or location you are linking to
- URL – enter the link you wish to use
9. The following fields are optional:
- Description field – enter a description for the link
10. Click the Save button.
Submitting a Daily Work Report for Approval
| NOTE |
|---|
| Depending on your access, you may not have the ability to submit for approval, approve, or reject a DWR and can skip this section. |
1. From the Home screen, Select the Contract Progress Overview component.
2. Select the Contract ID in which the DWR is located.
3. Select the Daily Work Reports tab.
4. Select the Daily Work Report you want to submit.
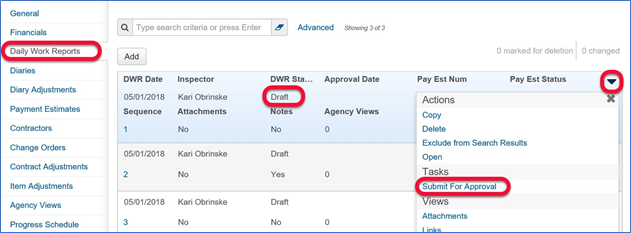
5. The Status must be Draft to Submit for Approval.
6. Click the row Actions button and choose the Submit for Approval action.
7. The DWR will save automatically and the Status will change to Pending.
Approving a Daily Work Report
| NOTE |
|---|
| The system restricts who can approve a Daily Work Report. Even if your role allows the approving of Daily Work Reports, the system will not allow you to approve your own. The system does not allow the DWR creator to approve their own DWRs. |
1. From the Home screen, Select the Construction component.
2. Select the Daily Work Reports tab.
3. To approve a DWR, you must have authority to approve it and it must have a status of Pending Approval.
4. Click the row Actions button and choose the Approve action.
5. The DWR will save automatically and the Status will change to Approved.
| NOTE |
|---|
| A DWR can be rejected and submitted for approval many times. However, once the DWR is approved and placed on an estimate, it is not able to be edited. An approved DWR, that has been picked up by an estimate is locked from any future changes. |
Revising an Approved Daily Work Report
To revise an approved DWR, you must have authority to reject the DWR.
Roles/Associated Actions:
Inspector
-Can Change to Draft their own DWR that is Submitted for Approval
-Can Reject their own DWR that has been Approved
-Can change the status of their own DWR to Draft, to make revisions
MDOT Office Tech
-Can Reject a DWR that has been Submitted for Approval
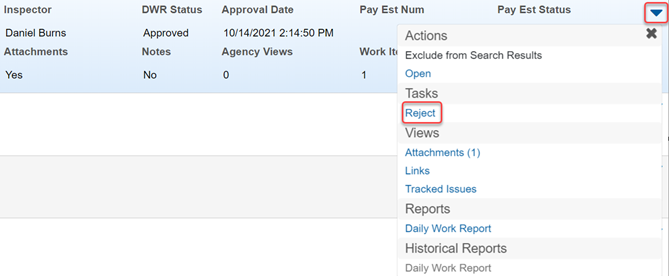
-Can Reject a DWR that has been Approved
| NOTE |
|---|
| When a DWR is approved and included within a pay estimate the DWR is Locked and cannot be revised. |
1. From the Home screen, Navigate to the Construction component.
2. Select the Daily Work Reports Link.
3. Find the Daily Work Report and Click the row Actions button on the right, choose the Reject action.
4. The DWR will save automatically, and the Status will change to Rejected.
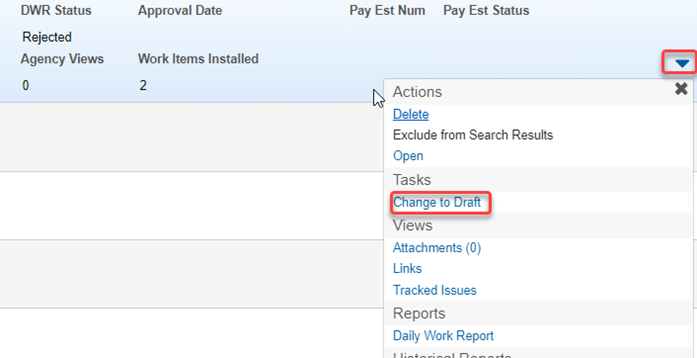
5. When the DWR is Rejected the creator of the DWR will be notified. At which time the creator must change the state of the DWR to Draft in order to make the necessary revisions.
6. After revisions are made submit the DWR for approval; see Submitting a Daily Work Report for Approval.
Adding Additional Daily Work Reports
The steps below show another popular way to create a DWR. This method shows the navigation steps of creating a DWR from within the contract itself.
1. From the Home screen, Select the Contract Progress Overview component.
2. Select the Contract ID in which to add a DWR.
3. Select the Daily Work Reports tab and Click the Add button.
4. Enter the general information for the DWR as shown in “Adding First Daily Work Report.”
5. Click the Save button.
Copying a Daily Work Report
1. From the Home screen, Select the Contract Progress Overview component.
2. Select the Contract ID in which the DWR is located.
3. Select the Daily Work Reports tab
4. Click the row Actions button on the DWR you wish to copy and choose the Copy action.
5. Select the data you wish to copy (all options are selected by default).
6. Click the Save button.
7. Update information for the DWR and Click Save again.
Generating DWR Reports
1. From the Home screen, Select the Contract Progress Overview component.
2. Select the Contract ID in which the DWR is located.
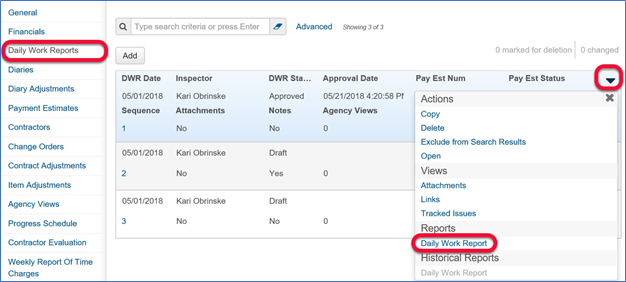
3. Select the Daily Work Reports tab.
4. Sub reports can optionally be generated for remarks; contract times; contractor personnel and equipment and attachments in the DWR.
5. You can generate reports for multiple DWRs created by multiple inspectors for different date ranges. When multiple reports are generated, each DWR is separated by a page break.
6. If you generate this report for a DWR that is not yet approved, the system automatically includes a Draft watermark on all pages of the report.
7. Click the row Actions button and choose the Daily Work Report action from the Reports section.
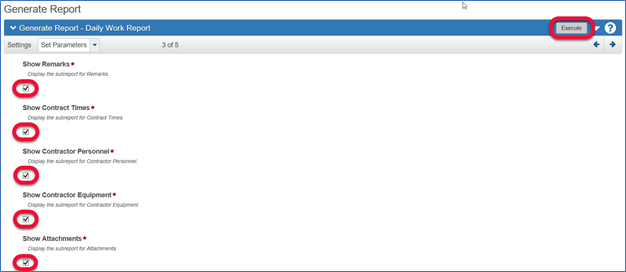
1. Click all of the following check boxes:
- Show Remarks check box to display the sub report for Remarks.
- Show Contract Times check box to display the sub report for Contract Time.
- Show Contractor Personnel check box to display the sub report for Contractor Personnel.
- Show Contractor Equipment check box to display the sub report for Contractor Equipment.
- Show Attachments check box to display the sub report for Attachments.
2. Click the Execute button.


